You have a handful of services running at home. A dashboard, a photo library, a Git server. You want to reach them from anywhere over HTTPS, but you would rather not forward ports on your router, expose your home IP, or hand the whole thing to a third party. Pangolin solves exactly that: you run a small piece on a cheap public VPS, a connector dials out from your homelab, and your services show up on real subdomains with valid certificates and no inbound ports opened at home.
You will see Pangolin described as a self-hosted Cloudflare Tunnel alternative. That is a fair description of what it does. The project itself positions it as an identity-aware VPN and tunneled reverse proxy built on WireGuard, which matters because access control and single sign-on are baked in, not bolted on. This guide takes you from a fresh VPS to a real homelab service published on HTTPS, including the Newt connector, a public resource, and the login gate that protects it.
Ran through this on Ubuntu 24.04 in July 2026 with Pangolin 1.20.0, Newt 1.14.0, and Docker 29. Fresh VPS to a homelab app on HTTPS, working end to end.
How Pangolin works
The whole design is outbound-only, and that is the point. Nothing at home listens for inbound connections. Instead, a lightweight connector called Newt runs next to your services and dials out to the VPS over WireGuard. Public traffic lands on the VPS, gets authenticated, then rides that same tunnel back down to your service.
Four pieces do the work. Pangolin is the control plane: the dashboard, the API, and the identity layer. Traefik is the actual reverse proxy that terminates TLS and routes requests. Gerbil manages the WireGuard side on the VPS. Newt is the connector you run on each private network. Traffic for a published app flows like this:
Browser  ->  DNS (*.example.com -> VPS IP)  ->  Traefik (TLS) on the VPS
         ->  Pangolin auth  ->  Gerbil  ->  WireGuard tunnel
         ->  Newt on your private host  ->  http://localhost:PORT
If you have run WireGuard or a mesh VPN like Tailscale before, the tunnel part will feel familiar. What Pangolin adds on top is the reverse proxy, per-resource access control, and a browser-based login, which a plain Nginx reverse proxy does not give you on its own.
Prerequisites
Pangolin is the front door for everything you publish, so size it for connections and bandwidth rather than CPU. The official floor is 1 vCPU and 2 GB RAM; 2 vCPU and 2 GB with 20 GB of disk is the comfortable recommendation, and that is what I used. A small VPS is fine because the work is proxying, not compute. What you actually need:
- A VPS with a public IP (DigitalOcean, Vultr, Hetzner, Linode, and similar all work). Your home host needs neither a public IP nor open ports.
- A domain you control, with the ability to add a wildcard DNS record.
- Docker and Docker Compose on the VPS. The installer checks for them.
- A private host running the service you want to publish (a homelab box, a NAS, a Raspberry Pi, anything that runs Docker or the Newt binary).
One note on editions before you start. This guide installs the free, open-source Community Edition under AGPL-3. There is also an Enterprise edition that is free for personal use and small businesses but still requires a license key to activate, plus a fully managed Pangolin Cloud. For a homelab, Community is all you need. Everything here is Docker-based, so it runs the same on Ubuntu 26.04, Ubuntu 24.04, or Debian 13; I tested on 24.04.
1. Set reusable shell variables
You will type your domain and email in a few places. Export them once on the VPS so the rest of the commands paste as-is. Swap in your real values:
export BASE_DOMAIN="example.com"
export DASH_DOMAIN="pangolin.example.com"
export LE_EMAIL="[email protected]"
export VPS_IP="203.0.113.10"
These hold only for the current shell. If you reconnect, export them again before continuing.
2. Point your domain at the VPS
Pangolin gives every published service its own subdomain, so the cleanest setup is a single wildcard record. At your DNS provider, create two A records, both pointing at the VPS public IP, as DNS-only (no proxy):
| Type | Name | Value | Purpose |
|---|---|---|---|
| A | * | Your VPS IP | Covers the dashboard and every resource subdomain |
| A | @ | Your VPS IP | Optional, only if you serve the apex domain itself |
The wildcard *.example.com record is what lets you add new services later without touching DNS again. The dashboard domain (pangolin.example.com here) is just one name the wildcard already covers. Give DNS a minute, then confirm it resolves to your VPS before moving on:
dig +short "${DASH_DOMAIN}"The answer should be your VPS IP. If it is empty or wrong, the certificate step later will fail, so fix DNS first.
3. Open the firewall ports
Traefik needs 80 and 443, and the WireGuard tunnels need two UDP ports. This is the one place people get bitten: cloud firewalls happily pass 80 and 443 but silently drop UDP, and then the tunnel never comes up. Open all four:
sudo ufw allow 80/tcp
sudo ufw allow 443/tcp
sudo ufw allow 51820/udp
sudo ufw allow 21820/udp
sudo ufw reload
Port 51820/udp carries the site tunnels (your homelab to the VPS) and 21820/udp handles client tunnels. If your provider has a separate security group or cloud firewall in front of the VM, add the same four rules there too, UDP included.
4. Install Pangolin
Pangolin ships an interactive installer that writes the Docker Compose stack for you and brings it up. Download it into a working directory:
mkdir -p ~/pangolin && cd ~/pangolin
curl -fsSL https://static.pangolin.net/get-installer.sh | bash
Run it with sudo:
sudo ./installerIt asks a short series of questions. Here is what it wants and the answers that give you a standard homelab install:
- Installation directory: accept the default
/opt/pangolin. - Enterprise version? No, for the free Community Edition.
- Use PostgreSQL? No. The default SQLite is right for a single-node homelab.
- Base domain:
example.com(your${BASE_DOMAIN}). - Dashboard domain:
pangolin.example.com(your${DASH_DOMAIN}). - Let’s Encrypt email: your
${LE_EMAIL}, used for certificate notices. - Enable Gerbil for tunneled connections? Yes. This is the WireGuard tunneling you want.
- Enable email (SMTP)? No, unless you already have an SMTP server to wire in.
When you finish the prompts, the installer writes /opt/pangolin/docker-compose.yml plus its config, then runs docker compose up -d. Give it a couple of minutes to pull images and start. Check the containers are healthy:
cd /opt/pangolin
sudo docker compose ps
You should see pangolin, gerbil, and traefik all up:
NAME       STATUS
gerbil     Up About a minute
pangolin   Up About a minute (healthy)
traefik    Up About a minute
Traefik requests a Let’s Encrypt certificate for your dashboard domain over the HTTP-01 challenge the moment it starts, which is why port 80 had to be reachable. That is the default and it works with any DNS provider. Watch it happen if you want proof:
sudo docker compose logs traefik | grep -i certificateA line reading Server responded with a certificate for your dashboard domain means TLS is live. Prefer the manual route or Podman? The official quick-install guide documents a hand-written Docker Compose stack that produces the same result.
5. Create the admin account and organization
The first admin is gated by a one-time token printed in the logs, so nobody can grab your fresh dashboard before you do. Pull the token:
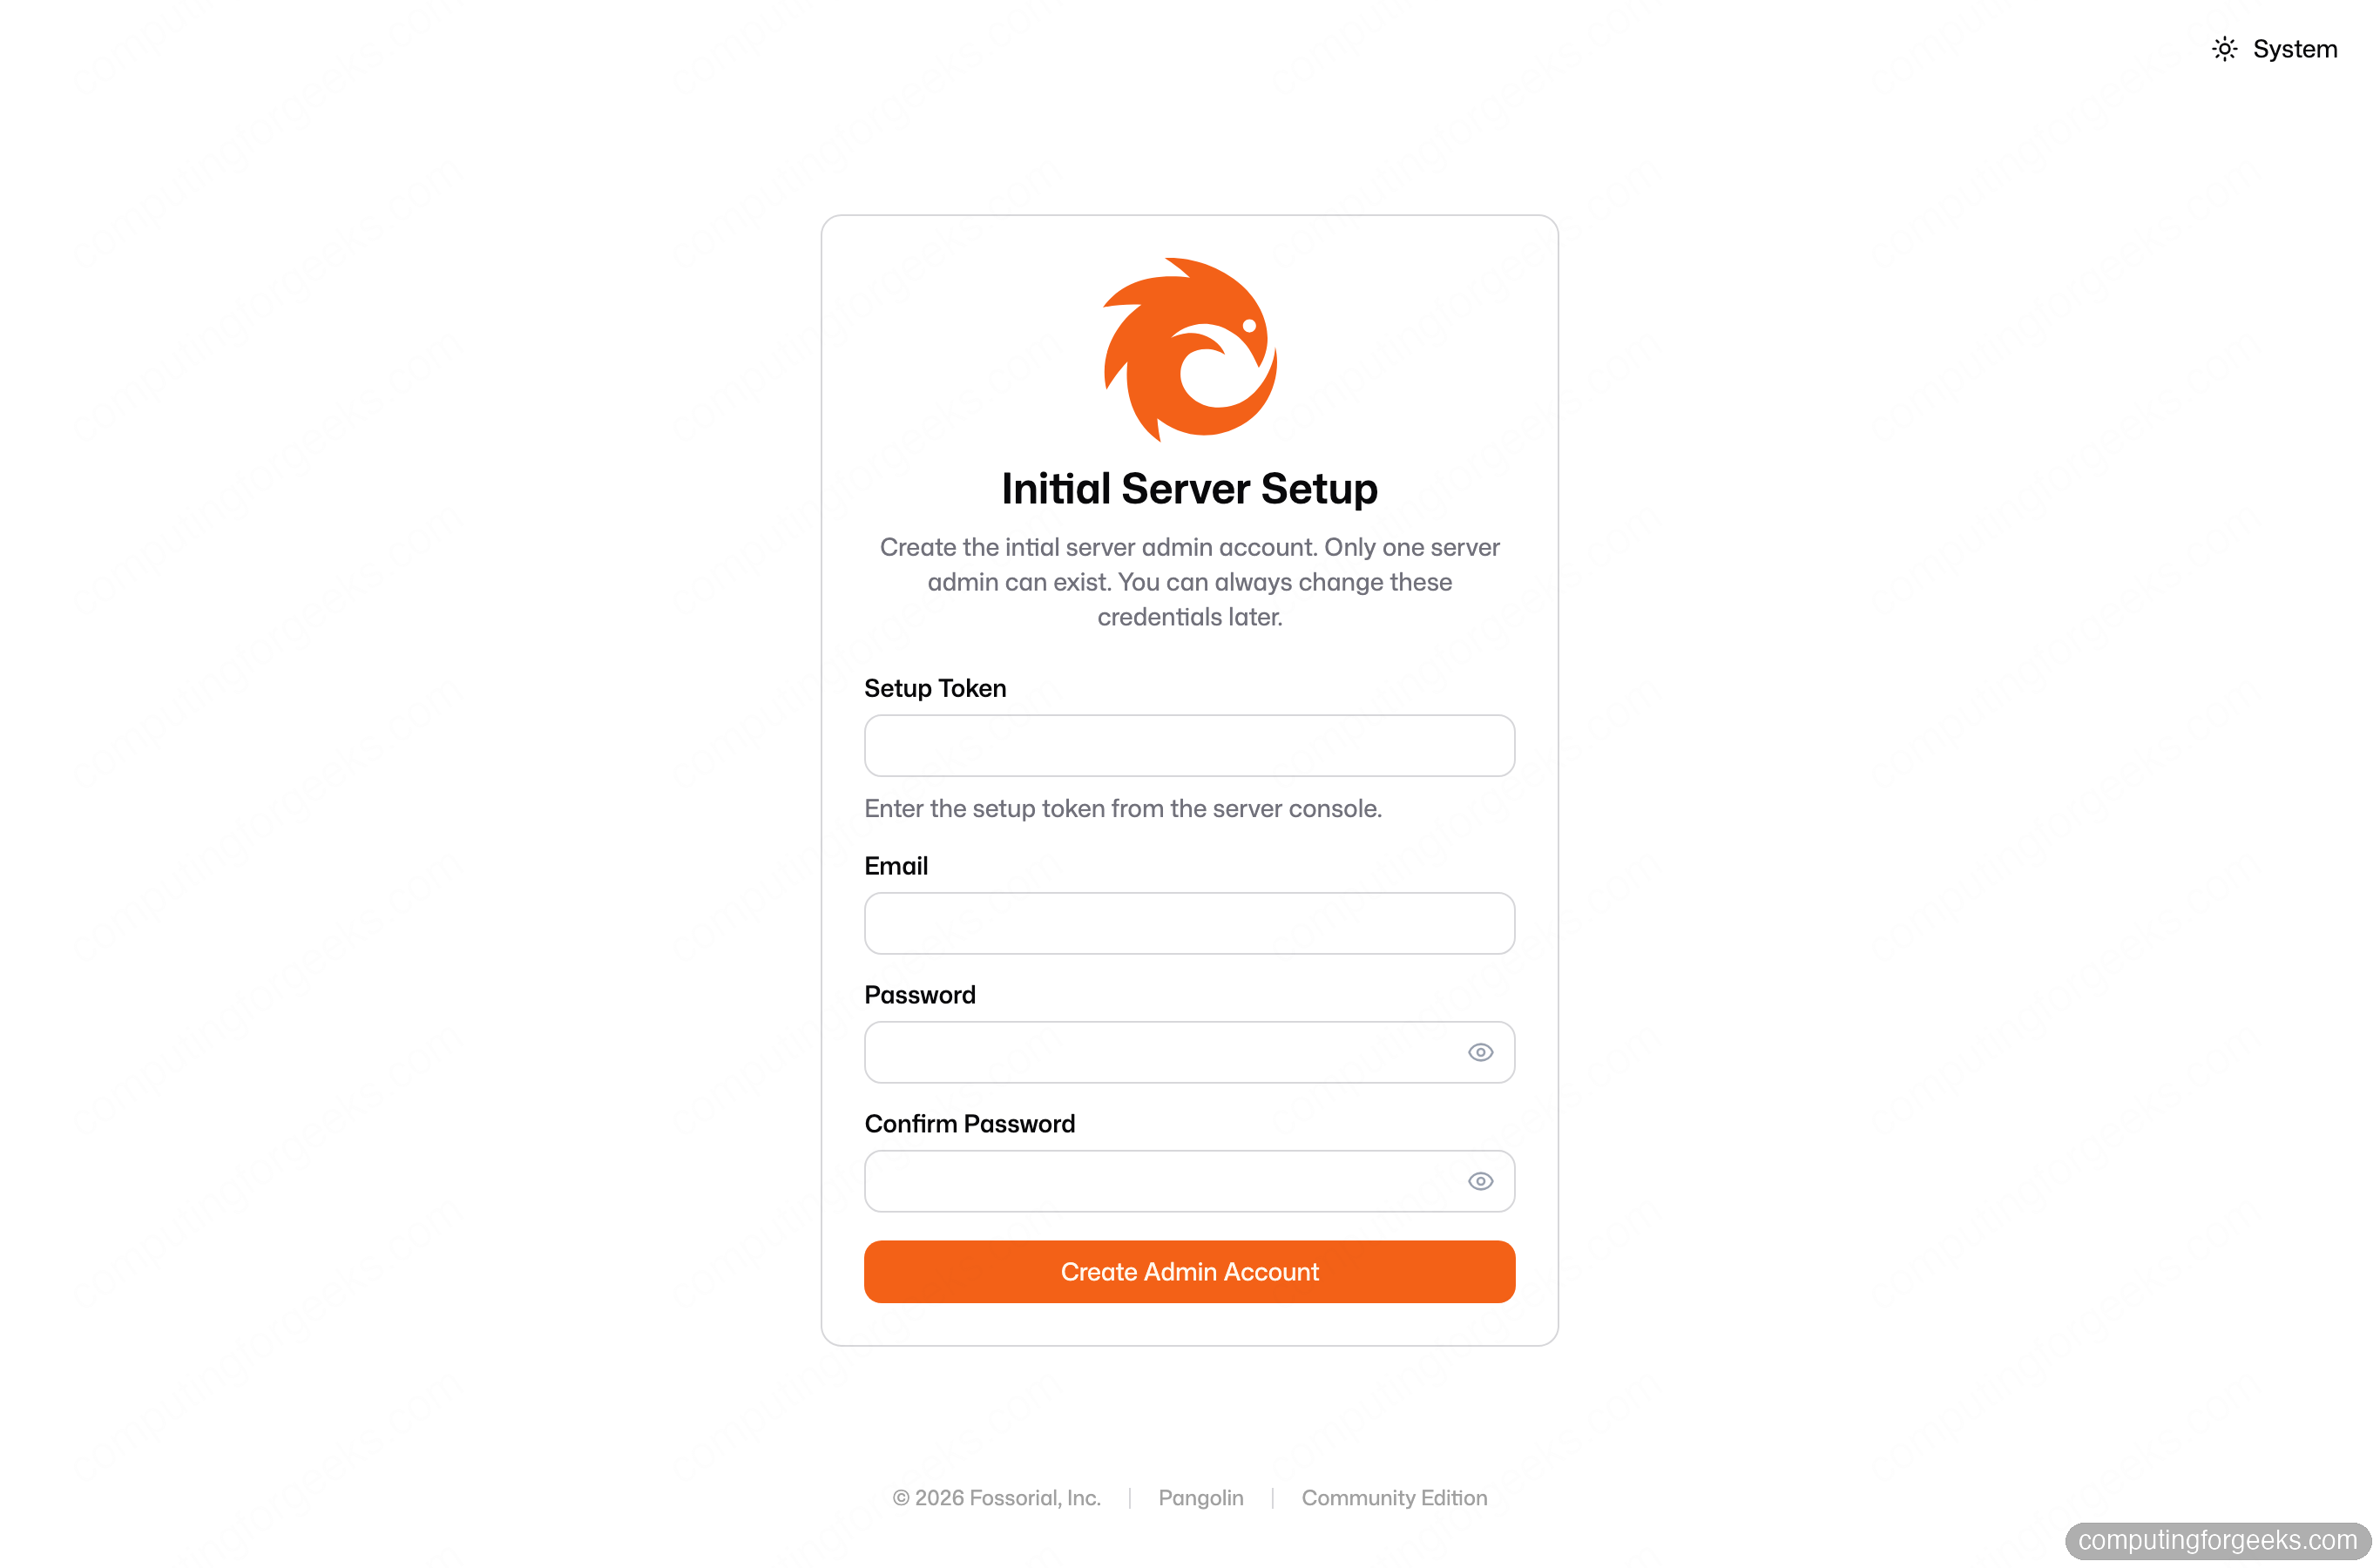
sudo docker compose logs pangolin | grep -i "token"Copy the value after Token:, then open https://pangolin.example.com/auth/initial-setup in your browser. Paste the token, set the admin email and a strong password, and create the account.
The setup page is where you paste that token and create the server admin:
Log in with those credentials and Pangolin asks you to create your first organization. Give it a name (I used “Homelab”); the organization ID fills in automatically. An organization is just the container for your sites, resources, and users, so one is plenty to start.
6. Connect your homelab with a Newt site
A site in Pangolin is a network you connect through the Newt connector. In the dashboard, go to Sites and add one. Name it after the network it lives on (I called mine homelab-server). Pangolin immediately generates the connector credentials and shows you the exact command to run, with a tab for Linux, Docker, and a few others.
On the private host that runs your services, install and start Newt. The dashboard gives you the real ID and secret; drop them into this command:
curl -fsSL https://static.pangolin.net/get-newt.sh | bash
sudo newt --id <YOUR_SITE_ID> --secret <YOUR_SITE_SECRET> \
  --endpoint https://pangolin.example.com
Newt dials out, opens a WebSocket to Pangolin for configuration, and brings up the WireGuard tunnel. Within a few seconds the log confirms it:
INFO: Server version: 1.20.0
INFO: Websocket connected
INFO: Tunnel connection to server established successfully!
INFO: Client connectivity setup. Ready to accept connections from clients!
Back in the dashboard, the site flips to Online and shows the connector version. That is the tunnel established, with nothing opened on the home network:
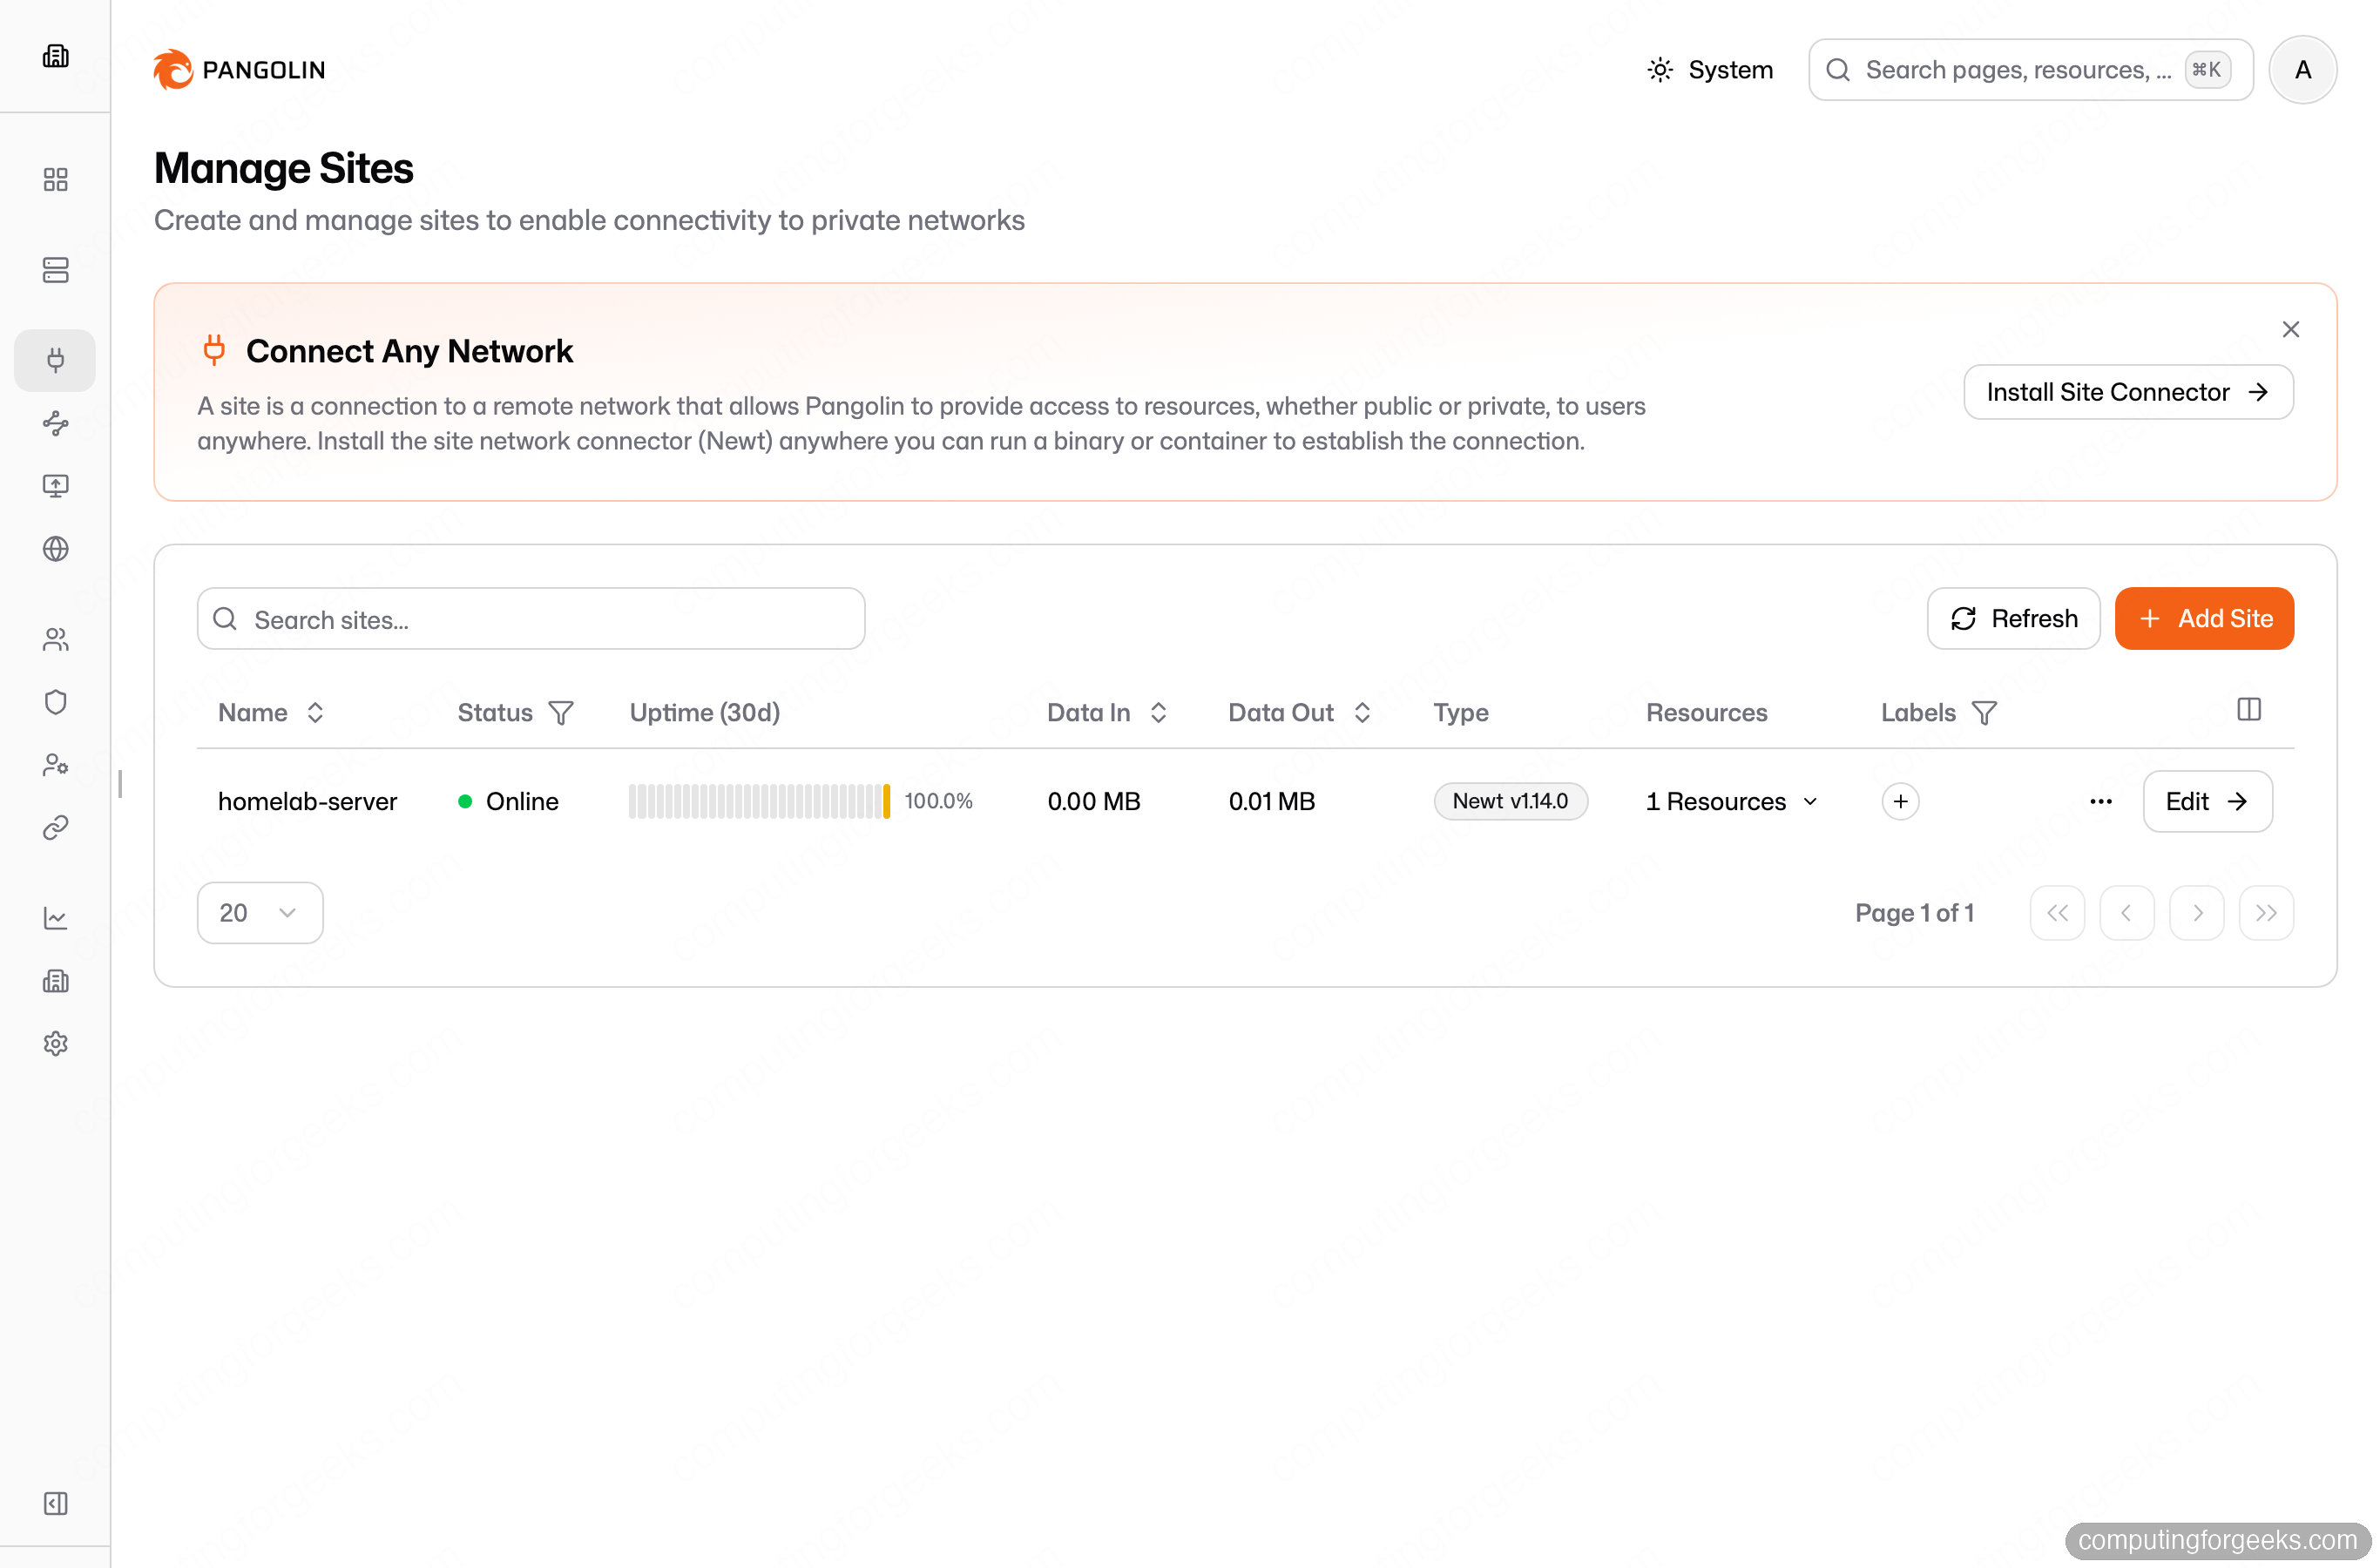
For a long-lived setup, run Newt as a container with restart: unless-stopped or as a systemd service so it survives reboots. If you run it in Docker, give the container network_mode: host so it can reach your other services by their LAN address. Skip that and Newt sees only its own container network, which trips people up the first time.
7. Expose a service as a resource
A resource maps a public subdomain to an internal target reachable through a site. For this walkthrough I ran a tiny traefik/whoami container on the homelab host, bound to port 8080 and never exposed to the internet, then published it.
In the dashboard, open Resources, add a public resource, and fill in four things: a name, the subdomain (app, which becomes app.example.com), the protocol (HTTP), and a target. The target is the site plus the address the connector should reach, here http://localhost:8080:
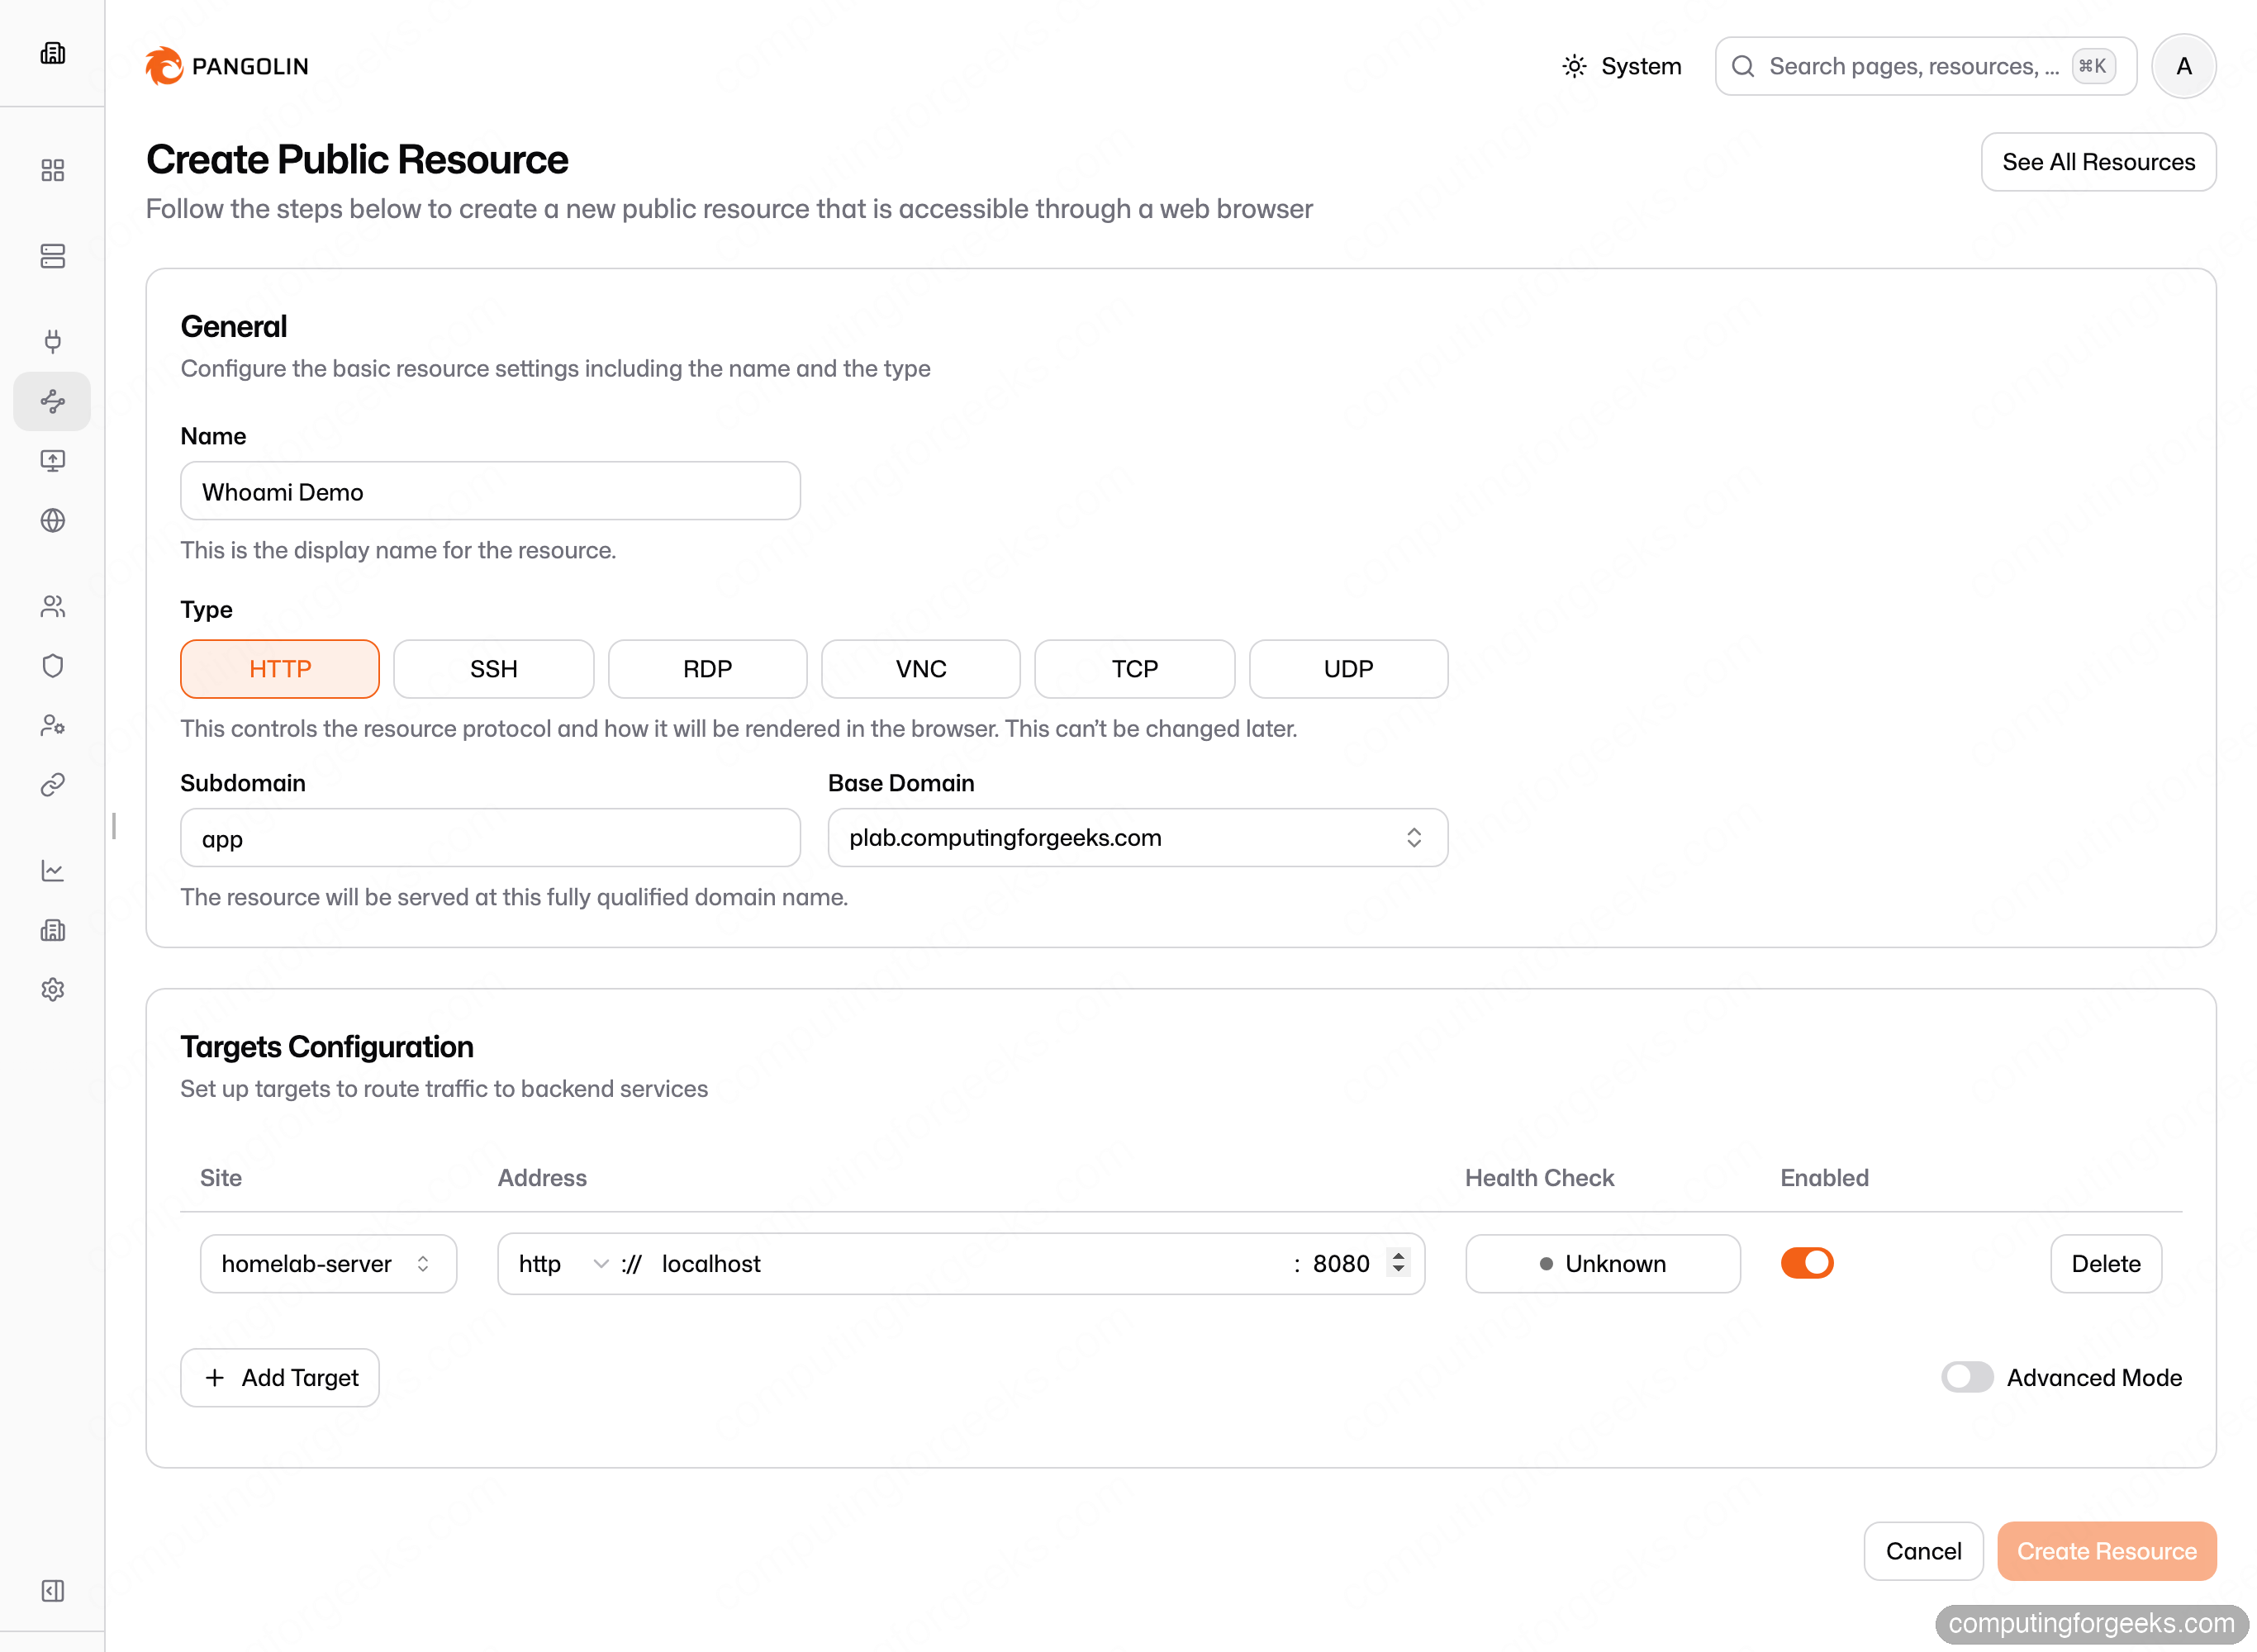
Create it, and Traefik issues a certificate for app.example.com the same way it did for the dashboard. The service is now reachable on its own HTTPS URL, served entirely through the tunnel. The interesting part is what is not reachable: port 8080 on the homelab host stays firewalled off the internet, so the only path to that service is through Pangolin.
8. Lock it down with identity-aware access
By default a public resource is protected, not open. Visit app.example.com in a private window and Pangolin intercepts the request with its own login gate before your service ever sees traffic:
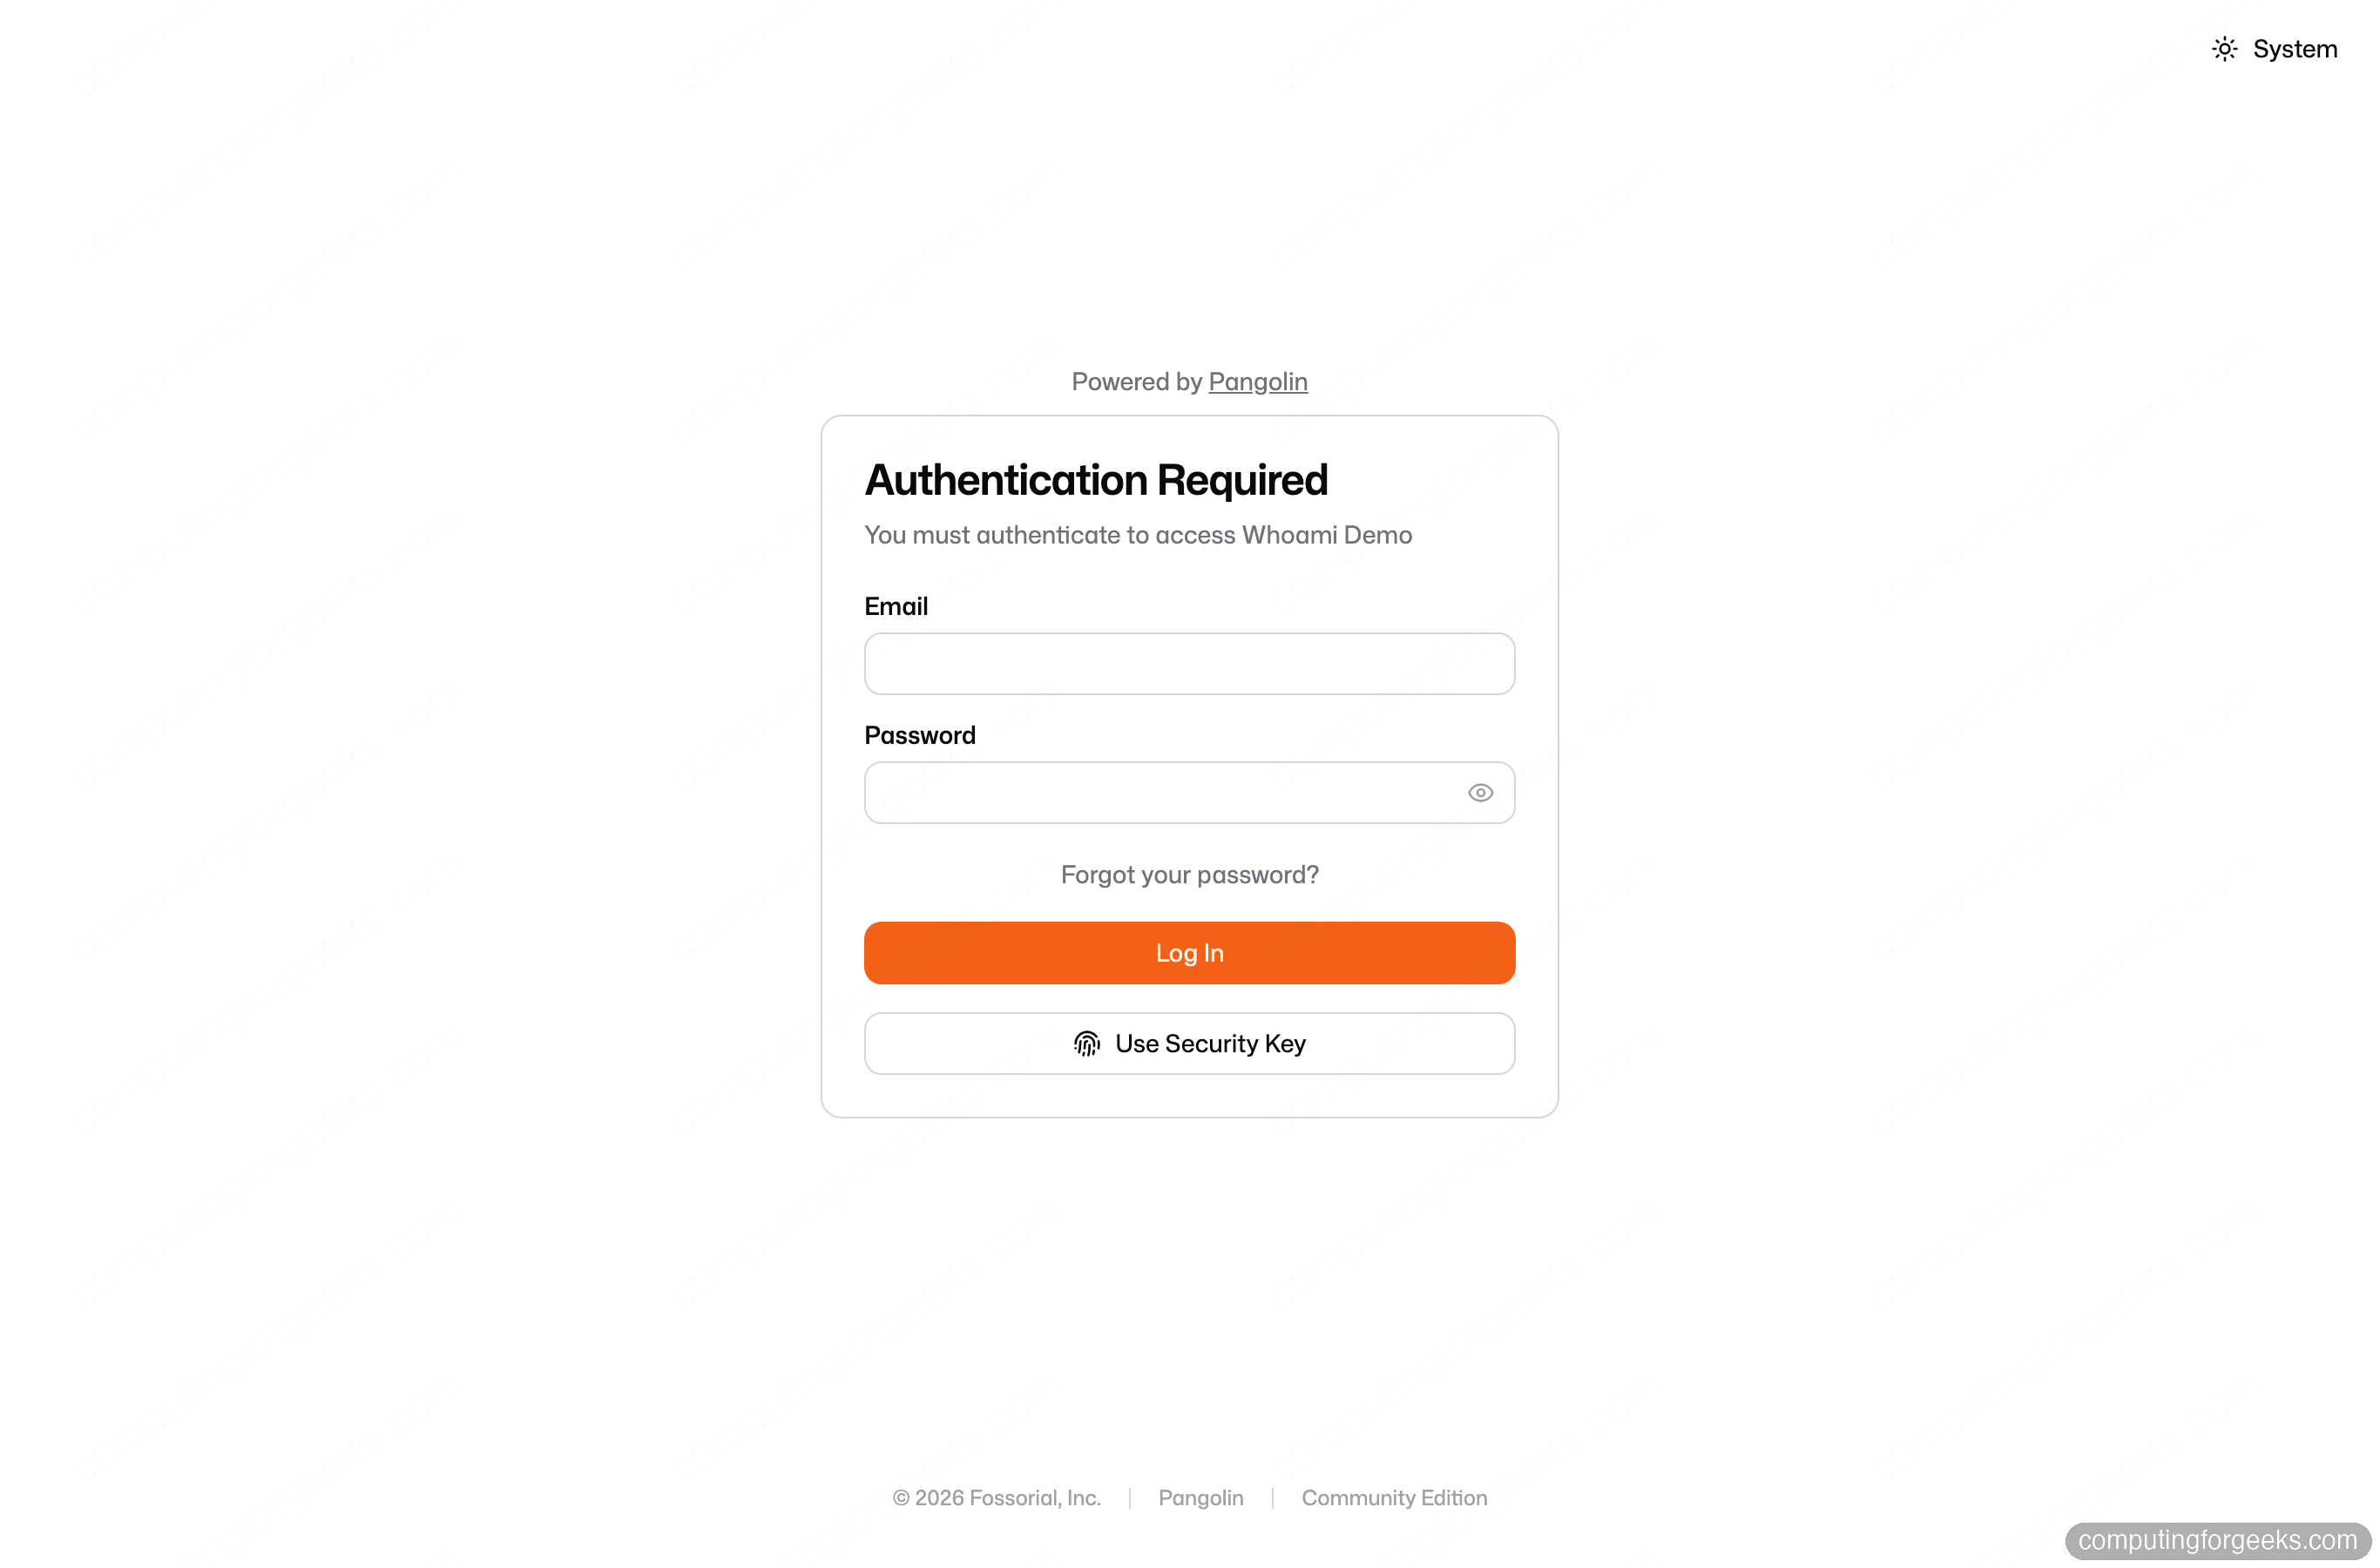
This is the piece a plain reverse proxy makes you build yourself. Each resource carries its own access policy, and on the resource’s Authentication tab you choose how strict it is: signed-in organization users with roles, a shared PIN, a password, or fully public with no gate. You can also turn on multi-factor auth, security keys, one-off shareable links, and external identity providers like Google or generic OIDC.
Once you authenticate as a user with access, Pangolin forwards you straight to the real service over HTTPS. Here is the whoami app answering through the tunnel, on its public subdomain, from a host that has no inbound ports open at all:
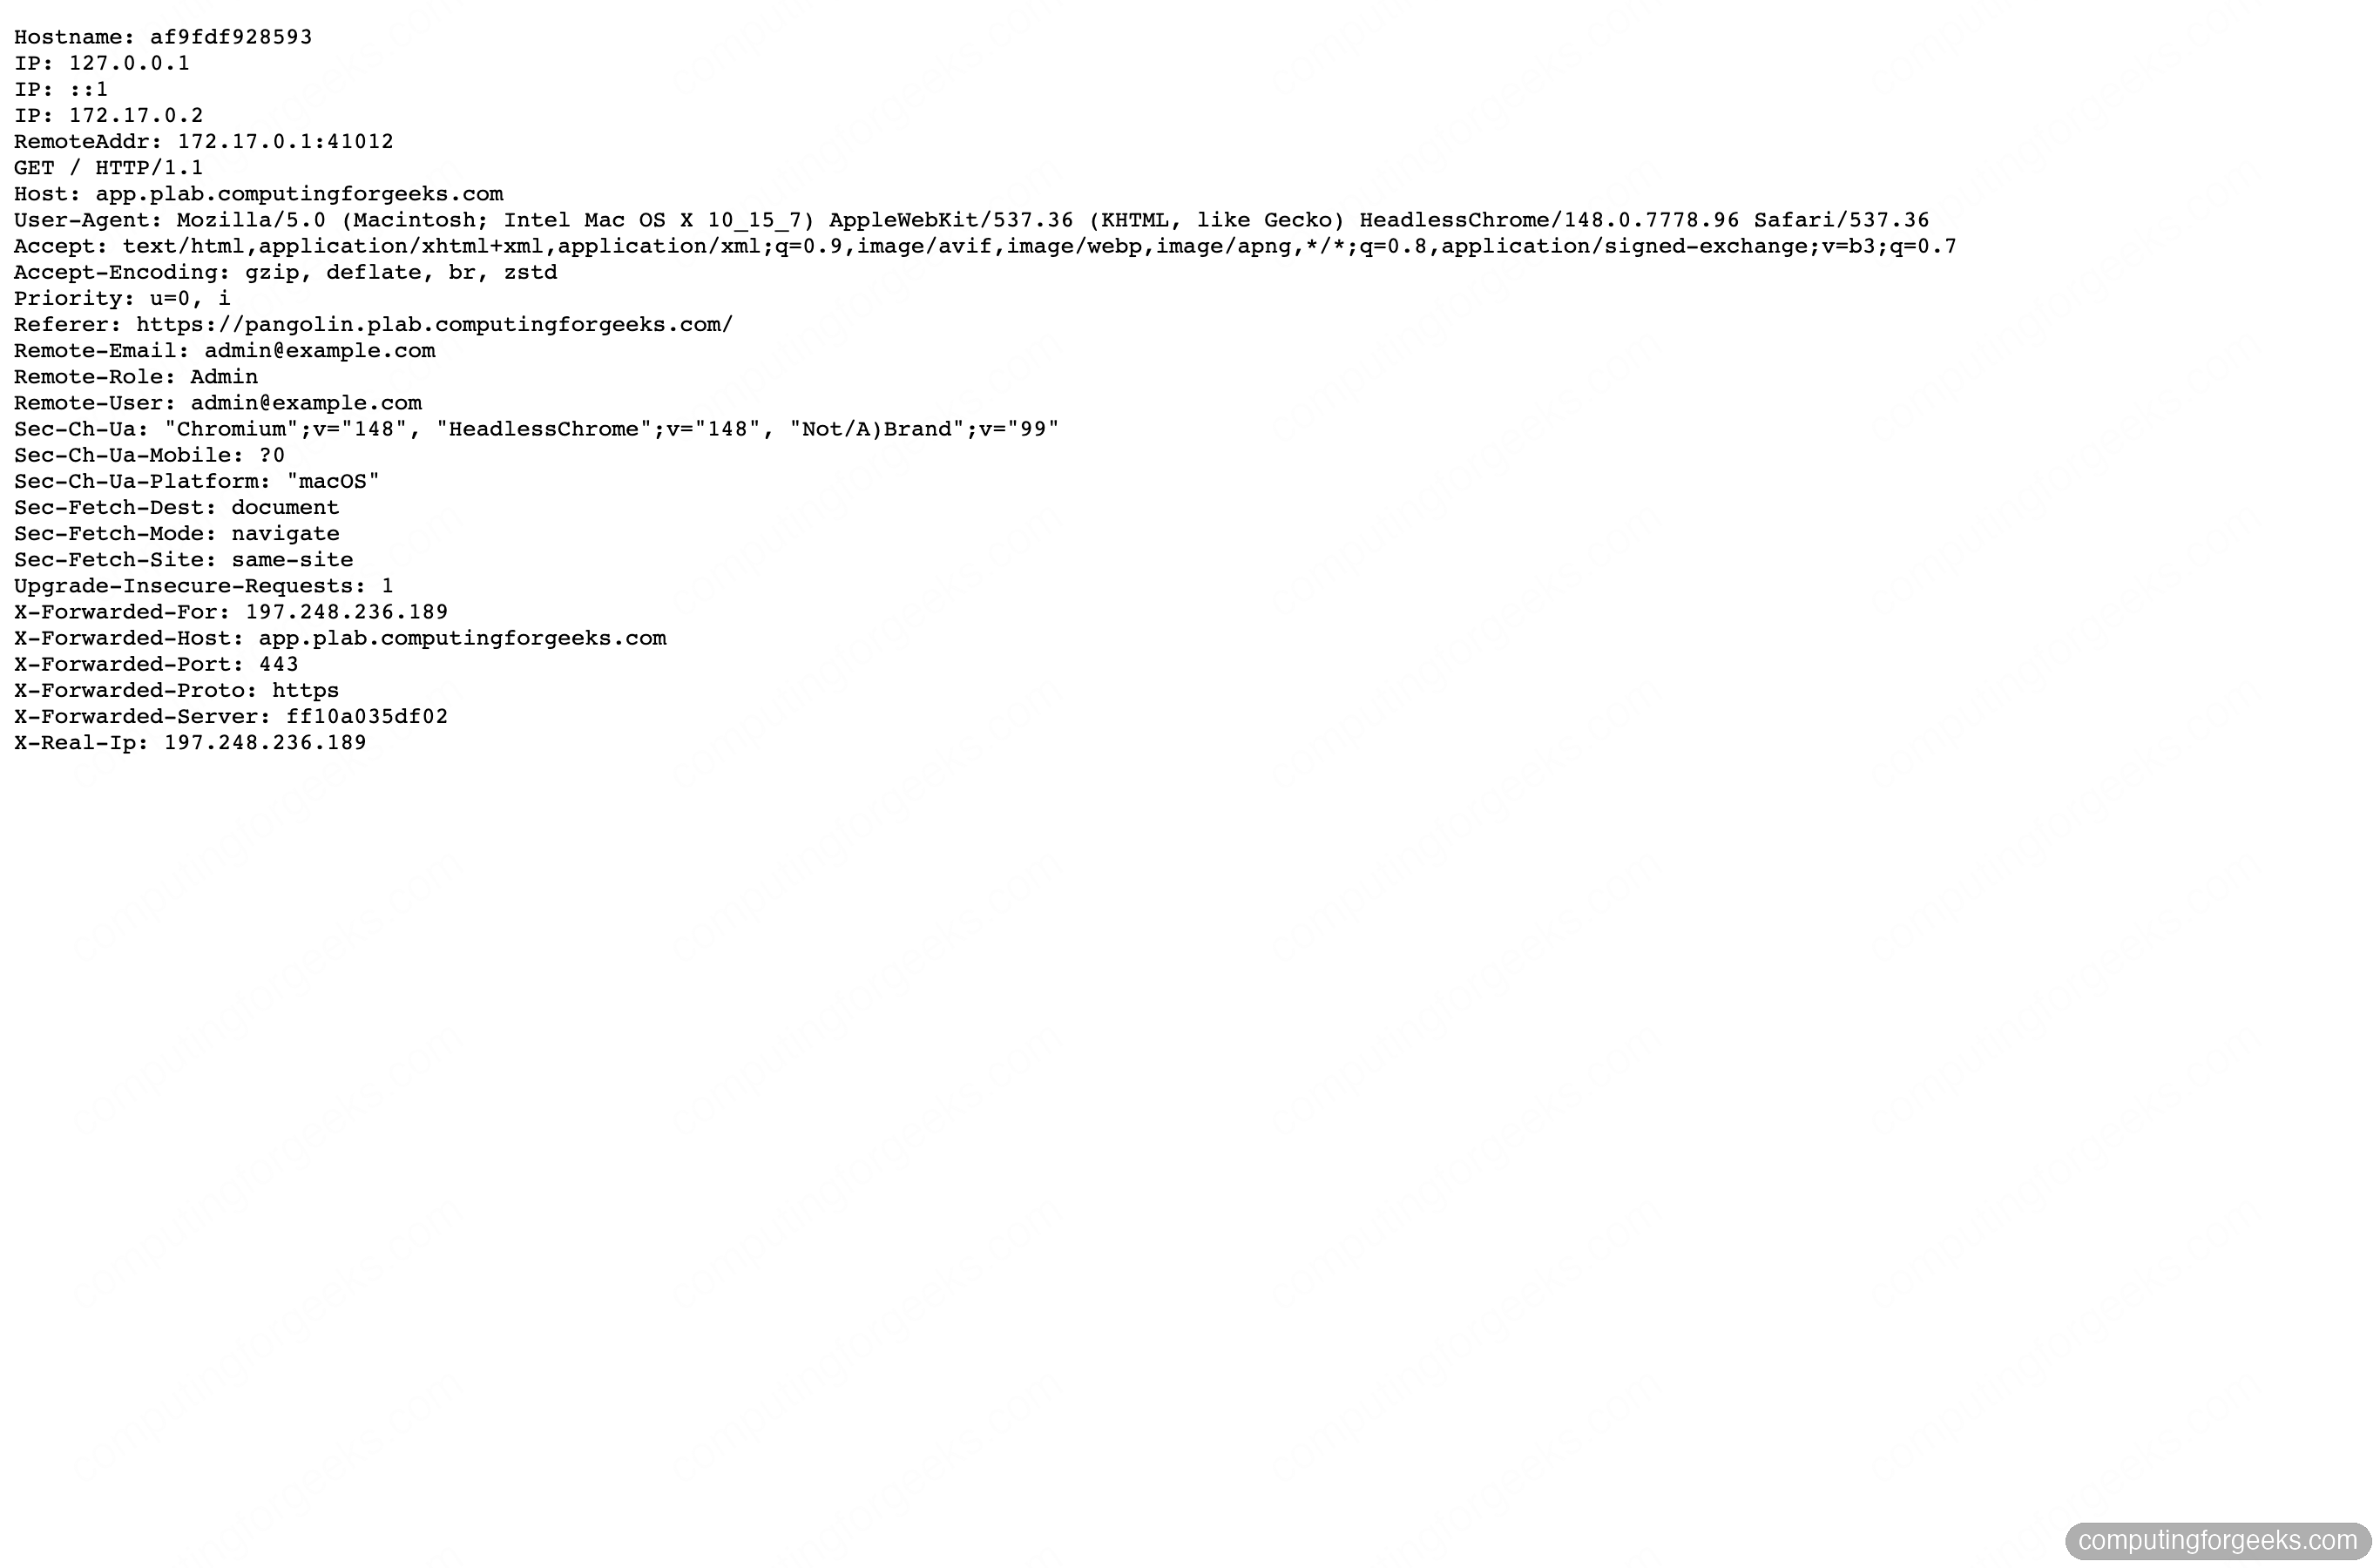
Point any real service at Pangolin the same way. Swap the whoami target for your dashboard on localhost:3000, your photo library on localhost:2283, or a NAS UI on another host entirely, and each one gets a subdomain, a certificate, and a login gate.
Use a wildcard certificate (optional)
The default HTTP-01 setup issues one certificate per resource, which is fine and needs no API tokens. Once you publish a lot of services, though, per-resource certificates add up against Let’s Encrypt’s rate limits. The fix is a single wildcard certificate for *.example.com, and wildcards require the DNS-01 challenge instead of HTTP-01.
DNS-01 means Traefik proves domain ownership by writing a TXT record through your DNS provider’s API, so you supply provider credentials (a Cloudflare, Route 53, or other supported token) and set prefer_wildcard_cert: true in the Pangolin config. It is worth doing for a busy instance and unnecessary for a handful of services. The wildcard domains documentation has the exact per-provider settings.
Troubleshooting
These are the snags that actually cost time, most of them from the tunnel or DNS rather than Pangolin itself.
The site never goes Online
Almost always a blocked UDP port. TCP 80 and 443 pass, so the dashboard loads and you assume the firewall is fine, but the WireGuard handshake on 51820/udp is being dropped by a cloud security group. Confirm both the host firewall and the provider firewall allow 51820/udp and 21820/udp, then restart Newt and watch its log for Tunnel connection to server established successfully.
The dashboard certificate never issues
Traefik can only complete HTTP-01 if the dashboard domain resolves to the VPS and port 80 is reachable from the internet. Re-run dig +short "${DASH_DOMAIN}" and make sure it returns your VPS IP, not a proxy address. If your DNS provider proxies traffic (an orange-cloud toggle, for example), set the record to DNS-only so Let’s Encrypt reaches Traefik directly.
Newt in Docker cannot reach a LAN service
A containerized Newt only sees its own Docker network, so a target like another machine’s LAN IP fails. Run the Newt container with network_mode: host, or target services on the same host by an address the container can actually resolve.
Port 51820 conflicts with an existing WireGuard server
If the VPS already runs WireGuard on 51820, Gerbil cannot bind it. Remap the published port in docker-compose.yml (for example 51888:51820/udp) and update the matching start_port and endpoint in /opt/pangolin/config/config.yml, then recreate the stack.
What I’d change for production
For a homelab this setup is solid as-is, but a few things are worth hardening before it carries anything important. Move the database from SQLite to PostgreSQL if you expect real traffic or plan to cluster; it is a config switch documented in Pangolin’s database options. Put the whoami target behind a proper resource policy: tie access to specific users and turn on MFA rather than leaving anything on the honor system. Run Newt as a managed service on every private host so a reboot does not quietly drop your tunnels. And keep an eye on the WireGuard UDP ports at the provider level, since that is the single most common reason a working setup goes dark after a firewall change. Do those four and you have a genuinely self-owned alternative to a hosted tunnel, with your certificates, your identity layer, and your data path all under your control.