

Fedora ships MySQL 8.4 LTS in its default repositories, which means installing MySQL on a Fedora workstation or server is a one-line dnf install. No third-party repos, no licence acceptance prompts, no temporary password to scrape out of a log file. The Fedora-packaged build is the upstream Oracle source rebuilt for the distro, with the mysql-selinux policy bundled so the daemon runs cleanly with SELinux in enforcing mode.
This guide walks through the full setup: install MySQL Server, set the root password (Fedora’s package leaves authentication wide open on first start, so this is mandatory), create a database and an application user, open the firewall for remote access, and tune the daemon for production use. Every command was run on Fedora 44 with the same instructions verified on Fedora 43 and 42. A short companion section covers the Oracle MySQL Community repo for anyone who needs the official Oracle build instead of the Fedora rebuild.
Prerequisites
You need a Fedora 44, 43, or 42 system (Workstation, Server, or Cloud Edition all work) with sudo access. Plan for at least 2 GB RAM if you intend to run real workloads. SELinux can stay in enforcing mode, which is the Fedora default. The Fedora mysql-server package ships with mysql-selinux as a dependency, so policies are loaded automatically.
Step 1: Set reusable shell variables
Pick a strong root password, an application database name, and an application user once. Every later step references these:
export MYSQL_ROOT_PW="Strong@Pass2026!"
export APP_DB="appdb"
export APP_USER="appuser"
export APP_USER_PW="AppPass2026!"
export REMOTE_CIDR="10.0.1.0/24"
Confirm the variables are set before running anything destructive:
echo "Root PW:   set (${#MYSQL_ROOT_PW} chars)"
echo "App DB:    ${APP_DB}"
echo "App user:  ${APP_USER}"
echo "Remote IP: ${REMOTE_CIDR}"
MySQL’s validate_password plugin requires at least one uppercase letter, one lowercase letter, one digit, one special character, and a minimum of eight characters. Pick passwords that satisfy that on every variable above.
Step 2: Confirm the package version
Check what Fedora’s repos offer before installing. This avoids surprises if the package version is ahead of or behind what you expected:
dnf info mysql-serverThe Fedora repo carries MySQL 8.4 LTS, with the package source name matching the upstream Oracle release:
Available packages
Name           : mysql-server
Epoch          : 0
Version        : 8.4.8
Release        : 2.fc44
Architecture   : x86_64
Download size  : 19.2 MiB
Installed size : 114.6 MiB
Source         : mysql8.4-8.4.8-2.fc44.src.rpm
Repository     : fedora
URL            : http://www.mysql.com
Step 3: Install MySQL Server
One command installs the server, the CLI client, the shared libraries, and the SELinux policy:
sudo dnf install -y mysql-serverDNF pulls roughly 22 MiB of packages and creates the mysql system user and group:
Installing:
 mysql-server              x86_64  0:8.4.8-2.fc44     fedora
Installing dependencies:
 mariadb-connector-c-config   noarch
 mysql                        x86_64  0:8.4.8-2.fc44
 mysql-common                 x86_64
 mysql-errmsg                 x86_64
 mysql-selinux                x86_64  0:1.0.14-3.fc44
 mecab                        x86_64
 protobuf-lite                x86_64

>>> Creating group 'mysql' with GID 27.
>>> Creating user 'mysql' (MariaDB and MySQL Server) with UID 27 and GID 27.
[10/10] Installing mysql-server-0:8.4.8 100% | 114.6 MiB

Complete!
Step 4: Start and enable mysqld
Enable the service so it survives reboots, then start it now:
sudo systemctl enable --now mysqldConfirm the daemon is running and that mysql-prepare-db-dir initialised /var/lib/mysql on first boot:
sudo systemctl status mysqld --no-pagerThe service should report active (running) with the Server is operational status line:
● mysqld.service - MySQL 8.4 database server
     Loaded: loaded (/usr/lib/systemd/system/mysqld.service; enabled; preset: disabled)
    Drop-In: /usr/lib/systemd/system/service.d
             └─10-timeout-abort.conf
     Active: active (running) since Wed 2026-05-20 22:40:36 UTC; 3s ago
    Process: 11787 ExecStartPre=/usr/libexec/mysql-check-socket (code=exited, status=0/SUCCESS)
    Process: 11812 ExecStartPre=/usr/libexec/mysql-prepare-db-dir mysqld.service (code=exited, status=0/SUCCESS)
   Main PID: 11885 (mysqld)
     Status: "Server is operational"
      Tasks: 35 (limit: 4591)
     Memory: 462.6M
Step 5: Verify the server version
Check the client and server are reporting the same MySQL release:
mysql --versionThe version string confirms the source build matches the package:
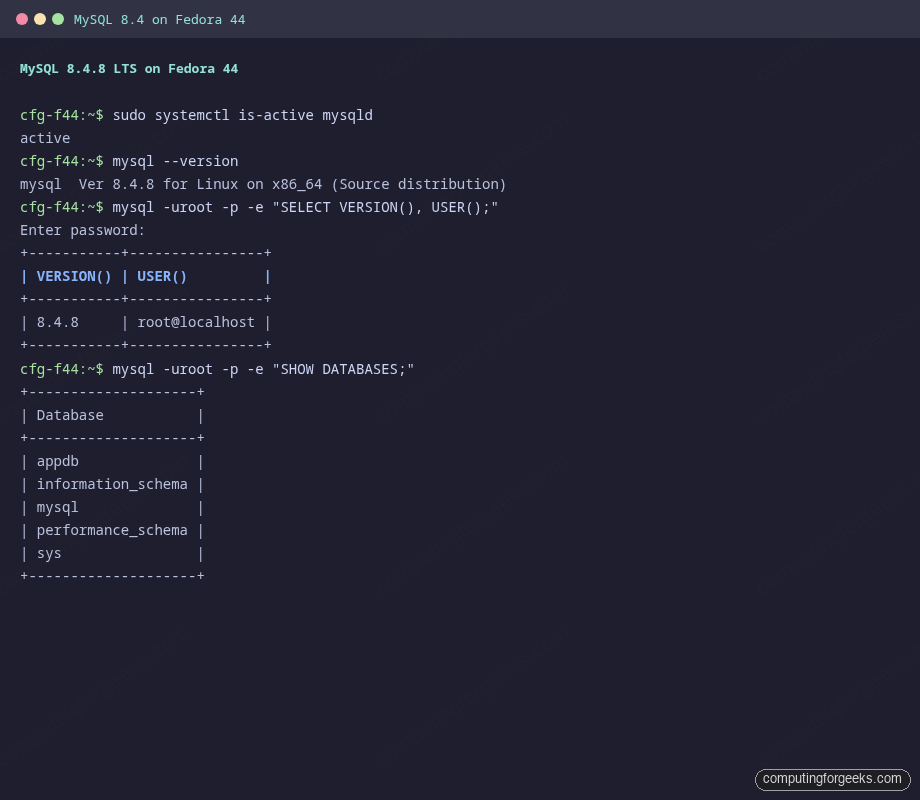
mysql Ver 8.4.8 for Linux on x86_64 (Source distribution)Here is the full verification captured on the test box: the service is active, the client reports MySQL 8.4.8, the root login works, and the app database is visible:
Step 6: Set the root password
The Fedora MySQL package does not generate a temporary password. On first start, root@localhost uses the auth_socket plugin, which means anyone with sudo on the host logs in without a password. Set a real password before anything else:
sudo mysqlYou drop straight into the MySQL prompt. Set the new root password and clean up the optional test database in the same session:
ALTER USER 'root'@'localhost' IDENTIFIED BY 'Strong@Pass2026!';
DELETE FROM mysql.user WHERE User='';
DROP DATABASE IF EXISTS test;
DELETE FROM mysql.db WHERE Db='test' OR Db='test\_%';
FLUSH PRIVILEGES;
EXIT;
From now on, root login requires the password:
mysql -uroot -p"${MYSQL_ROOT_PW}" -e "SELECT user, host, plugin FROM mysql.user;"The system accounts and the new root entry should all use the modern caching_sha2_password auth plugin:
user                host        plugin
mysql.infoschema    localhost   caching_sha2_password
mysql.session       localhost   caching_sha2_password
mysql.sys           localhost   caching_sha2_password
root                localhost   caching_sha2_password
Step 7: Create an application database and user
Production apps should never run as root@localhost. Create a dedicated database and a user scoped to it:
mysql -uroot -p"${MYSQL_ROOT_PW}" <<SQL
CREATE DATABASE ${APP_DB} CHARACTER SET utf8mb4 COLLATE utf8mb4_unicode_ci;
CREATE USER '${APP_USER}'@'localhost' IDENTIFIED BY '${APP_USER_PW}';
GRANT ALL PRIVILEGES ON ${APP_DB}.* TO '${APP_USER}'@'localhost';
FLUSH PRIVILEGES;
SHOW DATABASES;
SQL
The output confirms the new database is in place alongside the internal ones:
Database
information_schema
mysql
performance_schema
sys
appdb
Test the app user can connect and reach its database:
mysql -u"${APP_USER}" -p"${APP_USER_PW}" -e "USE ${APP_DB}; SELECT DATABASE(), CURRENT_USER();"Step 8: Allow remote connections
By default, MySQL listens on every interface on port 3306 and the X Protocol on 33060. Confirm:
sudo ss -tlnp | grep -E '3306|33060'Both sockets should be bound and owned by the mysqld process:
LISTEN 0  151  *:3306   *:*  users:(("mysqld",pid=11885,fd=22))
LISTEN 0  70   *:33060  *:*  users:(("mysqld",pid=11885,fd=19))
If you need to restrict the bind address to a single interface, edit /etc/my.cnf.d/community-mysql-server.cnf and add a bind-address line under [mysqld], then restart mysqld.
Grant the app user remote access from your application subnet:
mysql -uroot -p"${MYSQL_ROOT_PW}" <<SQL
CREATE USER '${APP_USER}'@'${REMOTE_CIDR}' IDENTIFIED BY '${APP_USER_PW}';
GRANT ALL PRIVILEGES ON ${APP_DB}.* TO '${APP_USER}'@'${REMOTE_CIDR}';
FLUSH PRIVILEGES;
SQL
Open port 3306 in firewalld if the firewall is active (Cloud Edition ships without firewalld; Workstation and Server run it by default):
sudo firewall-cmd --permanent --add-port=3306/tcp
sudo firewall-cmd --reload
For zone-aware rules and richer filtering, see the firewalld zones, services, and rich-rules guide.
Step 9: Tune MySQL for production
The Fedora default config is fine for development. For real workloads, edit /etc/my.cnf.d/community-mysql-server.cnf and tune the InnoDB buffer pool, log file size, and the binlog. The buffer pool is the single biggest knob: aim for 50-70% of RAM on a dedicated MySQL host.
sudo vi /etc/my.cnf.d/community-mysql-server.cnfA reasonable starting point for a host with 8 GB RAM:
[mysqld]
# Memory
innodb_buffer_pool_size = 4G
innodb_log_file_size = 512M
innodb_flush_log_at_trx_commit = 1
innodb_flush_method = O_DIRECT

# Connections
max_connections = 200
wait_timeout = 600

# Binary logging (for replication and PITR)
server-id = 1
log_bin = mysql-bin
binlog_format = ROW
expire_logs_days = 7

# Character set
character-set-server = utf8mb4
collation-server = utf8mb4_unicode_ci
Restart MySQL and confirm the settings loaded:
sudo systemctl restart mysqld
mysql -uroot -p"${MYSQL_ROOT_PW}" -e "
SHOW VARIABLES WHERE Variable_name IN
  ('innodb_buffer_pool_size','max_connections','character_set_server','log_bin');"
Step 10: Back up the database with mysqldump
For small to medium databases, mysqldump is the simplest backup tool. Dump a single database with schema and data:
mysqldump -uroot -p"${MYSQL_ROOT_PW}" \
  --single-transaction --routines --triggers --events \
  "${APP_DB}" | gzip > "${APP_DB}-$(date +%F).sql.gz"
Restore by piping the gunzipped dump back through the client:
gunzip < "${APP_DB}-2026-05-21.sql.gz" | mysql -uroot -p"${MYSQL_ROOT_PW}" "${APP_DB}"For databases over 100 GB, switch to mysqlpump (parallel dump, ships with MySQL) or mysqlsh dump-instance from MySQL Shell, which produces chunked files and parallelises both dump and restore.
Alternative: Oracle MySQL Community repository
The Fedora-packaged mysql-server tracks upstream MySQL closely and is the right choice for most setups. If you need the exact Oracle-built binaries (for support contract alignment, the libmysqlclient shim version Oracle ships, or because internal policy specifies the Oracle repo), add the MySQL Yum repository instead:
cd /tmp
curl -sLO https://dev.mysql.com/get/mysql84-community-release-fc43-1.noarch.rpm
sudo dnf install -y ./mysql84-community-release-fc43-1.noarch.rpm
sudo dnf install -y mysql-community-server
One caveat at the time of writing: Oracle’s yum repo page lists fc42 and fc43 release packages but not a fresh fc44 one yet. The fc43 package usually installs on Fedora 44 because the dependency graph is identical, but if dnf install mysql-community-server fails with “No match for argument”, the upstream repo has not yet been published for your Fedora release. In that case, use the Fedora-native path covered above (which IS upstream MySQL 8.4 rebuilt for Fedora) until Oracle ships the matching release.
The Oracle path also generates a temporary root password in /var/log/mysqld.log on first start, which the Fedora path does not. Extract it with:
sudo grep 'temporary password' /var/log/mysqld.log | tail -1Use that password for the first mysql -uroot -p login, then run ALTER USER 'root'@'localhost' IDENTIFIED BY ... exactly as in Step 6.
Troubleshooting
Error: Access denied for user ‘root’@’localhost’ (using password: NO)
You ran mysql without sudo before setting a real root password. On a fresh Fedora install, root uses auth_socket so only sudo mysql works. Either re-run with sudo mysql, or follow Step 6 to swap to caching_sha2_password with a real password.
Error: Your password does not satisfy the current policy requirements
The validate_password plugin rejected the password you supplied. The default policy needs at least one uppercase, one lowercase, one digit, one special character, and a minimum length of 8. Either pick a stronger password or relax the policy at the session level:
mysql -uroot -p"${MYSQL_ROOT_PW}" -e "SET GLOBAL validate_password.policy = LOW;"Setting LOW drops the policy down to length-only. Do not lower this on internet-facing servers.
mysqld fails to start with “Failed to initialize ACL/file permissions”
Either /var/lib/mysql ownership is wrong (should be mysql:mysql) or the SELinux label is broken after a manual file move. Reset both:
sudo chown -R mysql:mysql /var/lib/mysql
sudo restorecon -Rv /var/lib/mysql
sudo systemctl restart mysqld
Cannot connect to remote MySQL from another host
Three things to check, in order: (1) the user grant covers the source IP or subnet (SELECT user, host FROM mysql.user WHERE user='${APP_USER}';), (2) mysqld is bound to the right interface (ss -tlnp | grep 3306), (3) firewalld is allowing 3306/tcp (sudo firewall-cmd --list-ports). Use nc -vz HOST 3306 from the remote box to isolate whether it’s a network or auth issue.
Common MySQL administration commands
A short reference for the day-to-day commands you will use after the install:
| Command | What it does |
|---|---|
sudo systemctl status mysqld | Check whether mysqld is running |
sudo systemctl restart mysqld | Apply config changes |
mysql -uroot -p | Interactive root login |
mysql -uUSER -p DB < file.sql | Import a SQL dump non-interactively |
mysqldump -uroot -p --all-databases | Dump everything to stdout |
SHOW DATABASES; | List all databases |
SHOW PROCESSLIST; | See active connections and queries |
SHOW ENGINE INNODB STATUS\G | InnoDB diagnostic dump |
SHOW VARIABLES LIKE 'innodb%'; | Inspect InnoDB settings |
SHOW GRANTS FOR 'user'@'host'; | Print effective permissions |
FLUSH PRIVILEGES; | Reload the grant tables after manual edits |
From here, the next steps depend on your stack. For a full LAMP server (Apache + MySQL + PHP), follow the LAMP stack on Fedora guide. To manage databases through a browser instead of the CLI, install phpMyAdmin on Fedora. If you prefer MariaDB (a drop-in fork of MySQL with a different release cadence and licence), the MariaDB on Fedora guide covers the equivalent setup. For containerised MySQL where each app gets its own isolated database, run it under Docker on Fedora with the official mysql:8.4 image.




sudo firewall-cmd –permanent –add-rich-rule ‘rule family=”ipv4″ service name=”mysql” source address=”10.1.1.0/24″ accept’
can i also set “source address=”0.0.0.0/0” here..??
or is this Dangerous?
installing is not a issue, but actually connecting to a MySQL database is a different story, nor matter what you do, you will always get “Access denied for user@localhost using password (YES)” …
This could be password issue. We’ve tested and it works