A Brume 2 sits on your home network, draws under three watts, and does one job as a WireGuard gateway: it is the always-on box that terminates your VPN so a laptop in a hotel, a phone on cellular, or a second site can reach your home LAN as if it were plugged into the same switch. Run a WireGuard server on it and you get two things at once. Remote devices reach your NAS, Proxmox host, and printers over an encrypted tunnel, and you can push all of a client’s traffic out through your home connection when you are on an untrusted network.
This guide sets up that gateway end to end: the WireGuard server on the Brume 2 through its web panel, the client profile, and the two routing modes that decide whether a client reaches only your LAN or sends everything through home. It also shows the configuration the panel builds for you and how to confirm the tunnel is actually carrying traffic, so you are not trusting a green dot in a UI.
Confirmed working in July 2026. The WireGuard server, peer handshake, LAN reach, and throughput below were captured on a Linux gateway running the same WireGuard the Brume 2 runs on OpenWrt (WireGuard tools 1.0.x, client on Ubuntu 24.04); the panel steps are verified against the current GL.iNet firmware docs.
Why the Brume 2 for this
The Brume 2 (GL-MT2500) is a wired mini gateway built on a MediaTek MT7981B with 1 GB of RAM and 8 GB of storage. It has a 2.5 Gbps WAN port, a gigabit LAN port, one USB 3.0 port, and no Wi-Fi, which is exactly what you want in a device whose job is to route and encrypt rather than broadcast. GL.iNet rates its WireGuard throughput at up to 355 Mbps, and because it runs OpenWrt under a friendly panel, WireGuard server, OpenVPN, Tailscale, DDNS, and AdGuard Home are all built in.
Rated power draw is under 2.6 watts, so leaving it running as a permanent VPN endpoint costs almost nothing. If you expect to saturate a link faster than 355 Mbps of encrypted throughput, the Brume 3 (GL-MT5000) steps up to roughly 1100 Mbps with three 2.5G ports; for most home and small-office tunnels the Brume 2 is the right size.
What you need before starting
- A GL.iNet Brume 2 on your home network (roughly $80 to $90; check the live price). The aluminum GL-MT2500A and plastic GL-MT2500 are the same board.
- A public IP on your home connection, or a DDNS hostname if your ISP address changes. The Brume 2 provides free DDNS.
- The ability to forward UDP port 51820 to the Brume 2, needed only if it sits behind another router rather than being your edge device.
- The official WireGuard app on each client (Windows, macOS, Linux, iOS, Android), or the
wireguard-toolspackage on a Linux box.
If you are new to WireGuard itself, the WireGuard fundamentals guide covers keys and peers, and the install WireGuard on Ubuntu walkthrough is the plain-Linux counterpart to the panel workflow here.
How the WireGuard gateway fits together
The Brume 2 is the WireGuard server, always listening on a UDP port with a fixed private key. Every phone, laptop, or remote site is a peer that dials in. The one setting that changes everything is AllowedIPs on the client. Set it to your home subnet and the tunnel is a private door into the LAN while normal browsing still uses the local internet. Set it to 0.0.0.0/0 and the client sends all traffic through the Brume 2, which is what you want on hostile Wi-Fi. The same server handles both; the choice lives entirely in each client profile.
Create the WireGuard server in the panel
Open the admin panel at http://192.168.8.1 and sign in. Go to VPN, then WireGuard Server. On first use, click Generate Configuration. The panel proposes a tunnel subnet of 10.0.0.1/24; keep the /24 intact, and only change the network if it collides with your existing LAN. Leave the listen port at the default unless you have a reason to move it, then click Start in the top right to bring the server up.
Since firmware 4.8 you choose what the clients will connect to under the server address setting: your public IP, a DDNS domain, or the current WAN IP. Pick the DDNS domain if your ISP rotates your address. Enable it under Applications, then Dynamic DNS first, and the Brume 2 keeps the hostname pointed at your changing IP so client profiles never go stale.
One reachability rule catches people. If the Brume 2 is your main router at the edge, no port forwarding is needed. If it sits behind an ISP router, forward UDP 51820 from that router to the Brume 2, or the handshake never arrives.
Add a client profile and export it
Switch to the Profiles tab and click Add. Give the profile a name that tells you which device it belongs to, such as laptop or phone, and click Apply. Each profile is a separate peer with its own key pair, so revoking one device later never touches the others.
The panel then offers the profile three ways: a QR code to scan straight into the phone app, a plain-text block you can read, and a downloadable .conf file for the desktop app. Scan the QR on a phone, or import the .conf on a laptop, and the client is configured in seconds. For a second GL.iNet box acting as a remote site, the same profile imports under its own WireGuard client page.
The configuration it builds, on the command line
The panel hides a standard WireGuard configuration. Seeing it makes the moving parts obvious, and it is the exact file you would write by hand on any Linux gateway or edit through the Brume 2’s advanced LuCI page. On a Linux server the server config lives in one file:
sudo vim /etc/wireguard/wg0.confThe server holds its own private key, the listen port, and one [Peer] block per client. The PostUp line is what turns a plain VPN endpoint into a gateway: it enables forwarding and masquerades tunnel traffic out the WAN interface so clients can reach the LAN and the internet beyond it. Replace eth0 with your gateway’s real WAN interface name, which ip route show default reveals (modern distros often use names like ens3 or enp1s0). Get this wrong and the tunnel connects but no traffic is masqueraded.
[Interface]
Address = 10.0.0.1/24
ListenPort = 51820
PrivateKey = <server-private-key>
PostUp = iptables -A FORWARD -i wg0 -j ACCEPT; iptables -A FORWARD -o wg0 -j ACCEPT; iptables -t nat -A POSTROUTING -o eth0 -j MASQUERADE
PostDown = iptables -D FORWARD -i wg0 -j ACCEPT; iptables -D FORWARD -o wg0 -j ACCEPT; iptables -t nat -D POSTROUTING -o eth0 -j MASQUERADE

[Peer]
# laptop
PublicKey = <client-public-key>
AllowedIPs = 10.0.0.2/32
Note the asymmetry in AllowedIPs. On the server, a peer’s AllowedIPs is the address that peer is allowed to use inside the tunnel, so each client gets a single /32. Forwarding also needs to be on at the kernel level, which the Brume 2 sets for you and a Linux box needs explicitly:
echo 'net.ipv4.ip_forward=1' | sudo tee /etc/sysctl.d/99-wireguard.conf
sudo sysctl --system
Bring the interface up and WireGuard is listening:
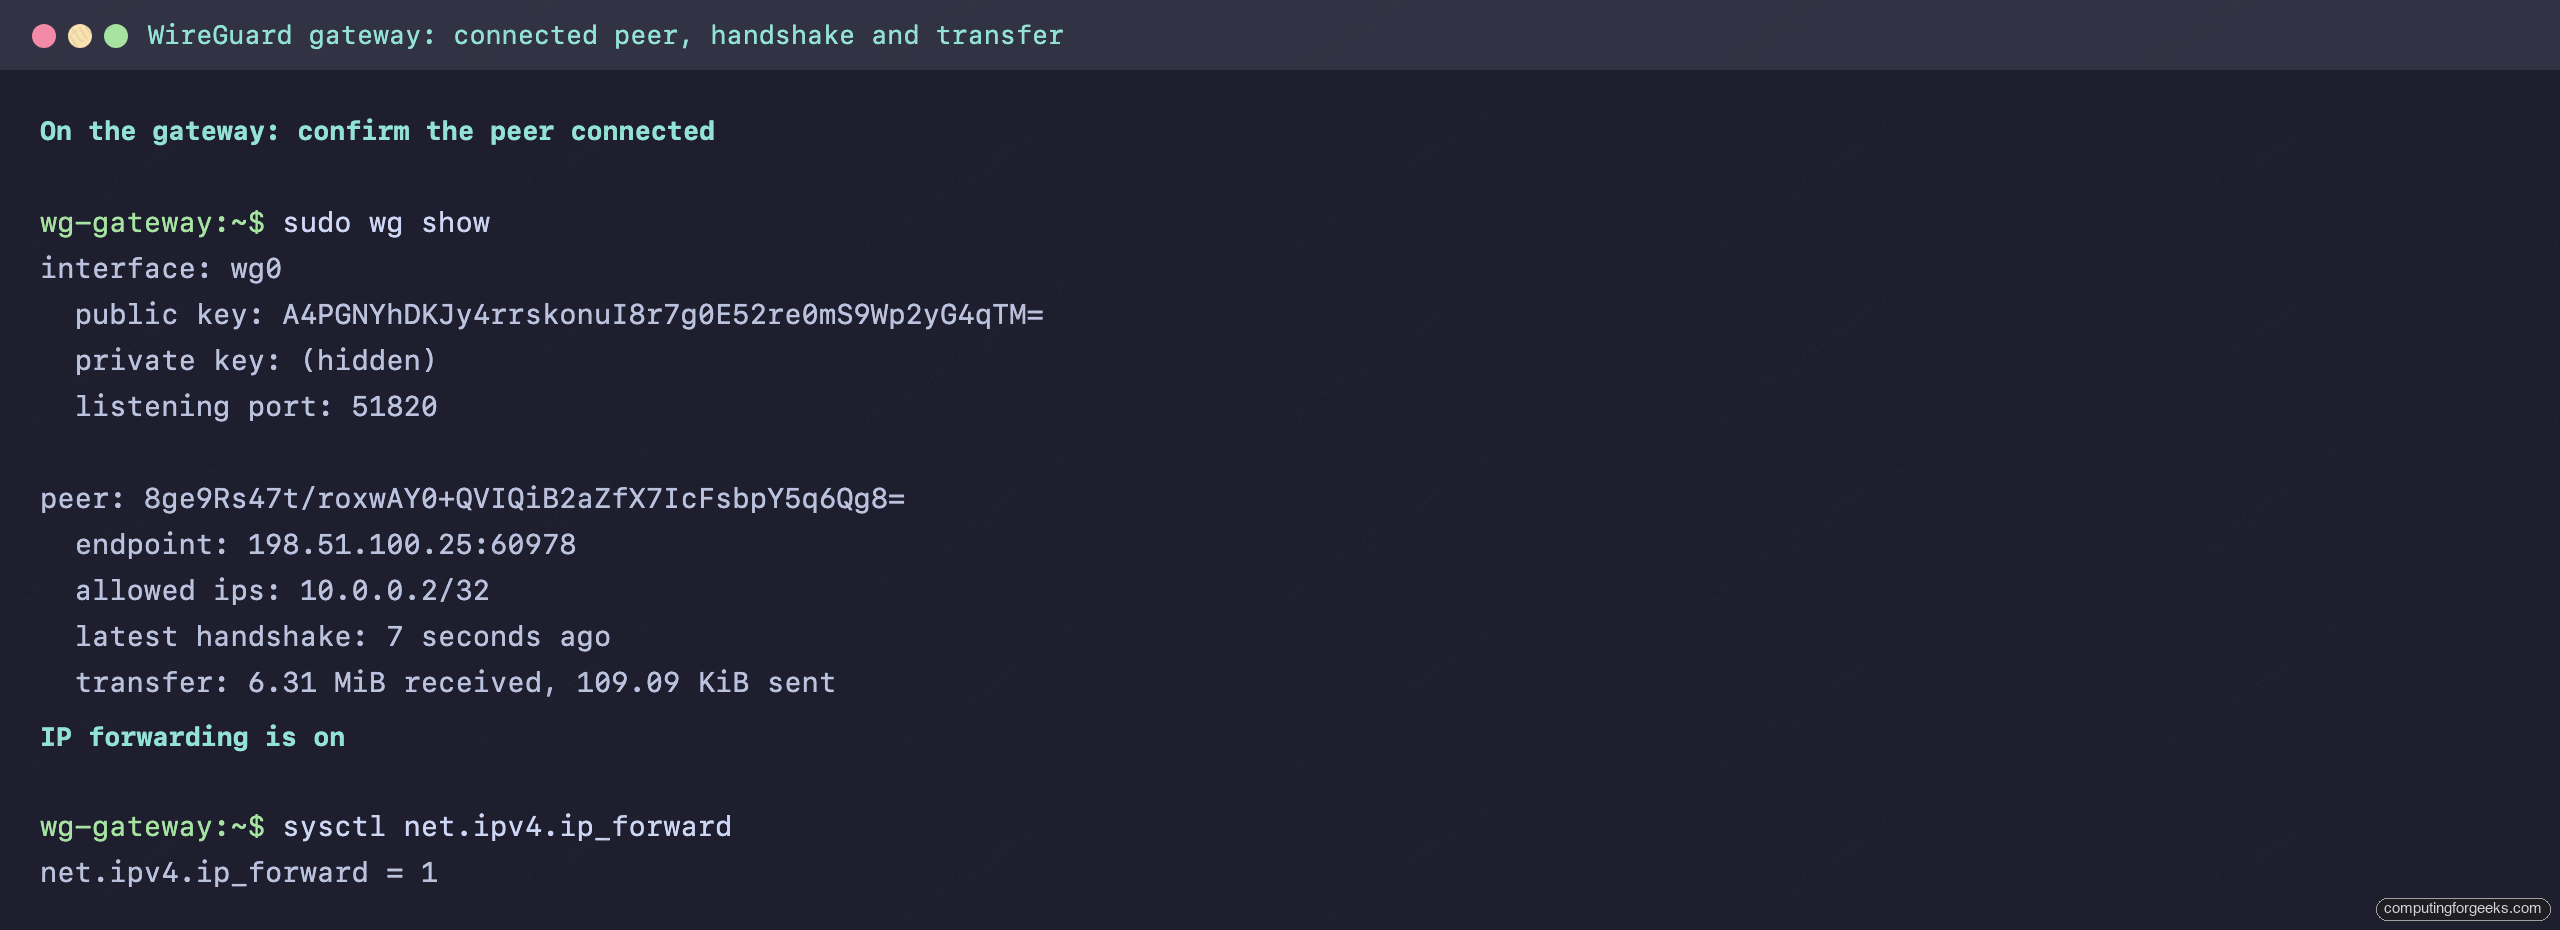
sudo wg-quick up wg0Once a client connects, wg show on the gateway reports the peer, its real source address, the last handshake time, and a live byte counter. That handshake and the growing transfer figure are the proof the tunnel is up, not just configured.
Configure the client side
On a phone or desktop you import the profile the panel exported and you are done. On a Linux client you write the mirror image of the server file. Create it:
sudo vim /etc/wireguard/wg0.confThe client points its single [Peer] at the Brume 2’s public address or DDNS name. Here AllowedIPs = 0.0.0.0/0 selects the full-tunnel mode, sending everything through home. The DNS = 10.0.0.1 line hands name resolution to the gateway, which matters in full-tunnel mode so lookups do not leak to a resolver the client can no longer reach, and it is what lets AdGuard Home filter the client later. PersistentKeepalive keeps the session alive through the NAT of whatever network the client is on.
[Interface]
Address = 10.0.0.2/24
PrivateKey = <client-private-key>
DNS = 10.0.0.1

[Peer]
PublicKey = <server-public-key>
Endpoint = your-ddns-domain.glddns.com:51820
AllowedIPs = 0.0.0.0/0
PersistentKeepalive = 25
Bring it up the same way, sudo wg-quick up wg0, and the client is on the tunnel.
Verify the tunnel carries traffic
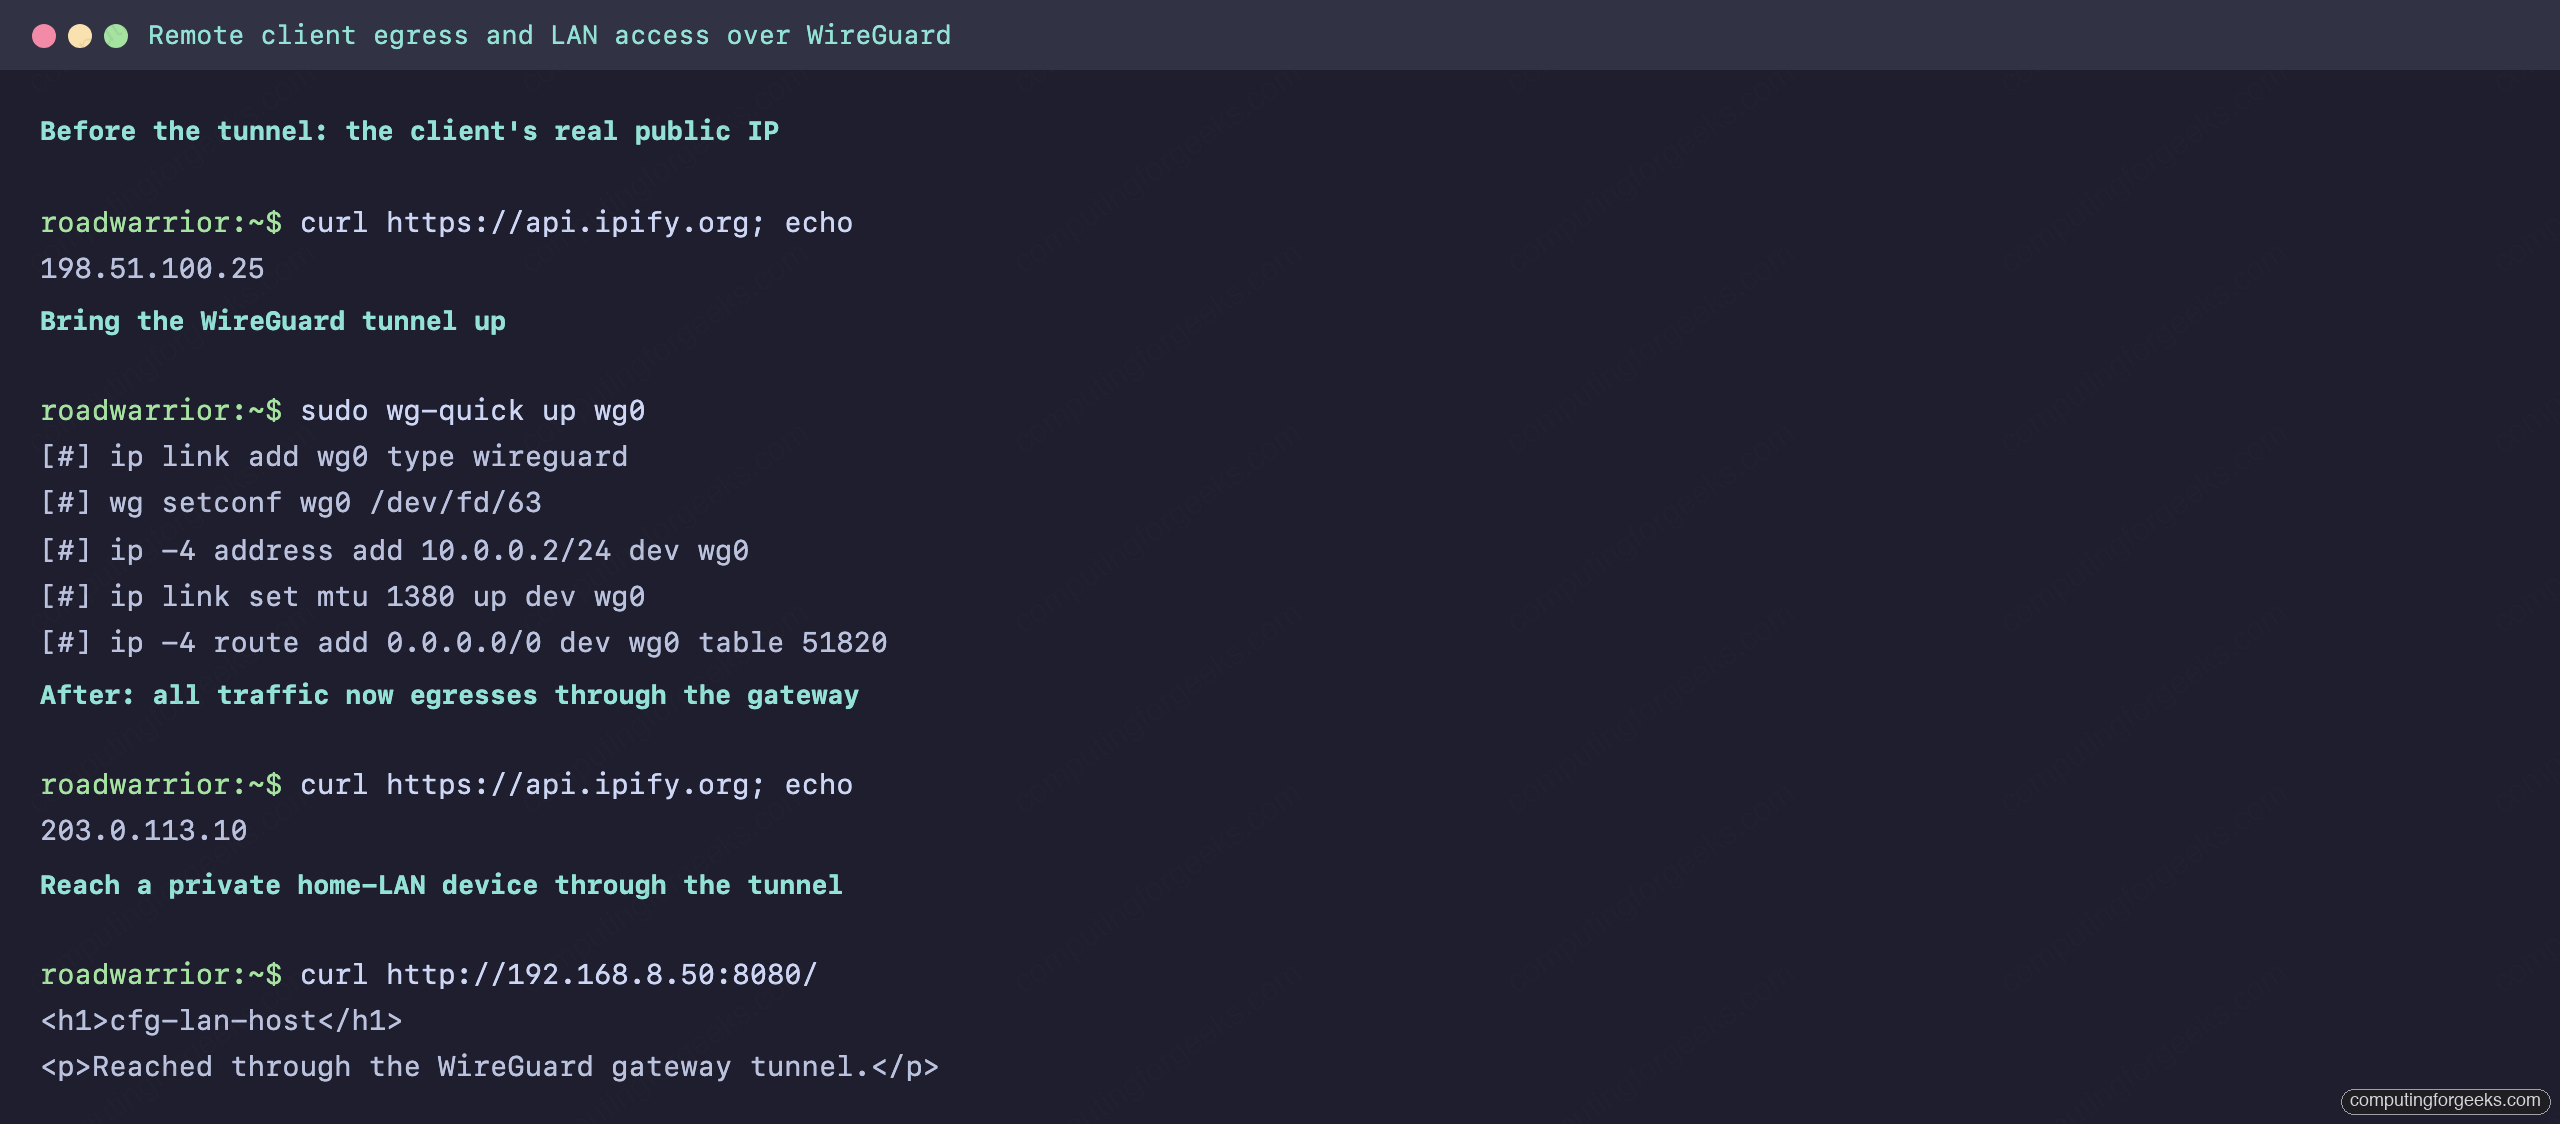
A configured tunnel and a working tunnel are different claims. Two checks settle it. First, confirm the client is now leaving the internet through the gateway by asking a public service what your address is, before and after connecting. In full-tunnel mode the answer flips from the client’s own IP to the gateway’s.
curl https://api.ipify.org; echoSecond, prove you can reach a device that lives only on the home LAN, which is the whole point of the gateway. Point a request at a private address behind the Brume 2 and it answers through the tunnel:
curl http://192.168.8.50:8080/In the capture below, the client’s public address changes from its own to the gateway’s after the tunnel comes up, and a private LAN host answers a request that could only have arrived over the tunnel. That is the round trip working end to end.
Full tunnel or split tunnel
The routing decision is one line in each client profile. Full tunnel sends everything home, which hides your traffic on public Wi-Fi and gives you your home country’s exit IP, at the cost of adding your home upload speed and latency to every request. Split tunnel routes only your home network through the VPN and leaves the rest on the local connection, which is what you want for day-to-day access to a NAS or Proxmox without slowing down the client’s own browsing.
For split tunnel, set the client’s AllowedIPs to the tunnel subnet plus your home LAN only:
AllowedIPs = 10.0.0.0/24, 192.168.8.0/24Throughput is bounded by the slower of the WireGuard crypto ceiling and the network path. On a same-region link the Brume 2’s 355 Mbps rating is realistic; over a long-distance connection the path dominates. A tunnel between a client in Australia and a gateway in the United States measured about 95 Mbps at 184 ms round trip in testing, limited by distance rather than the cipher. Your home upload speed is usually the real cap for a remote client.
iperf3 -c 10.0.0.1 -t 8The summary line reports the sustained rate through the encrypted tunnel:
[  5]   0.00-8.00   sec  91.0 MBytes  95.4 Mbits/sec    0             sender
[  5]   0.00-8.19   sec  91.0 MBytes  93.3 Mbits/sec                  receiver
Block ads for every tunnel client with AdGuard Home
Because clients can use the Brume 2 as their DNS resolver, one toggle cleans up ads and trackers for every device on the tunnel with no per-device software. Under Applications, open AdGuard Home, enable it, and click Apply. It blocks at the DNS layer, so a phone routing through the gateway inherits the filtering automatically. Upstream resolvers and block lists are adjustable inside the AdGuard Home interface under its DNS settings. This pairs naturally with full-tunnel mode, where all of a client’s lookups already pass through the gateway.
When the tunnel will not come up
Most first-connection failures fall into three buckets, and wg show tells you which one. If the peer never shows a latest handshake, the client cannot reach the server: the endpoint address or DDNS name is wrong, UDP 51820 is not forwarded to a Brume 2 that sits behind another router, or an upstream firewall is dropping the port. If you see a handshake but no traffic flows, forwarding or the masquerade rule is missing on the gateway, which on the Brume 2 means the WireGuard server was toggled off.
If you can ping the gateway’s tunnel address but not a LAN host, the client’s AllowedIPs does not include your home subnet, so widen it to cover the LAN. And if the handshake works but web pages hang while pings succeed, it is an MTU problem: WireGuard adds overhead, so lowering the client interface MTU toward 1380 usually clears it. For a hosted alternative that sidesteps port forwarding entirely, the GL.iNet Tailscale exit node setup reaches the same LAN over a coordinated mesh, and the travel router comparison covers where each GL.iNet model fits. Once the handshake lands and both checks pass, the gateway is doing its job.