Kali Linux is where a lot of networking and security work already happens, so running your GNS3 lab on the same box means one less machine to juggle. The catch nobody mentions: the old apt-repo instructions that used to work no longer do. Kali’s own repositories carry none of the GNS3 packages, the GNS3-specific apt repo that older guides reference is dead, and the Ubuntu PPA’s Python packages will not run on Kali’s current Python. This guide takes the path that actually works today.
The short version: install the emulator backends (Dynamips, ubridge, VPCS) from the GNS3 Ubuntu PPA, then install the GNS3 server and GUI with pipx so they get their own clean environment. Every command below was run on a fully upgraded Kali rolling machine in July 2026, ending on the current GNS3 2.2 line with the Qt GUI, a working topology, and a VPCS ping across a switch.
Tested on Kali Linux rolling (2026.3) in July 2026 with GNS3 2.2.59.
Why the old apt method stopped working
Search for GNS3 on Kali and check the current repositories, and you get nothing:
apt-cache policy gns3-server gns3-gui dynamips ubridgeEvery one of those comes back with no installation candidate on stock Kali. GNS3 has never shipped in Kali’s repos, and the standalone deb.gns3.com apt source that older tutorials add no longer serves current packages. The Ubuntu PPA does build these, but its gns3-server and gns3-gui packages bundle a Python virtual environment pinned to a specific Python minor version, and Kali rolling has already moved past it. Installing them that way gives you a gns3server that crashes on launch:
ModuleNotFoundError: No module named 'gns3server'The fix is to split the install. The compiled C backends (Dynamips, ubridge, VPCS) come from the PPA and run fine as native binaries. The two Python components go through pipx, which builds them a virtual environment against Kali’s own Python, so they stay working across rolling updates.
Prerequisites
- A Kali Linux rolling install, fully upgraded (
sudo apt full-upgrade) - A user with
sudoaccess - A CPU with VT-x or AMD-V for QEMU-based appliances (labs built only from Dynamips routers and VPCS do not need it)
Size the machine from the images you plan to run, not from GNS3 itself. The server idles under 100 MB of RAM and VPCS endpoints are almost free, but QEMU appliances are the real cost: a single IOSv wants 512 MB, IOSvL2 768 MB, and heavier vendor VMs 2 to 4 GB each. A CCNA-scale lab of Dynamips routers and VPCS hosts runs comfortably in 4 GB; plan for 8 GB or more once QEMU appliances enter the picture.
Step 1: Update Kali and refresh the signing key
Start from a current system. On a rolling release that has sat unused for a while, the archive signing key may have rotated, which shows up as a NO_PUBKEY error on the first update. Refresh the keyring, then upgrade:
sudo wget -q https://archive.kali.org/archive-keyring.gpg -O /usr/share/keyrings/kali-archive-keyring.gpg
sudo apt update
sudo apt full-upgrade -y
If a running kernel was replaced, reboot before continuing so the lab does not later fail on a mismatched kernel module. For a broader look at keeping Kali’s sources correct, see the notes on the official Kali repositories.
Step 2: Add the GNS3 PPA for the emulator backends
Kali is Debian-based, so it cannot use add-apt-repository against a Launchpad PPA directly. Add the PPA source by hand and import its two signing keys into a dedicated keyring. Install the tools first:
sudo apt install -y gpg curlFetch the PPA signing keys from the Ubuntu keyserver and export them where apt expects a keyring:
sudo gpg --no-default-keyring --keyring /tmp/gns3.gpg \
  --keyserver keyserver.ubuntu.com \
  --recv-keys 86C22C2EC6A24D7F 9A2FD067A2E3EF7B
sudo gpg --no-default-keyring --keyring /tmp/gns3.gpg --export \
  | sudo tee /usr/share/keyrings/gns3-ppa.gpg > /dev/null
Create the apt source. The PPA has no Kali or Debian suite, so point it at the Ubuntu noble (24.04 LTS) suite, whose compiled binaries run on Kali without issue:
sudo vim /etc/apt/sources.list.d/gns3-ppa.sourcesAdd the following deb822-style stanza:
Types: deb
URIs: https://ppa.launchpadcontent.net/gns3/ppa/ubuntu/
Suites: noble
Components: main
Signed-By: /usr/share/keyrings/gns3-ppa.gpg
Refresh and confirm apt now sees the packages:
sudo apt update
apt-cache policy dynamips
The candidate should come from the PPA:
dynamips:
  Installed: (none)
  Candidate: 0.2.23-1~noble1
  Version table:
     0.2.23-1~noble1 500
        500 https://ppa.launchpadcontent.net/gns3/ppa/ubuntu noble/main amd64 Packages
With the PPA wired in and its keys trusted, the backends install like any other package.
Step 3: Install the emulator backends and QEMU
Pull the three compiled backends from the PPA. Dynamips emulates Cisco IOS routers, ubridge bridges virtual interfaces to the host, and VPCS provides lightweight test endpoints:
sudo apt install -y dynamips ubridge vpcsQEMU, for running full VM appliances, comes from Kali’s own repository and is current there:
sudo apt install -y qemu-system-x86 qemu-utils libvirt-daemon-systemConfirm the ubridge binary kept its file capabilities. The package sets them during install, and without them links between running nodes pass no traffic:
getcap /usr/bin/ubridgeThe expected output:
/usr/bin/ubridge cap_net_admin,cap_net_raw=eipThe backends are in place. The two Python components are what the old apt method got wrong, so they go in through pipx instead.
Step 4: Install the GNS3 server and GUI with pipx
This is the step that keeps the install alive across Kali updates. pipx installs each Python application into its own virtual environment built against the system Python, sidestepping the version-pin problem entirely. Install it:
sudo apt install -y pipxInstall the server, pinning it to the same release line as the backends you just added:
pipx install "gns3-server==2.2.59" #https://github.com/GNS3/gns3-server/releasesThen the GUI. The 2.2 client needs the PyQt6 bindings, so inject them into the same environment right after install:
pipx install "gns3-gui==2.2.59" #https://github.com/GNS3/gns3-gui/releases
pipx inject gns3-gui PyQt6
pipx puts both launchers in ~/.local/bin, which needs to be on your PATH. Run its helper, then open a new terminal so the change takes effect (Kali defaults to zsh, so a stale session will not see it):
pipx ensurepath
exec $SHELL
Confirm both components report the same version:
gns3server --version
gns3 --version
Both should print the release you pinned. A full verification, from the pipx install through the backend versions, looks like this:
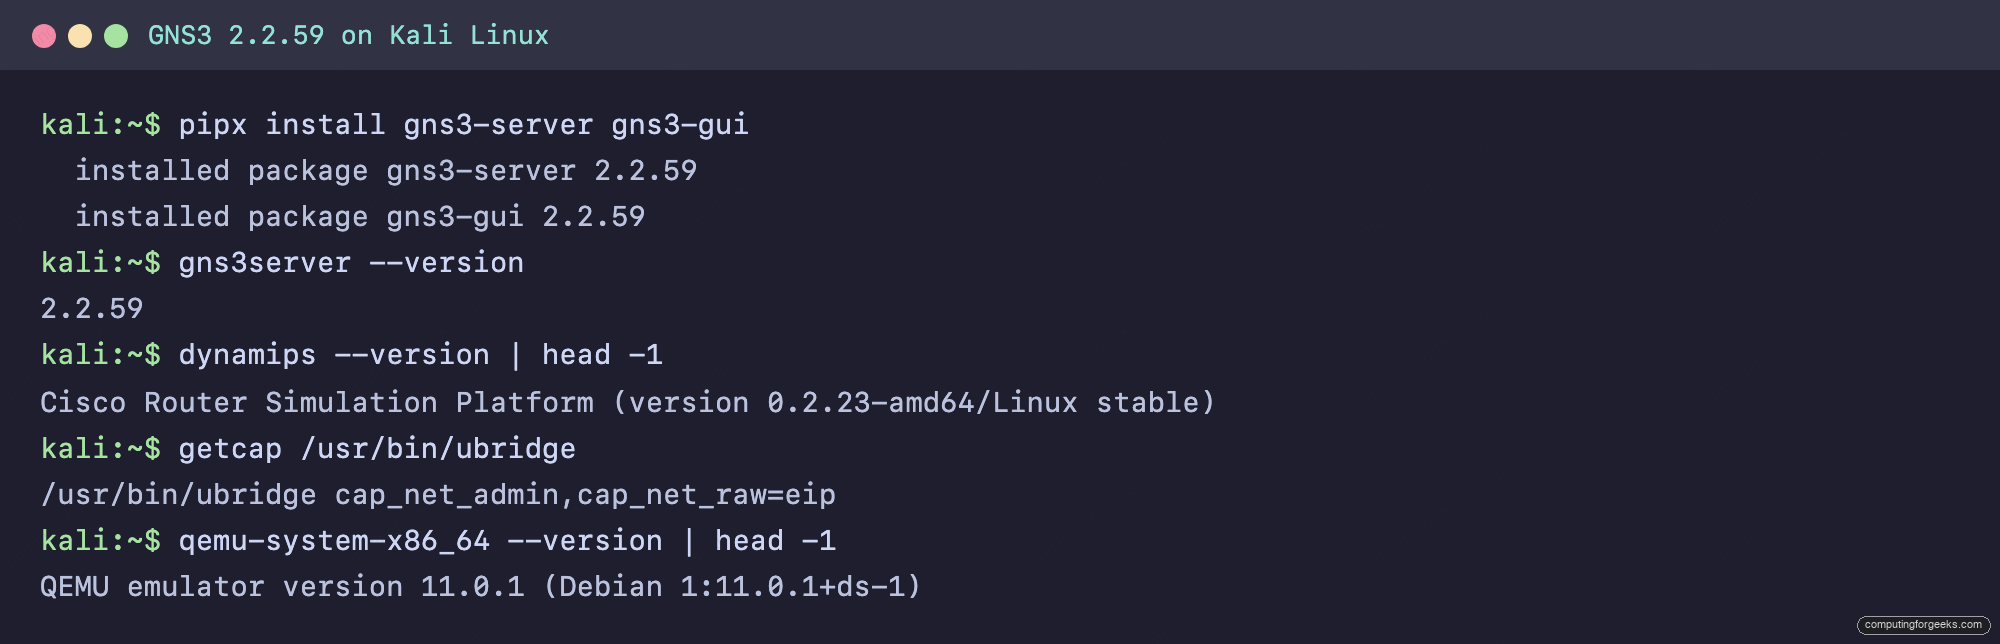
The software is installed. One permission step stands between this and a running lab.
Step 5: Add your user to the right groups
GNS3 runs emulators as the user who launches it, and that user needs group access to the KVM device, libvirt, and ubridge. Add all three at once:
sudo usermod -aG kvm,libvirt,ubridge $USERLog out and back in so the membership applies, then verify:
id | tr ',' '\n' | grep -E 'kvm|libvirt|ubridge'All three names should appear. Without kvm, QEMU silently falls back to software emulation and every appliance crawls. Without ubridge, traffic between nodes fails even though the links look connected.
Step 6: Launch GNS3 and finish the setup wizard
Start the GUI from the application menu or a terminal:
gns3On first launch the Setup Wizard asks where to run appliances. On Kali you are installing everything locally, so choose Run appliances on my local computer. The wizard notes that Dynamips and QEMU must be installed already, which you handled in Step 3.
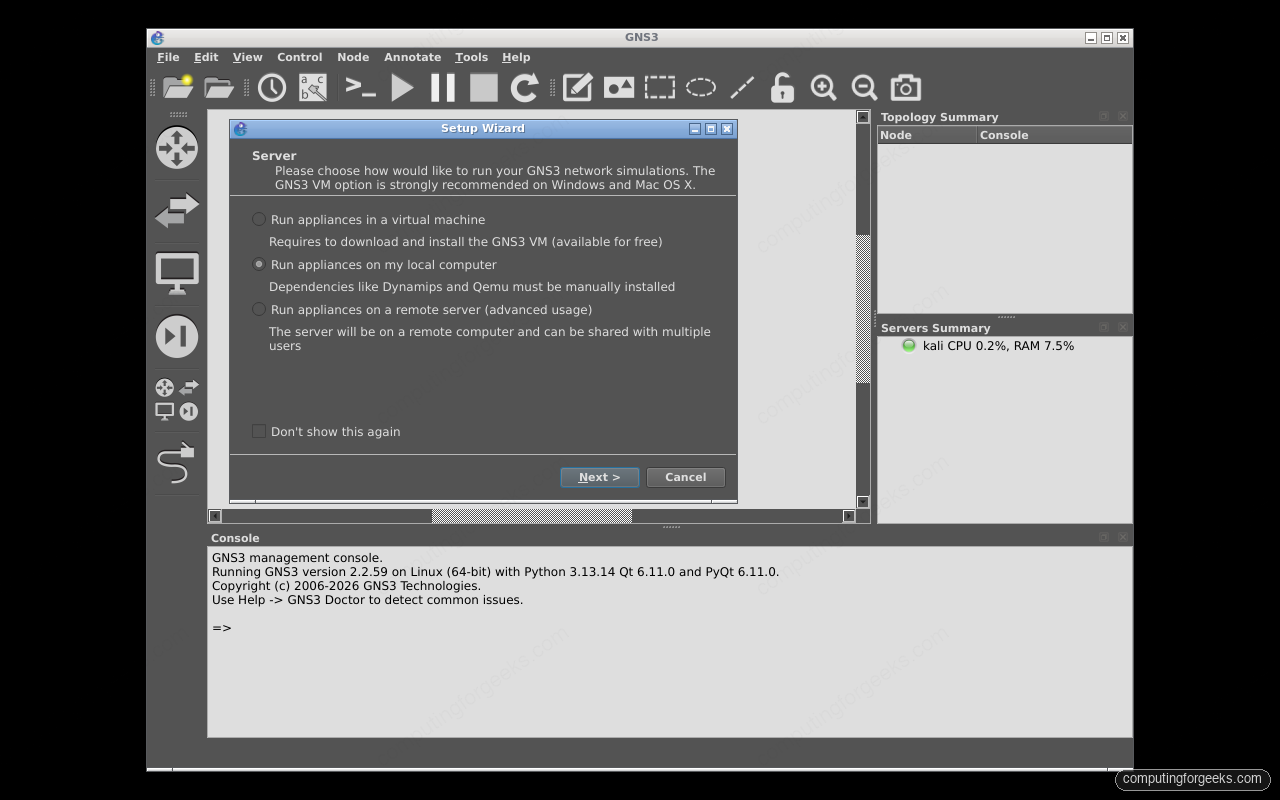
Click through to the summary, which shows the local server pointing at the pipx-installed gns3server on localhost:3080, then Finish. The GUI starts its own local server automatically, and the Servers Summary panel turns green when the connection is live.
Step 7: Build a first topology
You do not need Cisco images to prove the install works. GNS3 ships built-in nodes that cover the basics. Create a blank project, then from the node palette (the toolbar on the left) drag in an Ethernet switch and two VPCS nodes. Use the link tool to cable each PC to a switch port, and press the green start button. Every node indicator turns green:
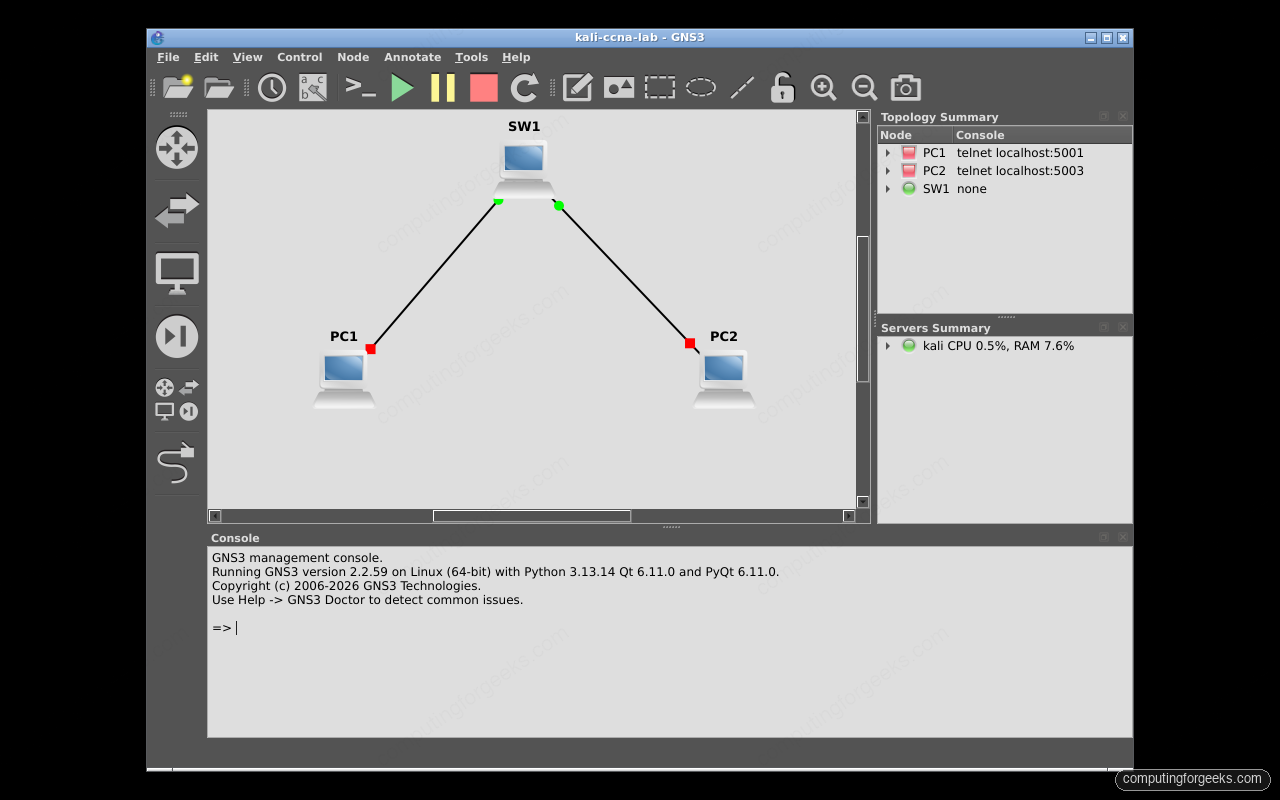
Double-click each PC to open its console. Give both an address on the same subnet and ping across the switch:
ip 192.168.1.11/24Do the same on the second PC with 192.168.1.12/24, then from the first:
ping 192.168.1.12Sub-millisecond replies confirm ubridge and the console plumbing all work:
84 bytes from 192.168.1.12 icmp_seq=1 ttl=64 time=0.214 ms
84 bytes from 192.168.1.12 icmp_seq=2 ttl=64 time=0.364 ms
From here, real router images slot into the same canvas through Edit > Preferences, where you add an IOS or QEMU appliance template and drop it onto the topology.
Sourcing Cisco IOS images
GNS3 emulates Cisco devices but does not ship their software. Cisco does not distribute IOS, IOSv, or IOSvL2 as free downloads. The usual route is a Cisco Modeling Labs personal subscription, which includes the IOSv and IOSvL2 images. Cisco licenses those for use inside CML itself, so running them in GNS3 is a common but unofficial practice. For study without any licensing question, Cisco’s own Packet Tracer is free and covers most CCNA topics, though its command output differs slightly from real IOS. This guide’s topology used only the built-in VPCS and switch nodes, which need no images at all.
Troubleshooting
gns3server exits with ModuleNotFoundError
You installed gns3-server from the PPA rather than through pipx. The PPA package bundles a Python environment pinned to a version Kali rolling has moved past, so its launcher cannot find its own modules. Remove the PPA Python packages and use pipx as in Step 4:
sudo apt remove -y gns3-server gns3-gui
pipx install "gns3-server==2.2.59"
Keep dynamips, ubridge, and vpcs from the PPA; only the two Python components move to pipx. A related symptom shows up on the GUI side.
GNS3 GUI reports Qt or PyQt is not installed correctly
The 2.2 GUI needs PyQt6, and a fresh pipx environment does not include it. Inject it into the GUI’s environment:
pipx inject gns3-gui PyQt6Relaunch gns3 and the GUI opens normally.
NO_PUBKEY error on apt update
The Kali archive key rotated while your install sat idle. Refresh it, which is the first command in Step 1:
sudo wget -q https://archive.kali.org/archive-keyring.gpg -O /usr/share/keyrings/kali-archive-keyring.gpg
sudo apt update
The index refreshes cleanly once the current key is in place.
Devices fail to start with a ubridge permission error
Group membership alone is not enough; the ubridge binary needs file capabilities to open raw sockets. Check them with getcap /usr/bin/ubridge. If the output is empty, set them and restart the node:
sudo setcap cap_net_admin,cap_net_raw=ep /usr/bin/ubridgeRe-run getcap to confirm the line is back, then start the node again.
Where this lab goes next
With GNS3 running, the box is ready for real practice. If you are working toward Cisco certification, the CCNA labs collection has 19 topology exercises with device configs that paste straight into this setup, and the 90-day CCNA study plan schedules them alongside the reading. Running Kali on a different desktop distro, or want the simpler PPA-native path? The GNS3 on Ubuntu guide covers that, and the Debian install is the closest sibling to this one.