

The main objective of UniFi is to simplify IT operations. It does this with a single stack that ties together networking, communications, security, and access control behind one interface. It allows one to manage deployments from both local and cloud environments.
The UniFi OS is the operating system that hosts the UniFi application suite. There are several products available in the UniFi application suite. These include:
- UniFi Network: designed for home and enterprise networks with UniFi Switches, Gateways, and Wireless Access Points that provide high performance.
- UniFi Talk: this is a fully-fledged subscription-based VoIP phone solution preferred by small to medium-sized organizations.
- UniFi Protect: this is a plug-and-play camera security solution used for surveillance with custom detection logic.
- UniFi IDentity (UID): This is a simple administration tool that allows the managing of employee roles, network permissions, door access, workflows, report hierarchies, support ticket processing e.t.c
- UniFi Access: This is an access control system that drives electric bolts and strikes, magnetic locks, and 12V (1 Amp) sensors. It can be used to manage visitors, schedules, and access policies
The UniFi Controller is a wireless network management software solution developed by Ubiquiti Networks™. It allows one to manage several wireless networks from its web UI. This tool is ideal for high-density deployments that required low latency and high uptime.
The UniFi Controller can be installed on Linux, Mac OS X, or Windows 10 or 11 by downloading the UniFi Controller software from the Ubiquiti Networks website. But this process requires one to install several dependencies such as Java Runtime Environment e.t.c
In this guide, we will learn how to Run UniFi Controller in Docker Container. This method is preferred since the containers come with all the dependencies bundled and make it easy to run the UniFi Controller.
This guide has been updated to the supported unifi-network-application image. LinuxServer.io retired the older unifi-controller image in January 2024, so containers still based on it run an outdated controller and receive no updates. The supported image no longer bundles a database, which means the setup is now two containers: the Network Application itself and a MongoDB instance it connects to.
Re-tested July 2026 on UniFi Network Application 10.4 with MongoDB 8.0.
Prefer a native package over a container? The controller also installs directly on Ubuntu and Debian.
You will need UniFi network devices to adopt. The UniFi U6 Lite is a popular WiFi 6 access point for home and small office deployments, and the UniFi Switch Lite 8 PoE provides managed switching with built-in PoE to power the APs. If you prefer an all-in-one appliance over running the controller in Docker, the UniFi Dream Router 7 has the controller, router, and switch built in.
Install Docker on Linux
Before we begin, you need to have the Docker Engine installed on your system. The guide below can be used to achieve this:
Once installed, ensure that the Docker service is up and running;
sudo systemctl start docker && sudo systemctl enable dockerAdd your system user to the Docker group;
sudo usermod -aG docker $USER
newgrp docker
Configure Persistent Volumes
Persistent volumes keep the data across container restarts. The stack needs three things on the host: a config directory for the application, a data directory for MongoDB, and the database init script:
sudo mkdir -p /unifi_data/config /unifi_data/dbSet the permissions:
sudo chmod 775 -R /unifi_dataMongoDB creates the database user for the controller from an init script the first time it starts. Create the script:
sudo vim /unifi_data/init-mongo.shPaste in the following. It reads the MONGO_ variables we pass to the database container and creates the user the controller authenticates with:
#!/bin/bash

if which mongosh > /dev/null 2>&1; then
  mongo_init_bin='mongosh'
else
  mongo_init_bin='mongo'
fi
"${mongo_init_bin}" <<EOF
use ${MONGO_AUTHSOURCE}
db.auth("${MONGO_INITDB_ROOT_USERNAME}", "${MONGO_INITDB_ROOT_PASSWORD}")
db.createUser({
  user: "${MONGO_USER}",
  pwd: "${MONGO_PASS}",
  roles: [
    "clusterMonitor",
    { db: "${MONGO_DBNAME}", role: "dbOwner" },
    { db: "${MONGO_DBNAME}_stat", role: "dbOwner" },
    { db: "${MONGO_DBNAME}_audit", role: "dbOwner" },
    { db: "${MONGO_DBNAME}_restore", role: "dbOwner" }
  ]
})
EOF
Make it executable:
sudo chmod +x /unifi_data/init-mongo.shThe script must exist as a regular file before the first start. If the path is missing when the container starts, Docker creates an empty directory there instead, the init script never runs, and the controller can never authenticate to the database. On RHEL-based systems, keep SELinux enforcing and append :Z to each volume mapping (for example -v /unifi_data/config:/config:Z) so Docker relabels the paths for container access.
Run UniFi Controller in Docker Container
Once the Docker engine has been installed, you can easily run the UniFi Controller from the docker command line.
The command has several parameters that include:
- -p for several ports. These ports are used for different services:
- 8443 – Unifi web admin port
- 3478/udp – Unifi STUN port
- 10001/udp – Required for AP discovery
- 8843 – Unifi guest portal HTTPS redirect port
- 8880 – Unifi guest portal HTTP redirect port
- 8080 – Required for device communication
- 1900/udp – Required to Make controller discoverable on L2 network option
- 6789 – For mobile throughput test
- 5514/udp – Remote Syslog port
- -e for environment variables such as:
- PUID and PGID that define the user and group permissions to avoid errors that arise between the host OS and the container due to persistent volumes/paths
- MEM_LIMIT and MEM_STARTUP is used to configure the Java memory you can set the default using the value
default
- -v defines the volume to store the container data.
The supported image needs its MongoDB companion on the same Docker network, so the command-line path is three commands: create the network, start the database, then start the controller. Create the network first:
docker network create unifi-netStart MongoDB with the init script mounted. The MONGO_ values are read by the init script on first run to create the database user, so change the two passwords to your own. MongoDB 8.0 needs a CPU with AVX support, so on a Proxmox or KVM guest set the VM CPU type to host; the default kvm64 model masks AVX and the database exits on an illegal instruction at startup:
docker run -d --name=unifi-db --net unifi-net
  -e MONGO_INITDB_ROOT_USERNAME=root
  -e MONGO_INITDB_ROOT_PASSWORD=Str0ngRootPass
  -e MONGO_USER=unifi
  -e MONGO_PASS=Str0ngUnifiPass
  -e MONGO_DBNAME=unifi
  -e MONGO_AUTHSOURCE=admin
  -v /unifi_data/db:/data/db
  -v /unifi_data/init-mongo.sh:/docker-entrypoint-initdb.d/init-mongo.sh:ro
  --restart unless-stopped
  mongo:8.0
MongoDB only runs the init script against an empty data directory. If the database ever starts with the wrong settings, stop it, wipe /unifi_data/db, and start again. Now launch the Network Application, pointing it at the database container. Add any optional ports from the list above that you need:
docker run -d --name=unifi-network-application --net unifi-net
  -e PUID=1000
  -e PGID=1000
  -e TZ=Etc/UTC
  -e MONGO_USER=unifi
  -e MONGO_PASS=Str0ngUnifiPass
  -e MONGO_HOST=unifi-db
  -e MONGO_PORT=27017
  -e MONGO_DBNAME=unifi
  -e MONGO_AUTHSOURCE=admin
  -e MEM_LIMIT=1024
  -e MEM_STARTUP=1024
  -p 8443:8443
  -p 3478:3478/udp
  -p 10001:10001/udp
  -p 8080:8080
  -v /unifi_data/config:/config
  --restart unless-stopped
  lscr.io/linuxserver/unifi-network-application:latest
First startup takes a few minutes while the Java application initialises. Poll the status endpoint until it reports up:
curl -sk https://localhost:8443/statusA fully started controller answers with its version:
{"meta":{"rc":"ok","up":true,"server_version":"10.4.57","uuid":"016f58b1-2e5c-4fe4-97ed-9bd3229ac209"},"data":[]}Run UniFi Controller using Docker Compose (Recommended)
You can also run the UniFi Controller using Docker Compose. First, ensure that Docker compose is installed on your system.
The Compose file wires the same two containers together and reads the secrets from an .env file sitting next to it, so create that first. Make a project directory and open the environment file:
mkdir -p ~/unifi && cd ~/unifi
vim .env
Define the two database passwords in it, using your own values:
MONGO_ROOT_PASS=Str0ngRootPass
MONGO_PASS=Str0ngUnifiPass
Then create the Compose file:
vim docker-compose.ymlIt defines the database, with the init script mounted, and the controller:
---
services:
  unifi-db:
    image: mongo:8.0
    container_name: unifi-db
    environment:
      - MONGO_INITDB_ROOT_USERNAME=root
      - MONGO_INITDB_ROOT_PASSWORD=${MONGO_ROOT_PASS}
      - MONGO_USER=unifi
      - MONGO_PASS=${MONGO_PASS}
      - MONGO_DBNAME=unifi
      - MONGO_AUTHSOURCE=admin
    volumes:
      - /unifi_data/db:/data/db
      - /unifi_data/init-mongo.sh:/docker-entrypoint-initdb.d/init-mongo.sh:ro
    restart: unless-stopped

  unifi-network-application:
    image: lscr.io/linuxserver/unifi-network-application:latest
    container_name: unifi-network-application
    depends_on:
      - unifi-db
    environment:
      - PUID=1000
      - PGID=1000
      - TZ=Etc/UTC
      - MONGO_USER=unifi
      - MONGO_PASS=${MONGO_PASS}
      - MONGO_HOST=unifi-db
      - MONGO_PORT=27017
      - MONGO_DBNAME=unifi
      - MONGO_AUTHSOURCE=admin
      - MEM_LIMIT=1024
      - MEM_STARTUP=1024
    volumes:
      - /unifi_data/config:/config
    ports:
      - 8443:8443
      - 3478:3478/udp
      - 10001:10001/udp
      - 8080:8080
    restart: unless-stopped
Save the file and start the stack. Recent Docker ships Compose as a plugin, so the command is docker compose, not the old docker-compose binary:
docker compose up -dBoth containers come up:
 Container unifi-db  Started
 Container unifi-network-application  Started
Whichever way you started it, verify both containers are running:
docker psThe controller and its database both show Up:
NAMES                       IMAGE                                                  STATUS          PORTS
unifi-network-application   lscr.io/linuxserver/unifi-network-application:latest   Up 2 minutes    0.0.0.0:8443->8443/tcp, 0.0.0.0:8080->8080/tcp, 0.0.0.0:3478->3478/udp, 0.0.0.0:10001->10001/udp
unifi-db                    mongo:8.0                                              Up 2 minutes    27017/tcp
Fix the two common startup failures
Both of these came up in testing and in reader reports, and both leave the web UI unreachable.
init-mongo.sh was created as an empty directory
If the init script does not exist as a file when the containers first start, Docker silently creates an empty directory at that path. The database then comes up without the unifi user and the controller can never connect. Check what you have:
ls -la /unifi_data/init-mongo.shIf that lists a directory, tear the stack down, remove the directory together with the half-initialised database, recreate the script as a file per the persistent volumes section, and start again:
docker compose down
sudo rm -rf /unifi_data/init-mongo.sh /unifi_data/db
sudo mkdir -p /unifi_data/db
Error: Cannot run program “bin/mongod”
This appears in /unifi_data/config/logs/server.log when the config volume still holds data from the retired unifi-controller image, which bundled its own database. The new image sees the old configuration and tries to launch a mongod binary it does not ship:
ERROR system - unable to exec
java.io.IOException: Cannot run program "bin/mongod" (in directory "/usr/lib/unifi"): Exec failed, error: 2 (No such file or directory)
Export a backup from the old controller first (Settings > System > Backups) if you need the configuration, then stop the container, clear /unifi_data/config, start fresh, and restore the backup through the setup wizard.
Access UniFi Controller Web UI
Now access the UniFi Controller web UI using the URL https://10.0.1.50:8443
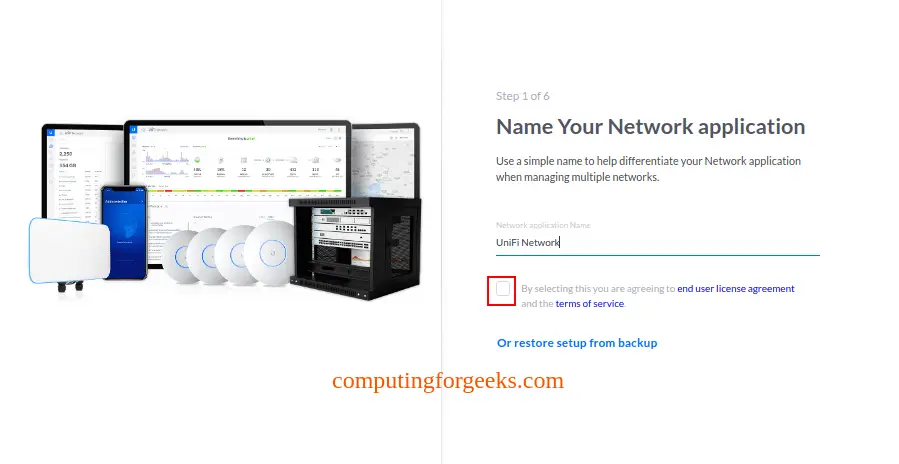
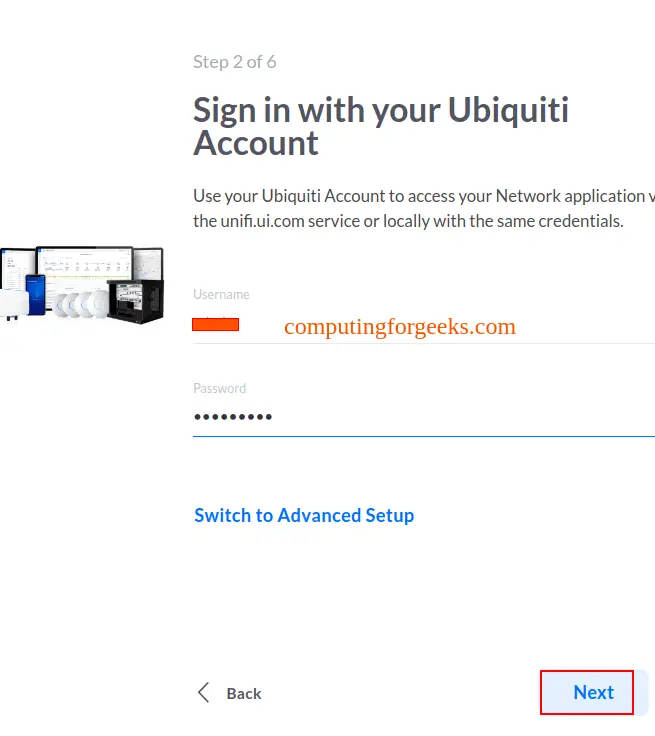
Set the name of the application and proceed to sign in using your Ubiquiti account.
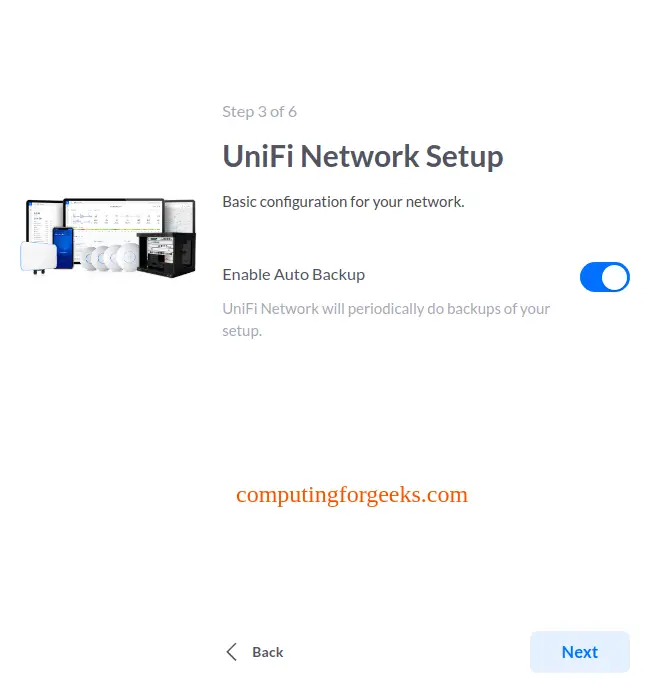
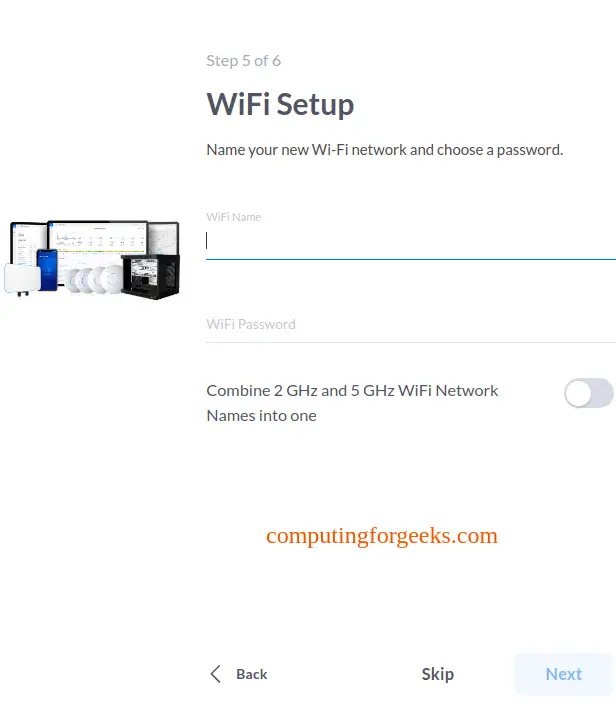
Configure the network.
The devices are not available since the application is running in a docker container. So skip and configure this later.
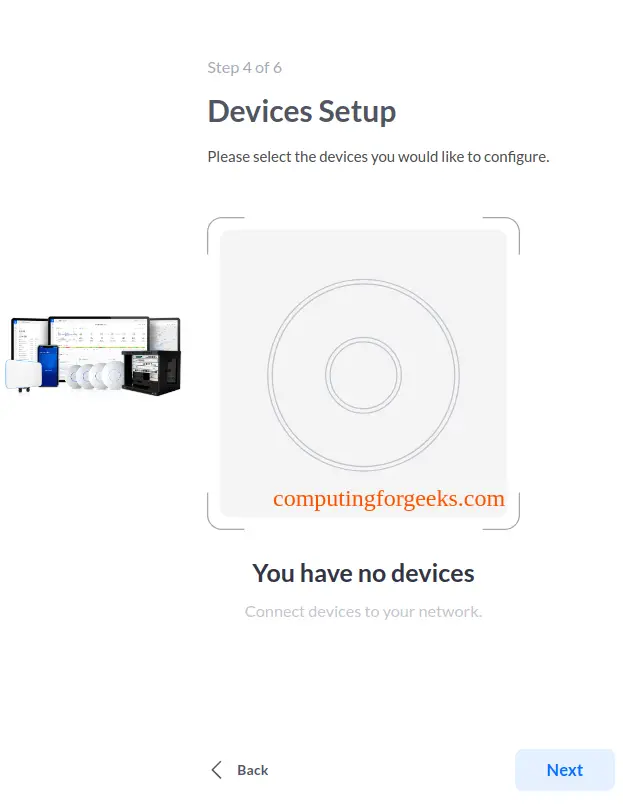
This too can be skipped and set later.
Review the configurations.
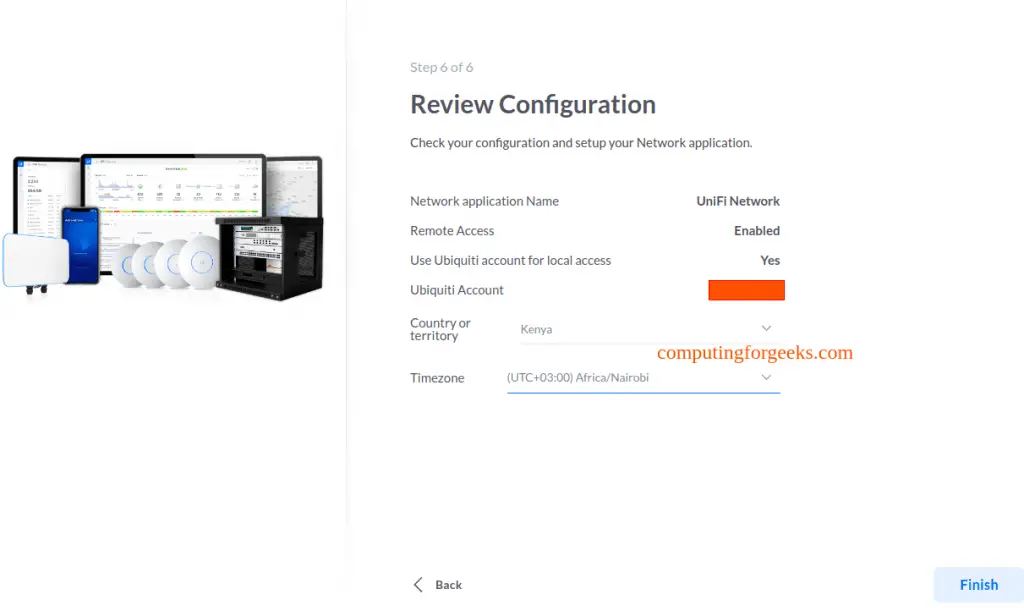
The configurations will be made as shown.

Once complete you will see the below dashboard.
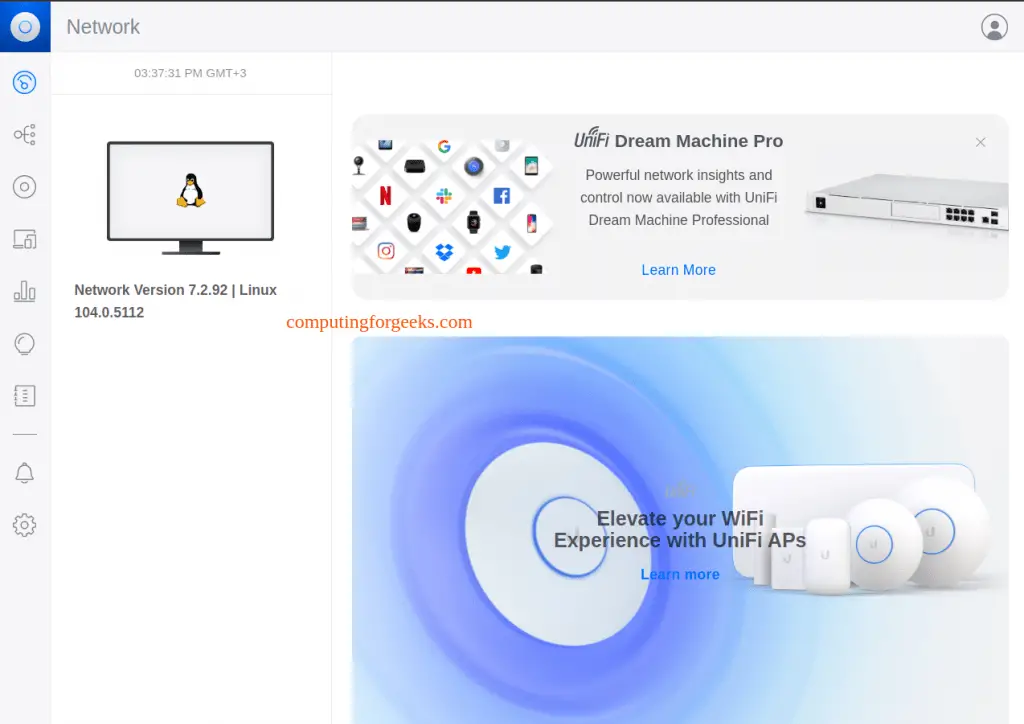
Adopt a UniFi access point into the self-hosted controller
Adoption is where a self-hosted controller behaves differently from a UniFi console. A factory access point looks for a controller on its local layer 2 segment, then keeps reporting in to whatever inform URL it is handed. A controller in a container answers on the Docker host’s LAN address, not on the internal bridge IP a device would otherwise learn, so the fix is to advertise an address the devices can actually reach.
Set that address once. Open Settings, then System, scroll to Advanced, switch Inform Host to manual, and enter the LAN IP or DNS name of the Docker host (here 10.0.1.50):
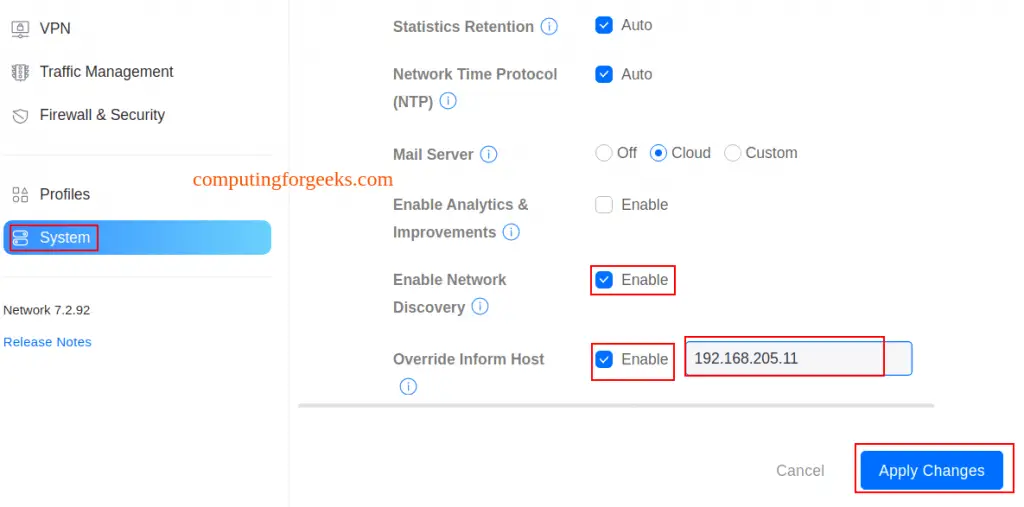
Apply the change. Any access point on the same subnet as the host is now discovered automatically and shows up under Devices ready to adopt.
Adopt manually with set-inform
When a device never appears, point it at the controller by hand over SSH. This is the reliable path when the AP sits on a different subnet from the container:
ssh [email protected]
set-inform http://10.0.1.50:8080/inform
Replace 10.0.1.60 with the device address and 10.0.1.50 with the Docker host. A factory device signs in with ubnt / ubnt. Run set-inform once so the device shows as Pending Adoption, click Adopt in the controller, then run it a second time after the device provisions so it locks onto the controller for good.
Adopt across subnets (layer 3)
Layer 2 discovery does not cross a router, so a controller in one VLAN and access points in another need one of the standard hand-off methods:
- DHCP option 43 on the device subnet, encoding the controller IP as
01:04:<controller-ip-in-hex>. - A DNS record named
unifithat resolves to the controller, which factory devices query on boot. - The
set-informcommand above, run once per device.
The inform host set earlier is what makes all three work: the device reaches the controller, and the controller replies with an inform URL it can keep using.
Create a VLAN network and a tagged SSID
The payoff of running the controller yourself is the same segmented network a hardware UniFi console would build: a VLAN for a class of devices and a wireless network whose traffic is tagged onto it. Both are defined once in the controller and pushed to every adopted gateway, switch, and access point.
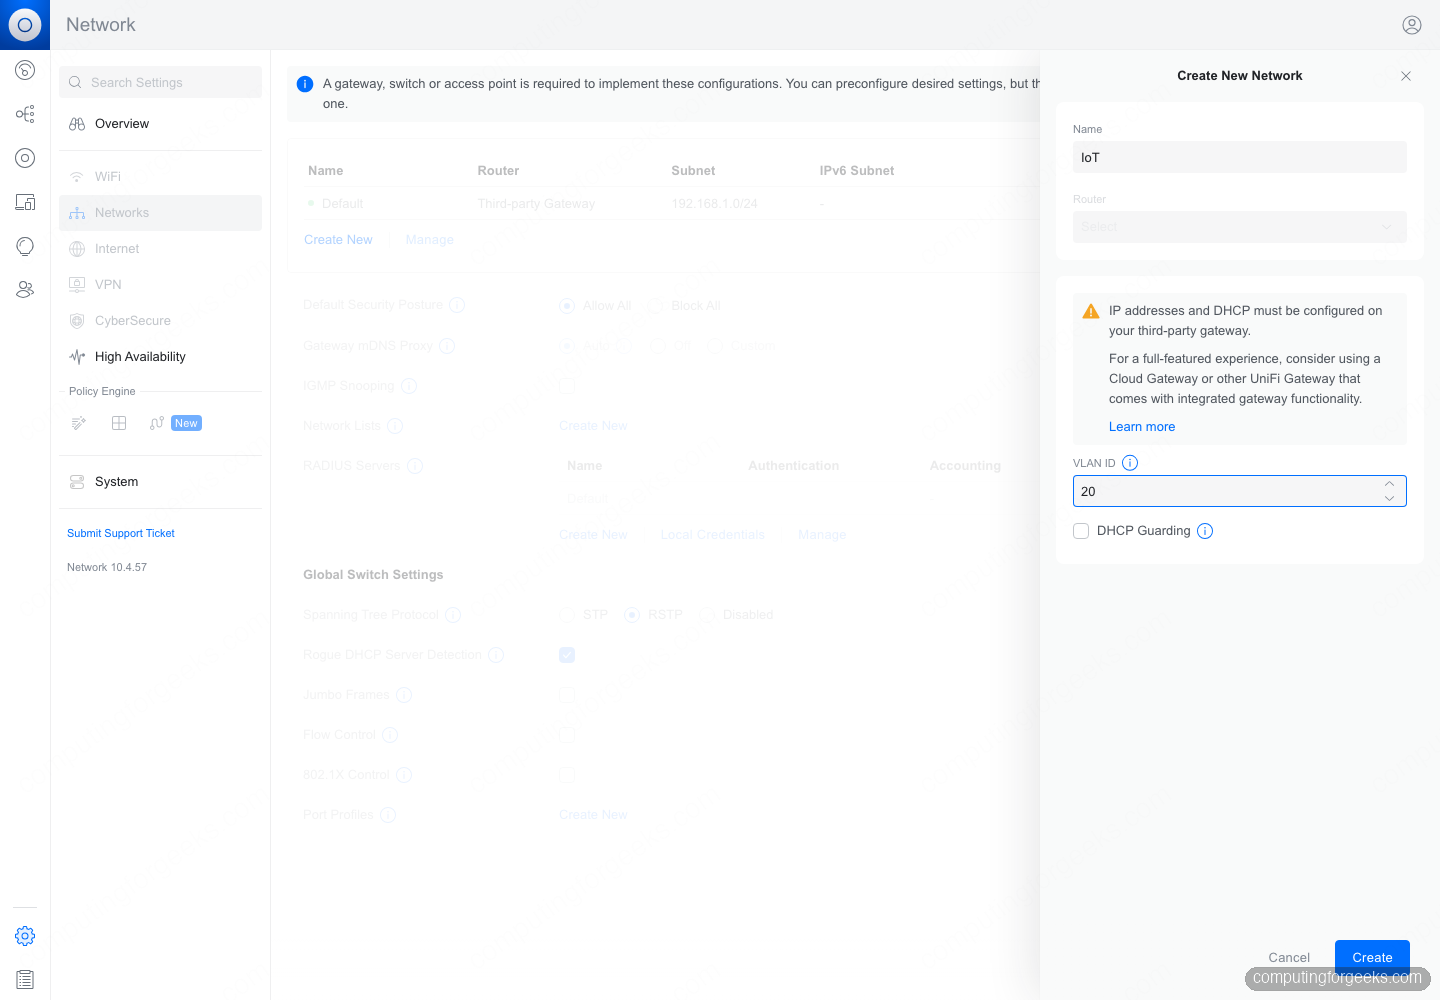
Create the VLAN first. Open Settings, then Networks, and add a network. Name it, set the VLAN ID (here 20 for an IoT segment), and either let the controller run DHCP for the subnet or mark it VLAN-only when an upstream router already serves it:
With the network saved, create the SSID that rides it. Open Settings, then WiFi, add a WiFi network, set the name and passphrase, then under the network option choose the VLAN you just created so client traffic is tagged with that VLAN ID:
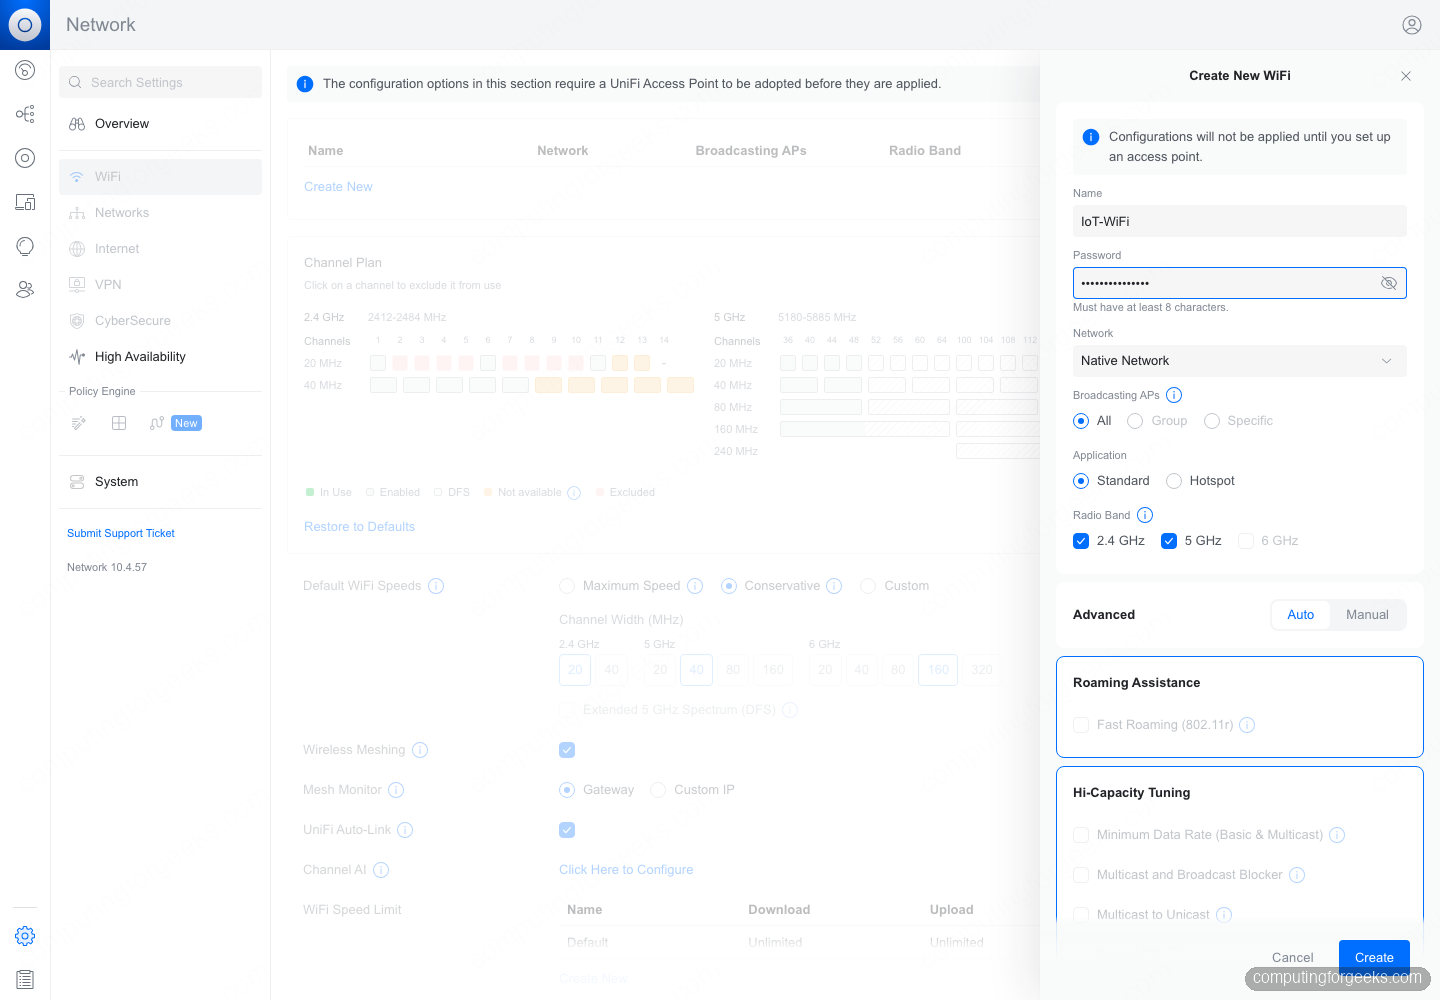
Every access point the controller has adopted now broadcasts the SSID and tags its clients onto the VLAN, exactly as a UniFi gateway would. The tag only carries end to end when the switch port feeding the AP trunks that VLAN, so confirm the uplink profile allows it. Measuring real throughput through the tagged SSID needs a physical access point on the wire; the controller-side configuration is complete here.
Keep the controller updated and backed up
A self-hosted controller is only as safe as its last backup, and the container makes both jobs quick. Pull new images on a schedule and recreate the stack:
cd ~/unifi
docker compose pull
docker compose up -d
The LinuxServer image tracks the current stable Network Application while MongoDB stays pinned to the 8.0 line, so upgrades are predictable. Before any upgrade, take a controller backup from Settings, then System, then Backups, and keep a copy off the host. Because the whole state lives in the config volume plus the database under /unifi_data, recovering after a host rebuild is a matter of bringing the same stack up against that directory and importing the backup through the setup wizard.


Telling people to set SELinux to permissive just to provide directory access is a very insecure approach. Why have you suggested this?
From experience most users are not that technical and troubleshooting SELinux related issues needs a bit of experience working with Linux.
For some reason when I try to start the unifi docker using docker-compose, I can’t get to the web interface like it is not using the ports and I followed the steps above exactly and it works fine if I use docker run.
Hello DP,
I have tested both on my end, it works fine, please share your
docker psoutput. In case you are trying both methods, remember to stop and remove the container first.What hardware setup is used to handle this? I mean, you need a router to receive the raw internet signal, and then send it to this computer, right? How about the outbound connections?
You just need UniFi devices to be on the same network as the controller deployment host.
where is the docker file ?
The compose file is one you create yourself: run vim docker-compose.yml and paste the contents shown in the guide, which has since been updated for the supported unifi-network-application image.
The docker compose file didn’t work for me either.
I see that you are using .env, but there is no step about creating the .env file.
Also, after bring up the container, it created a directory init-mongo.sh, but the directory is empty. Should this be a file and not a directory?
You hit two real problems and the guide has been rebuilt around the supported unifi-network-application image to fix both (the old unifi-controller image it used was retired by LinuxServer.io). The .env file now has its own creation step, and init-mongo.sh became a directory because Docker creates an empty directory when a mounted file does not exist yet. To recover on your machine: docker compose down, then sudo rm -rf init-mongo.sh and the MongoDB data directory, create init-mongo.sh as a regular file with the contents now shown in the guide, and run docker compose up -d again. The init script only executes against an empty database directory, which is why the data dir must go too.