
Follow the following steps to install, configure and use Windows Server 2025 on KVM Hypervisor.
1 – Installation of KVM and Cockpit / Virt Manager
KVM is required from your machine to be able to install Widows Server 2025 on it. Check out the following link for the actual installation process.
- Installing KVM on Linux Operating Systems
Installing Cockpit
Cockpit provides a web-based interface from where Windows server can be installed. Run the commands below to install Cockpit on your Linux machine.
# Debian based systems
sudo apt update && sudo apt install cockpit
sudo systemctl start cockpit && sudo systemctl enable cockpit

# RHEL based systems
sudo dnf install cockpit
sudo systemctl enable --now cockpit
After the installation Cockpit can be accessed at: https://your_server_hostname:9090/ or https://your_server_ip:9090/
Installing Virt-Manager
Virt-manager is another great desktop user interface application used to manage virtual machines on KVM through libvirt. Use the following commands to install virt-manager:
# Debian based systems
sudo apt install virt-manager

# RHEL based systems
sudo dnf -y install virt-viewer virt-manager
2 – Create Windows Server 2025 VM on KVM
The minimum hardware requirements for installing Windows Server 2025 are:
- Processor: 1.4 GHz 64-bit processor
- Memory: Minimum of 512 MB RAM for Server Core installations; 2 GB RAM for Server with Desktop Experience, 4 GB recommended.
- Storage: At least 32 GB of available disk space.
- Display: 1024 x 768 pixels resolution (required for certain features).
- Network: Ethernet adapter capable of at least 1 Gbps throughput or a wireless adapter supporting 802.11.
- Firmware: UEFI 2.3.1c-based system with firmware supporting secure boot (required for certain features).
- Security: Trusted Platform Module (TPM) version 2.0 (required for certain features).
Make sure you computer meet the min hardware requirements outlined in this guide for Windows Server to install correctly. Also note that the actual requirements will vary based on your system configuration, applications, and features that are installed.
The following items are only required for certain features:
- UEFI 2.3.1c-based system and firmware that supports secure boot
- Trusted Platform Module (TPM)
- Internet access
Installation Requirements
- Downloading Windows Server 2025 ISO from official Microsoft website.
- Download the VirtIO drivers ISO from the Fedora Project
Create Windows Server 2025 on KVM using virt-install
The virt-install command can be used to create virtual machines and install windows server operating system on it from the command line.
sudo virt-install \
 --name win2025 \
 --ram 8192 \
 --vcpus 2 \
 --os-variant win2k22 \
 --disk path=/var/lib/libvirt/images/win2025.qcow2,size=50,bus=virtio,format=qcow2 \
 --cdrom /var/lib/libvirt/images/win2025.iso \
 --disk path=/var/lib/libvirt/images/virtio-win.iso,device=cdrom \
 --network network=default,model=virtio \
 --virt-type kvm \
 --graphics spice
Where:
--name win2025– Specifies the name of the virtual machine.--ram 8192– Allocates 8GB of RAM to the VM.--vcpus 2– Allocates 2 virtual CPUs to the VM.--os-variant win2k22– Indicates the OS variant for optimization. List avalable variants usingosinfo-query os|grep win. At the time of creating this content, exact match for Windows server 2025 was not available.--disk– Path to primary disk. Specifies the location, size (50GB), and format (qcow2). Bus type: virtio is recommended for better performance.- Additional VirtIO ISO: Mounts the VirtIO drivers ISO as a second CD-ROM to load drivers during installation.
--cdrom /path/to/Windowsserver.iso– Path to the Windows installation ISO. This is the bootable media for installing Windows.--network network=default,model=virtio– Connects the VM to the defaultlibvirtnetwork using thevirtiodriver for optimized network performance.--virt-type kvm– Specifies that the VM will run on KVM, leveraging hardware virtualization for better performance.--graphics spice– Enables SPICE for graphical display.
Other installation options that can be used are:
--boot uefi. Enables UEFI firmware boot. Necessary for modern Windows versions, especially if Secure Boot is required.--machine q35– Sets the machine type toq35, which emulates a modern chipset with PCIe support. This is often required for UEFI compatibility.
To use custom network bridge, specify its name using --network option with bridge name. In the following example the bridge name is vmbr0:
--network bridge=br0If using using Open vSwitch network bridge, specify like below:
--network=bridge:br1,model=virtio,virtualport_type=openvswitchWhere br1 is the OVS bridge name configured on the KVM host machine.
3 – Installing Windows Server 2025 on KVM
Proceed with the standard windows server installation. You can use virt-viewer, virt-manager or cockpit web interface.

Set your language and time/currency format in the next screen.

Choose installation OS type – whether Core or Desktop Experience.

Installing VirtIO SCSI Controller driver
To resolve “No drives were found.” during windows installation on KVM we need to load the VirtIO SCSI Driver. Click “Load drive” to manually provide the VirtIO SCSI driver.

Select VirtIO ISO drive.

Go to the “amd64” folder and corresponding folder to your Windows version, example is “2k25” for Windows Server 2025. Once it’s select click the name and hit “Install“.

After driver installation the Virtual disk should be now visible. Select it to create partition and install the operating system.

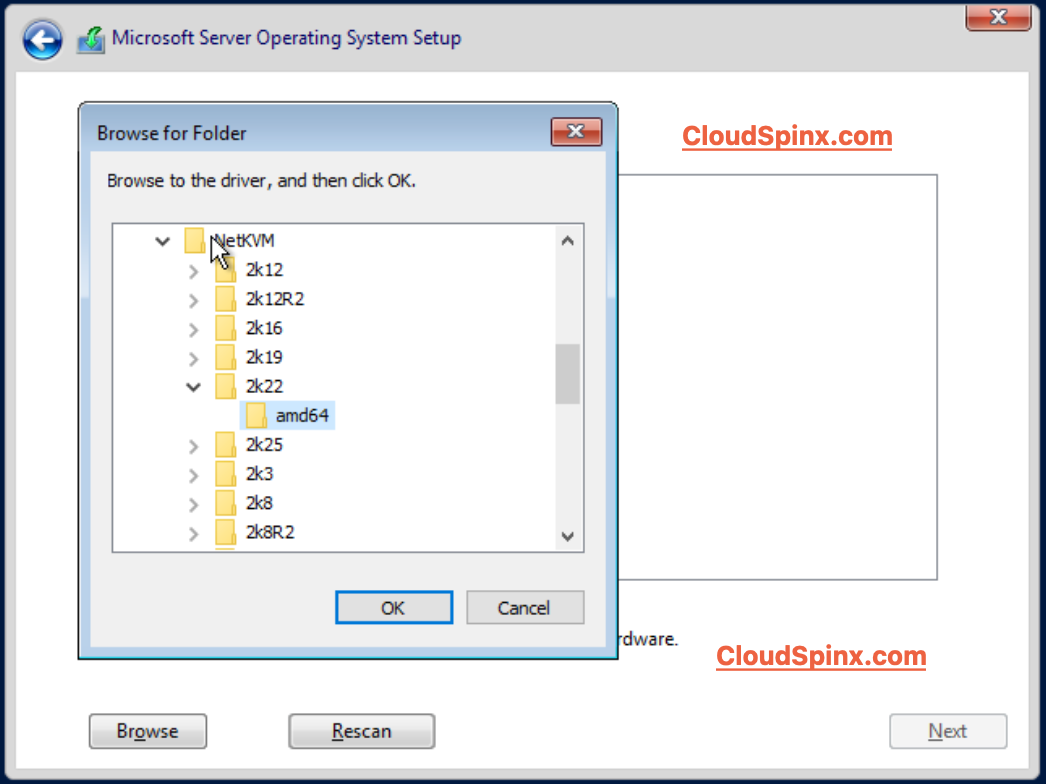
Installing VirtIO Ethernet driver
Choose your CDROM(the CD Drive labeled with virtio), then look for Drivers>NetKVM>2k22>amd64.

Click on OK to load driver and “Install” to perform its installation.

Follow the standard Windows operating system prompts to complete the installation. Check out other tutorials we have on Windows Server in our website.


