

KVM is the kernel-based hypervisor that the entire Linux virtualization world is built on. On Fedora, the KVM stack is the official virtualization solution: QEMU as the device emulator, libvirt as the management API, virt-install for scripted VM creation, and virt-manager for the graphical front end. Fedora 44 ships with the modular libvirt daemons (one socket per subsystem rather than the monolithic libvirtd of older releases), so the install procedure has a few F44-specific steps that the older guides skip.
This guide installs the full KVM stack on Fedora 44, 43, and 42, walks through the modular socket activation that catches most people on first try, sets up the default NAT network and storage pool, adds the user to the right group so VMs can be managed without sudo, then shows two paths to create a first VM: a scripted virt-install command and the graphical virt-manager. Every command was run on a Fedora 44 install.
Prerequisites
You need a Fedora 44, 43, or 42 system with a CPU that exposes hardware virtualization. Intel chips need VT-x; AMD chips need AMD-V. Most modern desktop and server CPUs have it, but some lower-end laptops or older NUCs leave it disabled in the BIOS. SELinux can stay in enforcing mode; the libvirt packages ship the correct policies. Plan for at least 8 GB RAM if you intend to run guest VMs with reasonable headroom.
Step 1: Confirm CPU virtualization support
Before installing anything, check whether your CPU advertises the virtualization extensions. A non-zero result means you are good to go:
grep -Ec '(vmx|svm)' /proc/cpuinfoThe output is the number of CPU threads that report the virtualization flag. Anything above zero is sufficient. vmx is Intel; svm is AMD. If you get zero, reboot into BIOS and look for “Intel Virtualization Technology” or “SVM Mode” and enable it.
Confirm the host details with lscpu:
lscpu | grep -iE 'virtualization|hypervisor|model name'The output names the CPU model and reports which virtualization technology is available:
Model name:                              11th Gen Intel(R) Core(TM) i7-1165G7 @ 2.80GHz
Virtualization:                          VT-x
Hypervisor vendor:                       KVM
Virtualization type:                     full
If you see a Hypervisor vendor line (KVM, VMware, Microsoft), the host itself is a guest. KVM-on-KVM works through nested virtualization, which is fine for labs but slower than bare-metal KVM.
Step 2: Install the @virtualization group
Fedora groups the entire KVM stack under the @virtualization meta-group. One command pulls down qemu-kvm, libvirt-daemon, virt-install, virt-viewer, and all the supporting modular daemons:
sudo dnf install -y @virtualizationThe transaction installs around 70 packages on Fedora 44. The headline versions:
qemu-kvm-10.2.2-1.fc44.x86_64
libvirt-daemon-12.0.0-3.fc44.x86_64
libvirt-client-12.0.0-3.fc44.x86_64
virt-install-5.1.0-4.fc44.noarch
virt-viewer-11.0-18.fc44.x86_64
For the graphical management UI, add virt-manager separately. It is no longer in the default @virtualization group on recent Fedora:
sudo dnf install -y virt-managerStep 3: Enable the modular libvirt sockets
This is the F44-specific gotcha. Older Fedora releases shipped a single libvirtd.service that you would enable with systemctl enable --now libvirtd and you were done. Fedora switched to the modular libvirt architecture, which splits the daemon into per-subsystem processes (one for QEMU, one for storage, one for networking, etc.). Each has its own socket that must be activated:
for SOCK in virtqemud.socket virtnetworkd.socket virtstoraged.socket \
            virtnodedevd.socket virtsecretd.socket \
            virtnwfilterd.socket virtinterfaced.socket; do
  sudo systemctl enable --now "$SOCK"
done
Confirm the three you will use the most are active:
sudo systemctl is-active virtqemud.socket virtnetworkd.socket virtstoraged.socketAll three should report active:
active
active
active
If you skip this step and try to run virsh list, you get the cryptic error “No URI is provided and cannot identify any listening daemon socket path.” That error means exactly one thing: the modular sockets are not enabled.
Step 4: Validate the host with virt-host-validate
libvirt ships a self-test that walks through every prerequisite KVM needs (CPU flags, kernel modules, cgroup controllers, IOMMU, hugepages). Run it as root:
sudo virt-host-validate qemuA healthy host returns PASS for the must-haves (hardware virtualization, /dev/kvm, vhost-net, cgroups) and may flag a few WARN entries for optional features like IOMMU or hugepages:
QEMU: Checking for hardware virtualization                : PASS
QEMU: Checking if device '/dev/kvm' exists                : PASS
QEMU: Checking if device '/dev/kvm' is accessible         : PASS
QEMU: Checking if device '/dev/vhost-net' exists          : PASS
QEMU: Checking if device '/dev/net/tun' exists            : PASS
QEMU: Checking for cgroup 'cpu' controller support        : PASS
QEMU: Checking for cgroup 'cpuacct' controller support    : PASS
QEMU: Checking for cgroup 'cpuset' controller support     : PASS
Any FAIL line on hardware virtualization or /dev/kvm blocks VM creation. Re-check the BIOS or, on a guest host, enable nested virtualization.
Step 5: Add your user to the libvirt group
Running every virsh command with sudo is tedious. Add your user to the libvirt group so the socket auth lets you talk to the system instance without privilege escalation:
sudo usermod -aG libvirt "$USER"
newgrp libvirt
The newgrp command spawns a sub-shell with the new group active. Confirm:
groupsYou should see libvirt in the list. From now on, virsh list --all (without sudo) works.
Default the libvirt connection URI to the system instance so you do not have to type --connect qemu:///system on every command. Add this to your shell rc:
echo 'export LIBVIRT_DEFAULT_URI=qemu:///system' >> ~/.bashrc
source ~/.bashrc
Step 6: Start the default network
libvirt creates a NAT network called default on first install. Check its state:
virsh net-list --allOn a fresh install, the network exists but is not auto-starting. Turn that on:
virsh net-autostart default
virsh net-start default
Re-list and confirm the network is active and set to autostart:
virsh net-list --allThe default network should now show as active and persistent:
Name      State    Autostart   Persistent
--------------------------------------------
default   active   yes         yes
This network gives every guest VM a 192.168.122.x address with NAT out to the host’s network and a built-in dnsmasq for DHCP and DNS. For production setups that need guests on the host’s LAN, switch to a bridged network. For lab and dev use, the default NAT is fine.
Step 7: Create a storage pool
libvirt stores guest disk images in storage pools. The default location is /var/lib/libvirt/images/ but no pool is registered automatically. Create the default pool:
virsh pool-define-as default dir --target /var/lib/libvirt/images
virsh pool-autostart default
virsh pool-start default
virsh pool-list --all
You should now see the pool in the list with State=active and Autostart=yes:
Name      State    Autostart
-----------------------------
default   active   yes
Step 8: Verify the install end to end
Confirm versions and that everything talks to everything else:
virsh version
virt-install --version
qemu-kvm --version | head -1
The libvirt version line confirms the API client and hypervisor agree:
Compiled against library: libvirt 12.0.0
Using library: libvirt 12.0.0
Using API: QEMU 12.0.0
Running hypervisor: QEMU 10.2.2
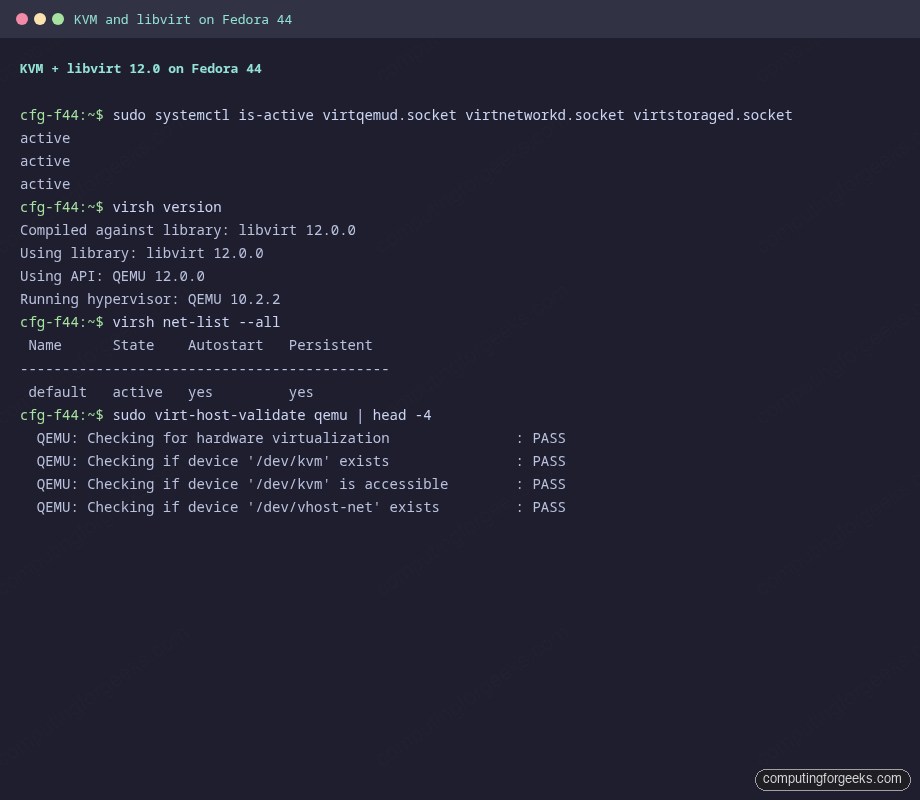
The screenshot below is the host-side summary captured on the test box: the three modular libvirt sockets all active, libvirt 12 and QEMU 10 reporting versions, the default network active and persistent, and the virt-host-validate prerequisites all PASS:
Step 9: Create your first VM with virt-install
The scripted way to create a VM is virt-install. Download a Fedora 44 cloud image (small, no installer required) and boot it as a 2 GB / 2 vCPU VM:
export VM_NAME="cfg-test"
export VM_DISK="/var/lib/libvirt/images/${VM_NAME}.qcow2"
export ISO_URL="https://download.fedoraproject.org/pub/fedora/linux/releases/44/Cloud/x86_64/images/Fedora-Cloud-Base-Generic-44-1.5.x86_64.qcow2"
Pull the cloud image into the storage pool:
sudo curl -L "${ISO_URL}" -o "${VM_DISK}"
sudo chown qemu:qemu "${VM_DISK}"
Launch the VM:
virt-install \
  --name "${VM_NAME}" \
  --memory 2048 \
  --vcpus 2 \
  --disk path="${VM_DISK}",format=qcow2,bus=virtio \
  --import \
  --os-variant fedora44 \
  --network network=default \
  --graphics none \
  --console pty,target_type=serial \
  --noautoconsole
List your VMs:
virsh list --allThe new domain appears with state running. To attach to its console:
virsh console "${VM_NAME}"Press Ctrl+] to detach from the console without shutting down the guest.
Step 10: Manage VMs with virt-manager
For a graphical workflow, launch virt-manager:
virt-manager &The Virtual Machine Manager window opens with a single connection to QEMU/KVM (the system URI). Right-click the connection and choose New to walk through a wizard that creates the VM from an ISO, a network install, or an existing disk image. The wizard maps one-to-one to the equivalent virt-install flags, so once you understand virt-install, the GUI is just a faster way to fill the same form.
Step 11: Common VM lifecycle commands
Day-to-day VM management uses a short set of virsh verbs:
| Command | What it does |
|---|---|
virsh list --all | List every defined VM, running or stopped |
virsh start <vm> | Boot a stopped VM |
virsh shutdown <vm> | Send graceful ACPI shutdown |
virsh destroy <vm> | Force-stop a VM (equivalent of pulling the plug) |
virsh reboot <vm> | Soft reboot via ACPI |
virsh console <vm> | Attach to the serial console |
virsh undefine <vm> | Delete the VM definition (disk stays) |
virsh dominfo <vm> | Print VM specs and state |
virsh edit <vm> | Edit the XML definition in $EDITOR |
virsh snapshot-create-as <vm> snap1 | Take a named snapshot |
virsh snapshot-revert <vm> snap1 | Roll back to a snapshot |
virsh domifaddr <vm> | Show the guest’s IP addresses (needs qemu-guest-agent) |
Troubleshooting
Error: No URI is provided and cannot identify any listening daemon socket path
You skipped Step 3. The modular libvirt sockets are not active. Enable them with the for-loop in that step. If you prefer the old monolithic layout, you can fall back with sudo systemctl enable --now libvirtd.socket, but the modular path is what Fedora ships and recommends.
Error: failed to connect to the hypervisor (Permission denied)
Your user is not in the libvirt group, or your shell session has not picked up the new group membership. Run groups to check. If libvirt is absent, run sudo usermod -aG libvirt "$USER" and start a fresh login. As a temporary fix, newgrp libvirt in the current shell adds the group without logging out.
virt-host-validate reports FAIL: Checking for hardware virtualization
Either CPU virtualization is disabled in BIOS, or the host is a VM that does not expose nested virtualization. Reboot into BIOS and enable VT-x (Intel) or SVM (AMD). On a nested setup, the parent hypervisor needs nested=1 on its kvm-intel or kvm-amd module.
virt-install fails with “Could not find an available default network”
The default NAT network is not started. Run Step 6 again to start it and mark it autostart. virsh net-list --all should show it as active.
VM console attaches but shows nothing
Most cloud images do not enable a serial console by default. Either use the graphical console via virt-manager, or add console=ttyS0 to the kernel cmdline of the guest image (Fedora cloud images already do this). For other distros, edit /etc/default/grub inside the guest and regenerate the bootloader config.
Where to go from here
For containers instead of full VMs on the same host, see Docker on Fedora or layer Distrobox or Toolbox on top for instant per-project Linux distros. To expose VMs over the network with the host firewall set up correctly, follow the firewalld guide for Fedora. For multimedia in the guest VMs (especially when forwarding GPU devices), the RPM Fusion codecs guide covers the host-side setup you will need.



Excellent tutorial. Thanx!