
Tailscale client is a software application that can be installed on your operating system such as Linux, Windows, macOS, Android, iOS and many others. It is used to connect devices to a secure Tailscale Mesh Network. At the core of Tailscale is WireGuard protocol that ensures there is a secure communication between devices in the network it creates.
In this article we will look at the installation, configuration, and how to join OPNsense into Tailscale or Headscale network. In the end, your OPNsense and optionally its routes will be part of Tailscale private network. The advantages of using Tailscale over traditional WireGuard server setup is that Tailscale doesn’t require port forwarding to work. So let’s get started.
1. Configure SSH Server
We will be doing the installation of Tailscale client on OPNsense from a command line interface. This dictates the configuration of SSH server on OPNsense which can be performed by following below article.
With SSH service active, login to your OPNsense console using ssh client.
$ ssh [email protected]
Last login: Thu Jan 25 01:05:07 2024 from 192.168.1.151
----------------------------------------------
|      Hello, this is OPNsense 23.7          |         @@@@@@@@@@@@@@@
|                                            |        @@@@         @@@@
| Website:	https://opnsense.org/        |         @@@\\\   ///@@@
| Handbook:	https://docs.opnsense.org/   |       ))))))))   ((((((((
| Forums:	https://forum.opnsense.org/  |         @@@///   \\\@@@
| Code:		https://github.com/opnsense  |        @@@@         @@@@
| Twitter:	https://twitter.com/opnsense |         @@@@@@@@@@@@@@@
----------------------------------------------

*** fw01.example.io: OPNsense 23.7.12 ***

 GuestWifi (vlan020) -> v4: 172.20.40.1/24
 IoTDevices (vlan021) -> v4: 172.20.41.1/24
 LAN (igb1)      -> v4: 192.168.1.1/24
 PrivateServers (vlan030) -> v4: 172.20.30.1/24
 WAN (igb0)      -> v4: a.b.c.d/24

 HTTPS: SHA256 66 1B 87 B8 43 2C 15 45 05 57 05 1E 5E FF BB BD
               AC A6 DF 50 C9 73 FC A6 D5 88 29 10 A4 16 7B 29
 SSH:   SHA256 lmQRFUxZjpwargrS5JII5m57XW04q8gE4ZHIrO3Ub0I (ECDSA)
 SSH:   SHA256 H3emXepr/oufi2zVoVRBWCt5iJM+JTVjtReBpBOlPUc (ED25519)
 SSH:   SHA256 +vgBRjGF6QyimDHDr9Dcq7aZqxuZGUlEdi//XEVLy8E (RSA)

  0) Logout                              7) Ping host
  1) Assign interfaces                   8) Shell
  2) Set interface IP address            9) pfTop
  3) Reset the root password            10) Firewall log
  4) Reset to factory defaults          11) Reload all services
  5) Power off system                   12) Update from console
  6) Reboot system                      13) Restore a backup

Enter an option:
2. Build Tailscale Client on OPNsense
The installation method used in this guide is building from source. Open shell with option 8
Enter an option: 8

root@fw01:~ #
Then run OPNsense code utility to update ports tree.
opnsense-code portsIf no update you will see the message below.
Already up to date.
ABI 23.7 is no longer supported
Already up to date.
Switch your working directory to /usr/ports/security/tailscale.
cd /usr/ports/security/tailscaleThen build and install Tailscale Client on OPNsense.
make installA successful installation will have an output similar to one shown below.
....
gvisor.dev/gvisor/pkg/sleep
gvisor.dev/gvisor/pkg/tcpip/transport
gvisor.dev/gvisor/pkg/tcpip/ports
gvisor.dev/gvisor/pkg/tcpip/transport/tcpconntrack
tailscale.com/net/packet/checksum
gvisor.dev/gvisor/pkg/tcpip/network/hash
gvisor.dev/gvisor/pkg/tcpip/stack
github.com/pkg/sftp
gvisor.dev/gvisor/pkg/tcpip/transport/internal/noop
gvisor.dev/gvisor/pkg/tcpip/header/parse
gvisor.dev/gvisor/pkg/tcpip/transport/internal/network
tailscale.com/net/tstun
gvisor.dev/gvisor/pkg/tcpip/transport/packet
gvisor.dev/gvisor/pkg/tcpip/link/channel
gvisor.dev/gvisor/pkg/tcpip/network/internal/fragmentation
gvisor.dev/gvisor/pkg/tcpip/network/internal/ip
gvisor.dev/gvisor/pkg/tcpip/transport/raw
gvisor.dev/gvisor/pkg/tcpip/network/internal/multicast
tailscale.com/wgengine/magicsock
gvisor.dev/gvisor/pkg/tcpip/network/ipv4
gvisor.dev/gvisor/pkg/tcpip/network/ipv6
gvisor.dev/gvisor/pkg/tcpip/transport/tcp
gvisor.dev/gvisor/pkg/tcpip/transport/udp
gvisor.dev/gvisor/pkg/tcpip/transport/icmp
gvisor.dev/gvisor/pkg/tcpip/adapters/gonet
tailscale.com/wgengine
tailscale.com/tsd
tailscale.com/ipn/ipnlocal
tailscale.com/wgengine/netstack
tailscale.com/ipn/localapi
tailscale.com/ssh/tailssh
tailscale.com/ipn/ipnserver
tailscale.com/cmd/tailscaled
===>  Staging for tailscale-1.58.0
===>   tailscale-1.58.0 depends on package: ca_root_nss>0 - found
===>   Generating temporary packing list
for t in ./cmd/tailscale  ./cmd/tailscaled; do  dst=$(echo ${t} |  /usr/bin/sed -Ee 's/^[^:]*:([^:]+).*$/\1/' -e 's/^\.$/tailscale/');  src=$(/usr/bin/basename ${dst});  case ${dst} in  /*) dst=/usr/ports/security/tailscale/work/stage${dst}; /bin/mkdir -p $(/usr/bin/dirname ${dst}) ;;  *) dst=/usr/ports/security/tailscale/work/stage/usr/local/bin/${src} ;;  esac;  echo "===>  Installing ${src} as ${dst}";  install  -s -m 555 /usr/ports/security/tailscale/work/bin/${src} ${dst};  done
===>  Installing tailscale as /usr/ports/security/tailscale/work/stage/usr/local/bin/tailscale
===>  Installing tailscaled as /usr/ports/security/tailscale/work/stage/usr/local/bin/tailscaled
====> Compressing man pages (compress-man)
===> Staging rc.d startup script(s)
===>  Installing for tailscale-1.58.0
===>  Checking if tailscale is already installed
===>   Registering installation for tailscale-1.58.0
Installing tailscale-1.58.0...
3. Configure Tailscale Client service
After the installation, enable tailscale client service to start automatically.
# service tailscaled enable
tailscaled enabled in /etc/rc.conf
Start the service as well.
service tailscaled startYou can get the process ID by checking service status.
# service tailscaled status
tailscaled is running as pid 72048.
4. Join OPNsense to Tailscale or Headscale network
Follow the steps provided in this section to join OPNsense to either Tailscale or Headscale network.
1) Generate Tailscale Authentication keys
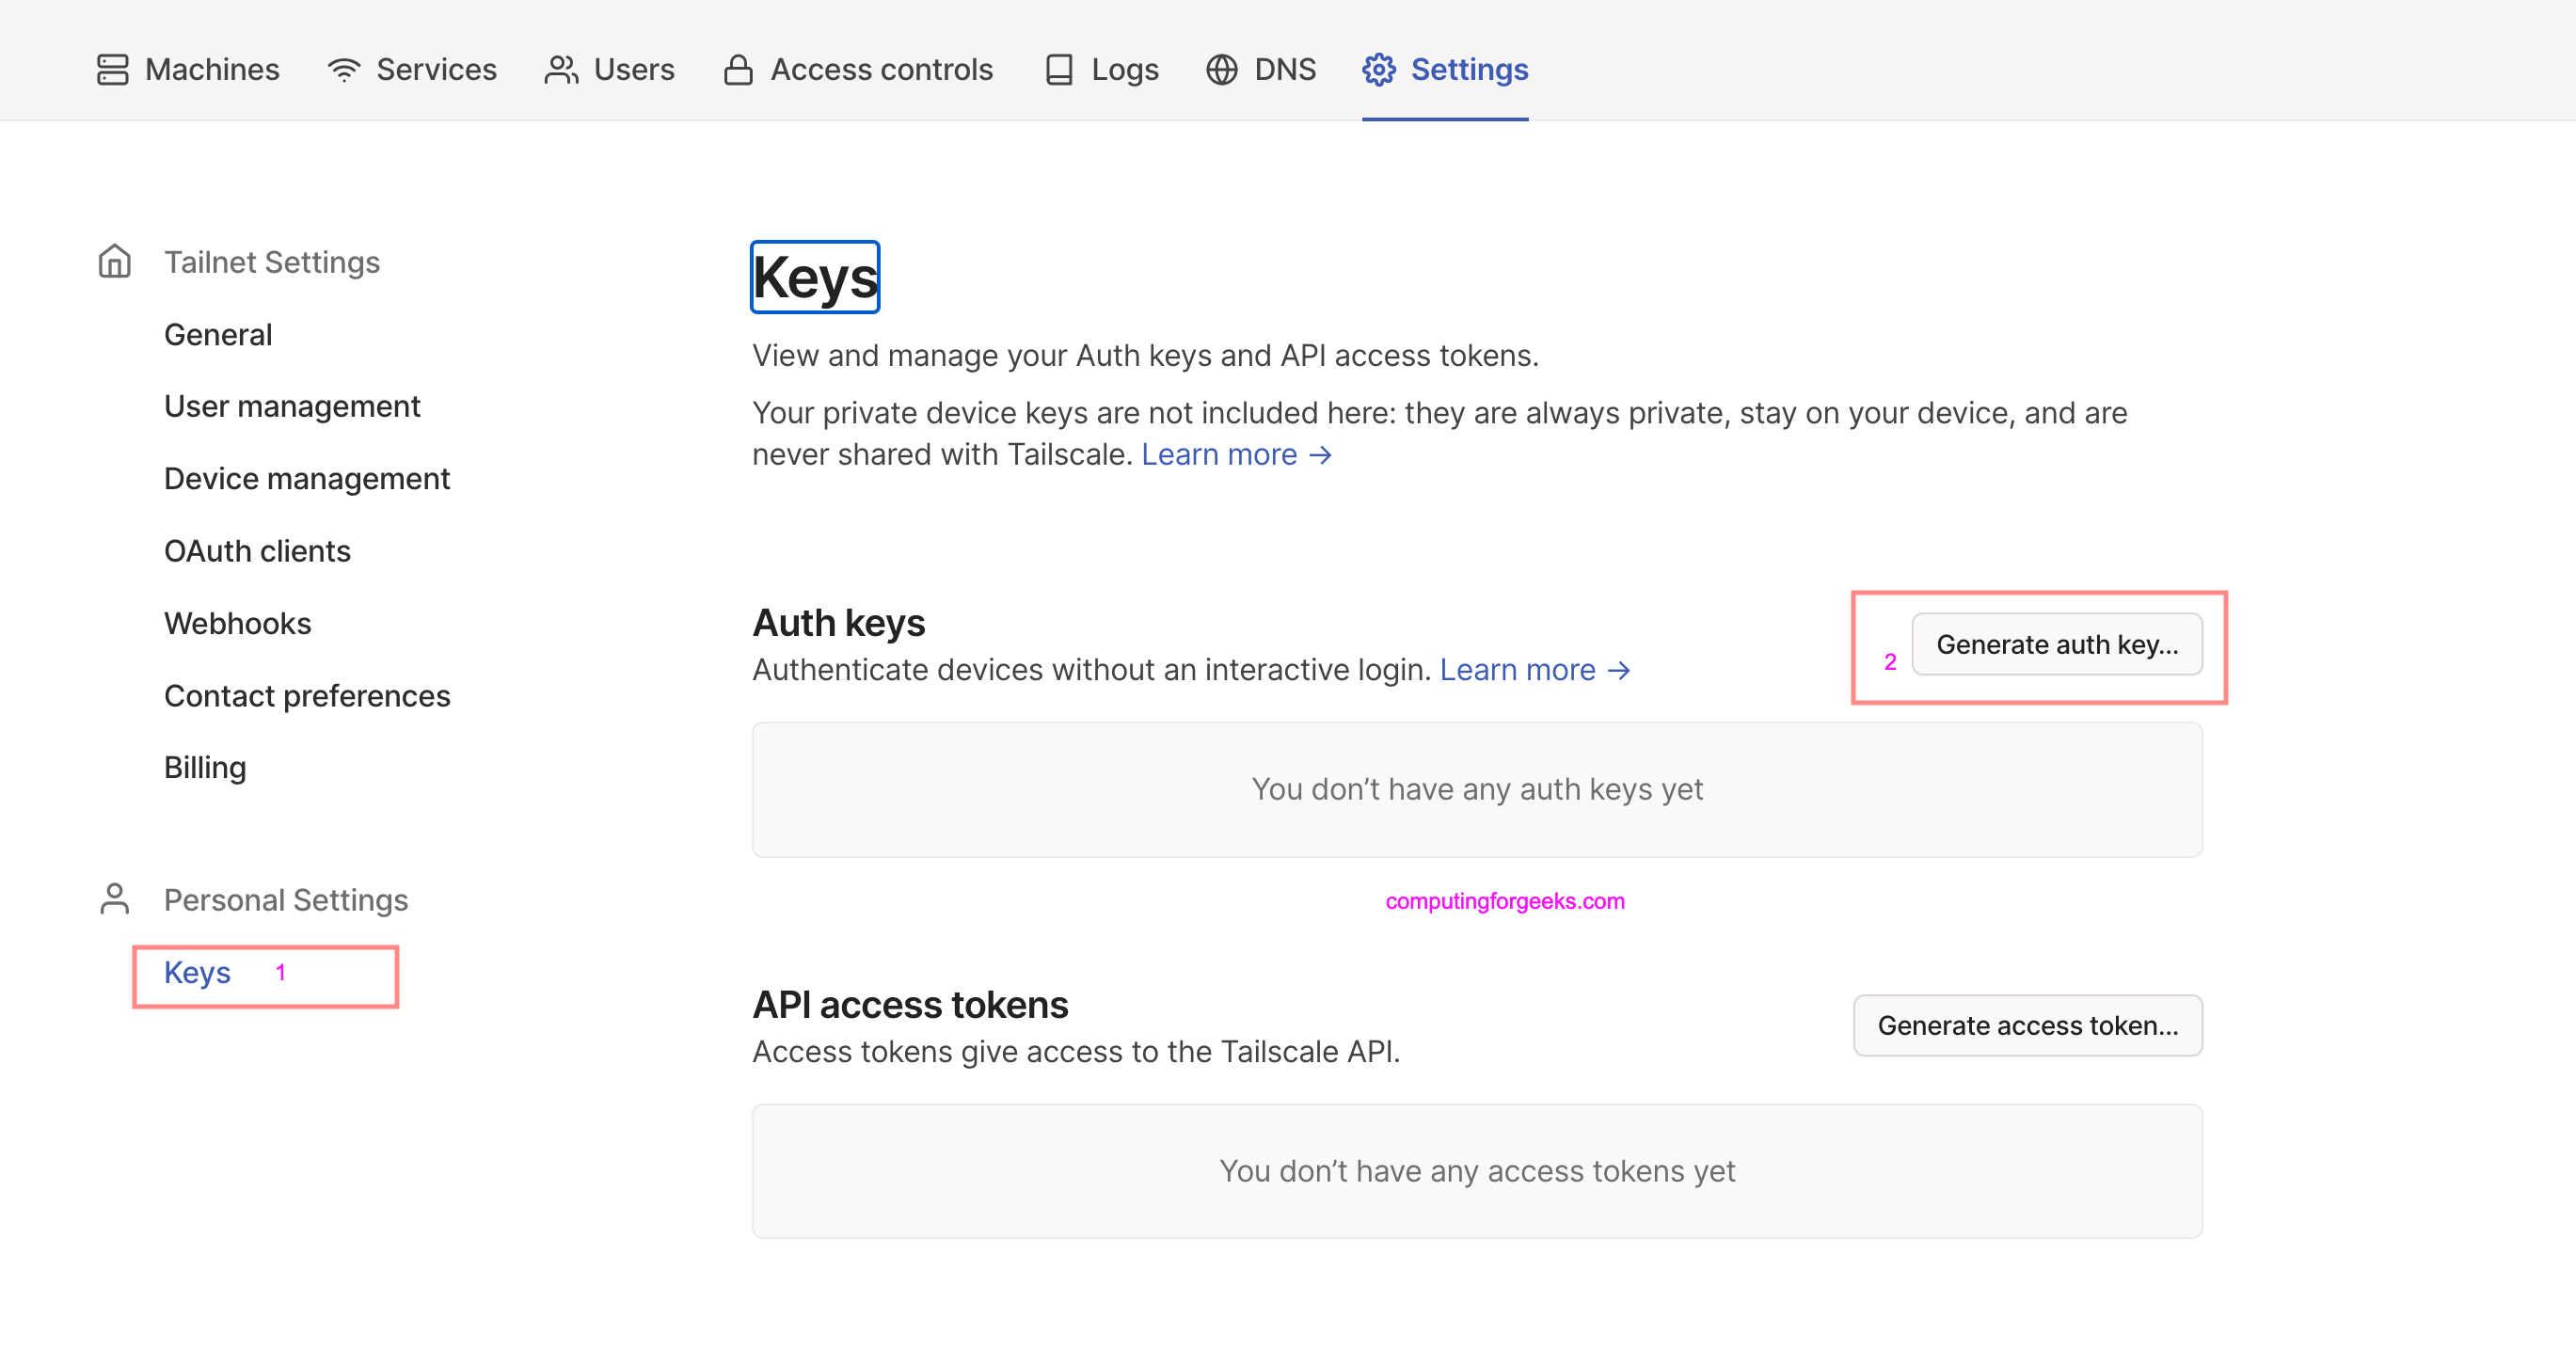
We need tailscale authentication keys to enroll OPNsense to Tailscale network. Open Tailscale UI dashboard and generate authentication keys by navigating to Settings > Personal Settings > Keys > Auth keys > Generate auth keys.

Set required options to generate the key.

Copy the key generated into a good place.

Headscale users:
If you are using the self-hosted Tailscale alternative – headscale, you can generate the key from CLI.
headscale --user <username> preauthkeys create --reusable --expiration 90d2) Join OPNsense to Tailscale / headscale network
To join Tailscale network, run tailscale up command. The following flags are available for use.
| Command flag | Meaning |
| –auth-key | Node authorization key; if it begins with “file:”, then it’s a path to a file containing the authkey |
| –accept-dns, –accept-dns=false | Accept DNS configuration from the admin panel (default true) |
| –accept-routes, –accept-routes=false | Accept routes advertised by other Tailscale nodes (default false) |
| –advertise-connector, –advertise-connector=false | Advertise this node as an app connector (default false) |
| –advertise-exit-node, –advertise-exit-node=false | Offer to be an exit node for internet traffic for the tailnet (default false) |
| –advertise-routes string | List of routes to advertise to other nodes (comma-separated, e.g. “10.0.0.0/8,192.168.0.0/24”) or empty string to not advertise routes |
| –exit-node string | Tailscale exit node (IP or base name) for internet traffic, or empty string to not use an exit node |
| -exit-node-allow-lan-access, –exit-node-allow-lan-access=false | Allow direct access to the local network when routing traffic via an exit node (default false) |
| –force-reauth, –force-reauth=false | Force reauthentication (default false) |
| –hostname string | The hostname to use instead of the one provided by the OS |
| –login-server string | The base URL of control server (default https://controlplane.tailscale.com) |
| –operator string | Unix username to allow to operate on tailscaled without sudo |
| –qr, –qr=false | Show QR code for login URLs (default false) |
| –reset, –reset=false | Reset unspecified settings to their default values (default false) |
| –shields-up, –shields-up=false | Don’t allow incoming connections (default false) |
| –ssh, –ssh=false | Run an SSH server, permitting access per tailnet admin’s declared policy (default false) |
| –timeout duration | maximum amount of time to wait for tailscaled to enter a Running state; default (0s) blocks forever (default 0s) |
Example of Tailscale join commands – https://controlplane.tailscale.com
tailscale up --login-server https://controlplane.tailscale.com  \
--authkey <your_auth_key> \
--accept-routes \
--advertise-routes=192.168.1.0/24 \
--force-reauth
Example of Headscale join commands – https://controlplane.tailscale.com
tailscale up --login-server https://vpn.example.com  \
--authkey <your_auth_key> \
--accept-routes \
--advertise-routes=192.168.1.0/24 \
--force-reauth
See our articles below on how to install Headscale server:
If you want the traffic from the devices in your mesh network routed through OPNsense firewall, then include the --advertise-exit-node flag.
Confirm status after running the login commands.
# tailscale status
100.85.221.75   fw01                 fw01.taila6df.ts.net freebsd -
100.99.203.103  desktop-irjpvj9      josphatkmutai@ windows -
A new network interface is created on OPNsense. Login to configure interface assignment and enable it.
This is done under Interfaces –> Assignments ==> “Assign a new interface” –> “Choose device” –> “tailscale0”.

Give the interface description e.g “Tailscale“

Save then click on created interface and tick the two boxed to enable and lock from accidental removal.

Login to Tailscale Admin console https://login.tailscale.com/admin/ and confirm that the device is connected in “Machines” menu section.
5. Approving OPNsense advertised routes
If you passed the routes to be advertised to other nodes using --advertise-routes flag, you will need to approve the routes to be effective.
Click on Machine name, click on the three dots at the right, then “Edit route settings“.

Select ones to approve or use “Approve all” to tick all the routes.

Confirm to save the settings.

If the option --advertise-exit-node was used while running the tailscale up command, “Use as exit node” will not be greyed out.
Conclusion
Both OPNsense and Tailscale are powerful networking tools and technologies that give great benefits to network users. By adding OPNsense to a Tailscale or Headscale private network, you will be able to access not only the device but all network devices available in the advertised routes. All this is possible without the need to configure OpenVPN server or Wildcard manually. The setup process is straightforward and doesn’t require any advanced networking skills. We hope our article was informative and we wish to see you next time.
More guides available on this webisite:


 with Practical Examples 13")

