A password pasted into a shell script outlives every rotation policy you have. The Bitwarden CLI (bw) exists so your scripts, cron jobs, and CI pipelines can pull secrets from an encrypted vault at runtime instead of carrying them around in plain text. It is a full vault client for the terminal: everything you can do in the browser extension, you can do from a shell, and pipe into whatever needs the secret.
This Bitwarden CLI tutorial works through the whole toolchain with real, tested commands: installing bw, logging in with your master password or an API key, managing sessions with BW_SESSION, creating and editing vault items, generating passwords, sharing secrets with Bitwarden Send, exporting backups, and running the built-in REST API for automation. Every command here works against the Bitwarden cloud and against a self-hosted Vaultwarden server, which is what the examples run on.
Tested July 2026 on Ubuntu 26.04 LTS with Bitwarden CLI 2026.6.0 against a self-hosted Vaultwarden server.
Step 1: Install the Bitwarden CLI
The CLI ships as a single self-contained binary, so the cleanest install on Linux is the official zip. It bundles its own Node.js runtime and needs no dependencies:
curl -Lso bw-linux.zip "https://bitwarden.com/download/?app=cli&platform=linux"
unzip bw-linux.zip
sudo install -m 755 bw /usr/local/bin/bw
Confirm the binary runs and note the version, because Bitwarden ships CLI releases on a near-monthly cadence and behavior does change between them:
bw --versionThe version prints on a single line:
2026.6.0Package managers work too. Snap and npm both delivered the same current release when we tested them, and the official GitHub releases page lists every build:
| Platform | Command |
|---|---|
| Linux (snap) | sudo snap install bw |
| Any OS (npm, needs Node.js) | npm install -g @bitwarden/cli |
| macOS (Homebrew, community-maintained) | brew install bitwarden-cli |
| Windows (Chocolatey) | choco install bitwarden-cli |
| Windows (winget, community-maintained) | winget install -e --id Bitwarden.CLI |
The npm route is the one to use on arm64 machines, since the prebuilt zip only ships for x64. One caveat on Homebrew: the formula is a GPL build that lacks the enterprise device-approval commands, which only matters if your organization uses SSO with trusted devices.
Step 2: Point the CLI at Your Server
By default bw talks to the Bitwarden US cloud at vault.bitwarden.com. If that is where your account lives, skip this step. Everyone else, and that includes EU cloud accounts and every self-hosted server, must set the server URL before logging in:
bw config server https://vault.example.comThe CLI confirms the change:
Saved setting `config`.Running the same command with no URL prints the currently configured server, which is the first thing to check when a login fails. EU cloud users point at https://vault.bitwarden.eu. If you run Vaultwarden behind Nginx with Let’s Encrypt or the official Bitwarden server in Docker, use that HTTPS URL here.
A self-hosted server with a self-signed or private-CA certificate needs one extra variable, because bw validates TLS through its bundled Node.js runtime rather than the system trust store:
export NODE_EXTRA_CA_CERTS="/etc/ssl/certs/my-private-ca.pem"Check where you stand at any time with bw status:
bw statusBefore authentication it reports unauthenticated:
{"serverUrl":"https://vault.example.com","lastSync":null,"status":"unauthenticated"}Step 3: Log In with Your Master Password
Interactive login is the right choice on a workstation. Run it with just your email and let the CLI prompt for the master password, so the password never lands in your shell history or the process list:
bw login [email protected]After the hidden password prompt (and a two-step login code if your account has one, passed with --method and --code in scripts), the CLI confirms authentication and hands you a session key:
You are logged in!

To unlock your vault, set your session key to the `BW_SESSION` environment variable. ex:
$ export BW_SESSION="P4tHpDULkFR5+NLL1lbfxD43q9NqIS2tmKnG0GMAn/Ft8w4JOipXty4uY4EQ5/gkTXDPGpidXuoC155F65X5sQ=="

You can also pass the session key to any command with the `--session` option.
The CLI does accept the password as a second positional argument. Do not use that form on a shared machine: bw login [email protected] MyPassword writes your master password into shell history and exposes it to anyone who can read /proc while the command runs. The failure mode when you fat-finger the password is at least honest:
Username or password is incorrect. Try againHere is what a clean run looks like on our lab box, from version check to an unlocked vault:
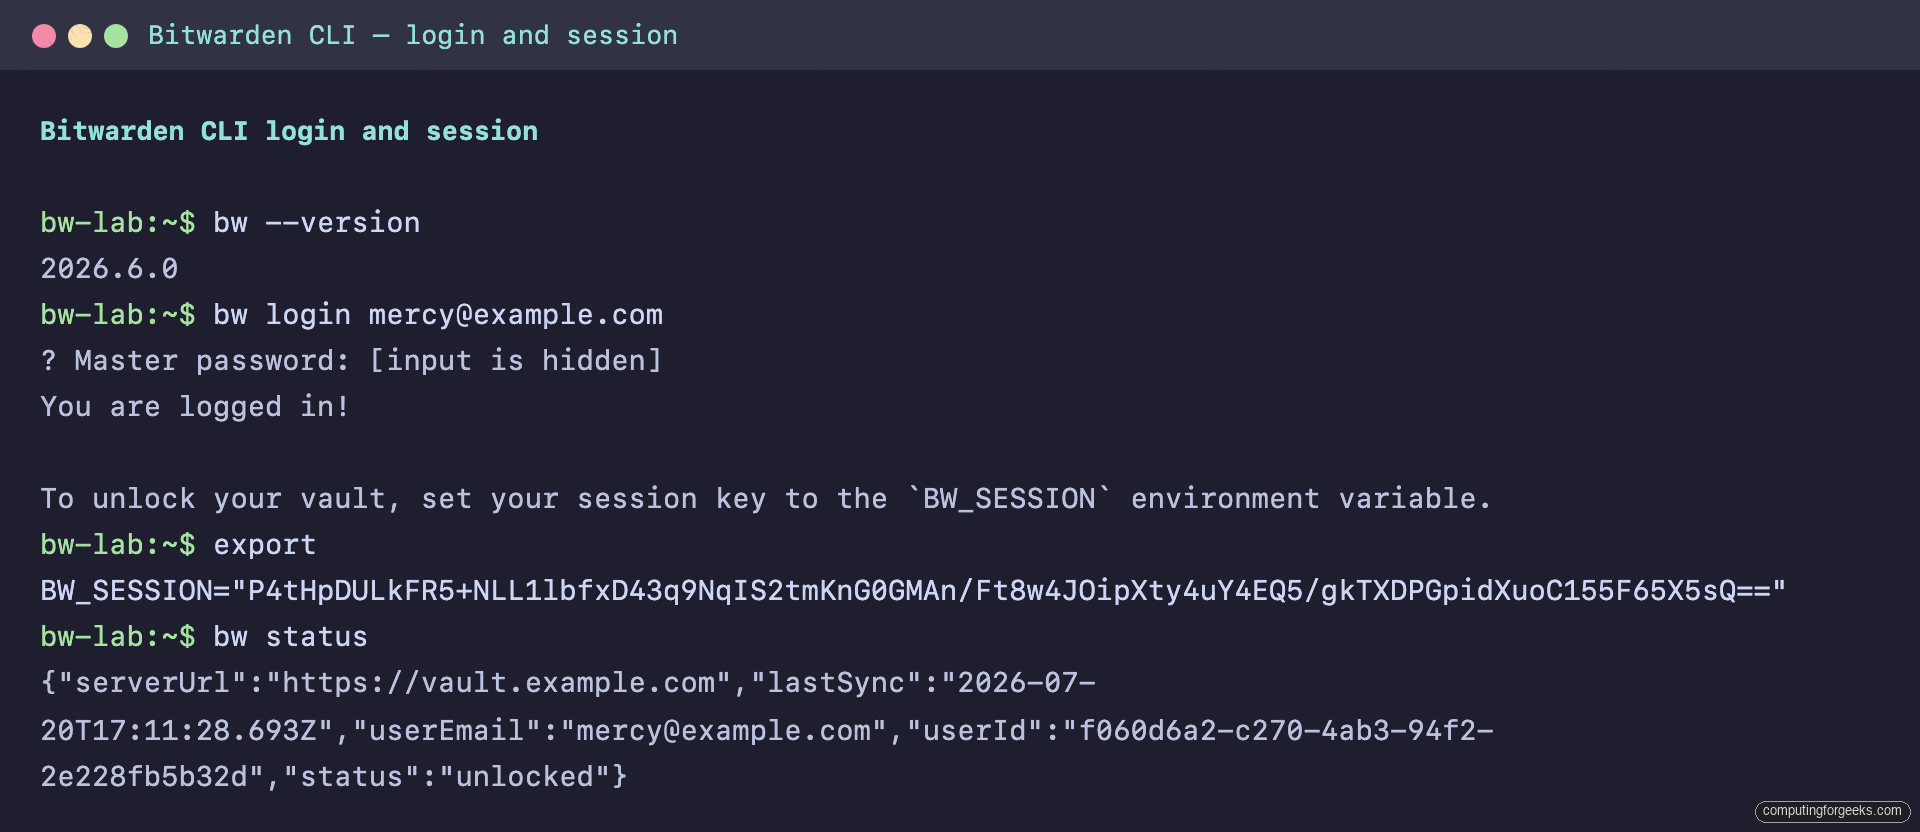
The full flow on our lab box: version check, login against the self-hosted server, session export, and a status readout showing unlocked.
Step 4: Understand Login vs Unlock, and Sessions
This distinction trips up almost everyone the first time. Login authenticates you to the server and pulls down your encrypted vault. Unlock derives the decryption key from your master password and issues a session key that can actually read the data. The vault status moves through three states: unauthenticated (not logged in), locked (logged in, data encrypted), and unlocked (session key active).
Every read or write command needs an unlocked vault. The session key from login or unlock travels in one of two ways. The environment variable is the usual one:
export BW_SESSION="P4tHpDULkFR5+NLL1lbfxD43q9NqIS2tmKnG0GMAn/Ft8w4JOipXty4uY4EQ5/gkTXDPGpidXuoC155F65X5sQ=="Or pass it per command with --session "$BW_SESSION". For scripts, --raw makes unlock print nothing but the key, which is exactly what you want to capture:
export BW_SESSION=$(bw unlock --raw)One behavior to burn into memory before you automate anything: every new unlock invalidates all previous session keys. The CLI’s own help states it plainly (“After unlocking, any previous session keys will no longer be valid”), and we confirmed it in testing. A second script that runs bw unlock silently kills the session of the first. Unlock once, store the key, and reuse it everywhere instead of unlocking per task.
When you walk away from the machine, drop the decryption key from memory:
bw lockAny vault command that runs against a locked vault in a non-interactive context fails with a clear error. Add --nointeraction in scripts so it fails instead of hanging on a hidden prompt:
Vault is locked.bw logout goes further than lock: it deletes the local copy of the encrypted vault and forgets the account entirely. Use it on any machine you do not fully control.
Step 5: Log In with an API Key
Interactive prompts and automation do not mix. For servers, containers, and CI runners, Bitwarden issues each account a personal API key: an OAuth client_id and client_secret pair. Find it in the web vault under Settings > Security > Keys, behind the View API key button, which asks for your master password before revealing anything.
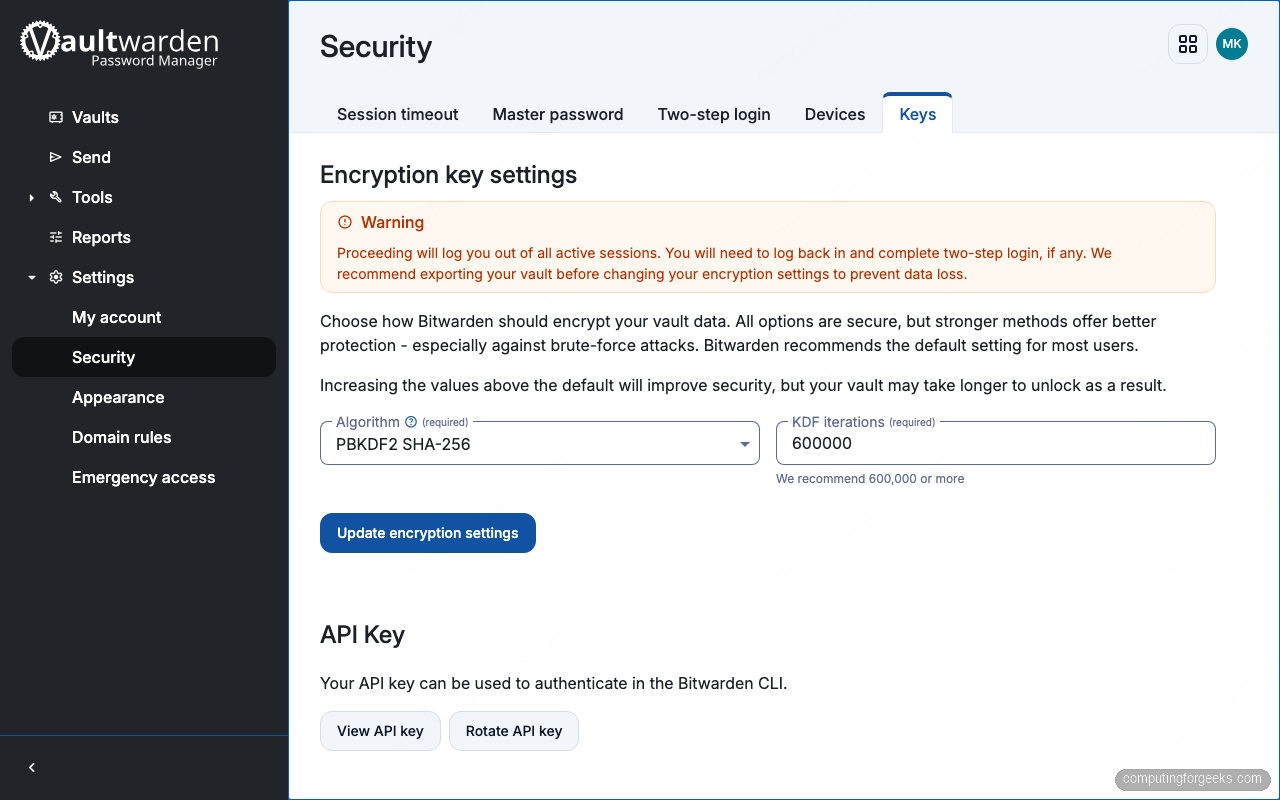
The CLI reads the pair from two environment variables, then authenticates without a single prompt:
export BW_CLIENTID="user.f060d6a2-c270-4ab3-94f2-2e228fb5b32d"
export BW_CLIENTSECRET="IOt2gZ5dERtUV3EvQyy1qyYa8CvH9T"
bw login --apikey
Authentication succeeds, and the output hints at the part most people miss:
You are logged in!

To unlock your vault, use the `unlock` command. ex:
$ bw unlock
The API key authenticates you. It cannot decrypt anything. Bitwarden is zero knowledge: the decryption key derives only from your master password, which the server never sees, so after an API key login the vault sits in the locked state and bw list items still fails. This is a feature. A stolen API key alone gets an attacker an encrypted blob, not your passwords.
To finish the non-interactive flow, feed the master password to unlock from an environment variable or a root-owned file. Both flags exist for exactly this:
export BW_PASSWORD='YourMasterPassword'
export BW_SESSION=$(bw unlock --passwordenv BW_PASSWORD --raw)
Or with a password file, locked down before anything else touches it:
chmod 600 ~/.bw-master
export BW_SESSION=$(bw unlock --passwordfile ~/.bw-master --raw)
In CI, put BW_CLIENTID, BW_CLIENTSECRET, and BW_PASSWORD in the platform’s secret store, never in the repository. And if a client secret ever leaks, the Rotate API key button next to View API key invalidates it immediately; rotating does not change your master password or re-encrypt the vault.
Step 6: Read Secrets from the Vault
With an unlocked session in place, pull a fresh copy of the vault before reading. Writes push to the server automatically, but reads work from the local encrypted cache, so a long-lived session drifts unless you sync:
bw syncListing returns JSON arrays, which makes jq the CLI’s natural partner:
bw list items | jq -r '.[] | .name'Our lab vault holds four items:
Old FTP server
PostgreSQL prod
web01 recovery codes
web01 root
Filter server-side with --search, or by container with --folderid, --collectionid, and --organizationid. The get subcommand fetches a single object, and its field shortcuts are what you will use daily:
bw get password "web01 root"
bw get username "web01 root"
bw get notes "web01 recovery codes"
bw get totp "web01 root"
Each prints the bare value with no decoration, ready for command substitution. The TOTP shortcut returns the current six-digit code computed from the item’s stored seed (a paid feature on the Bitwarden cloud, included in Vaultwarden):
989292The read commands in one terminal session, including a Send created at the end:
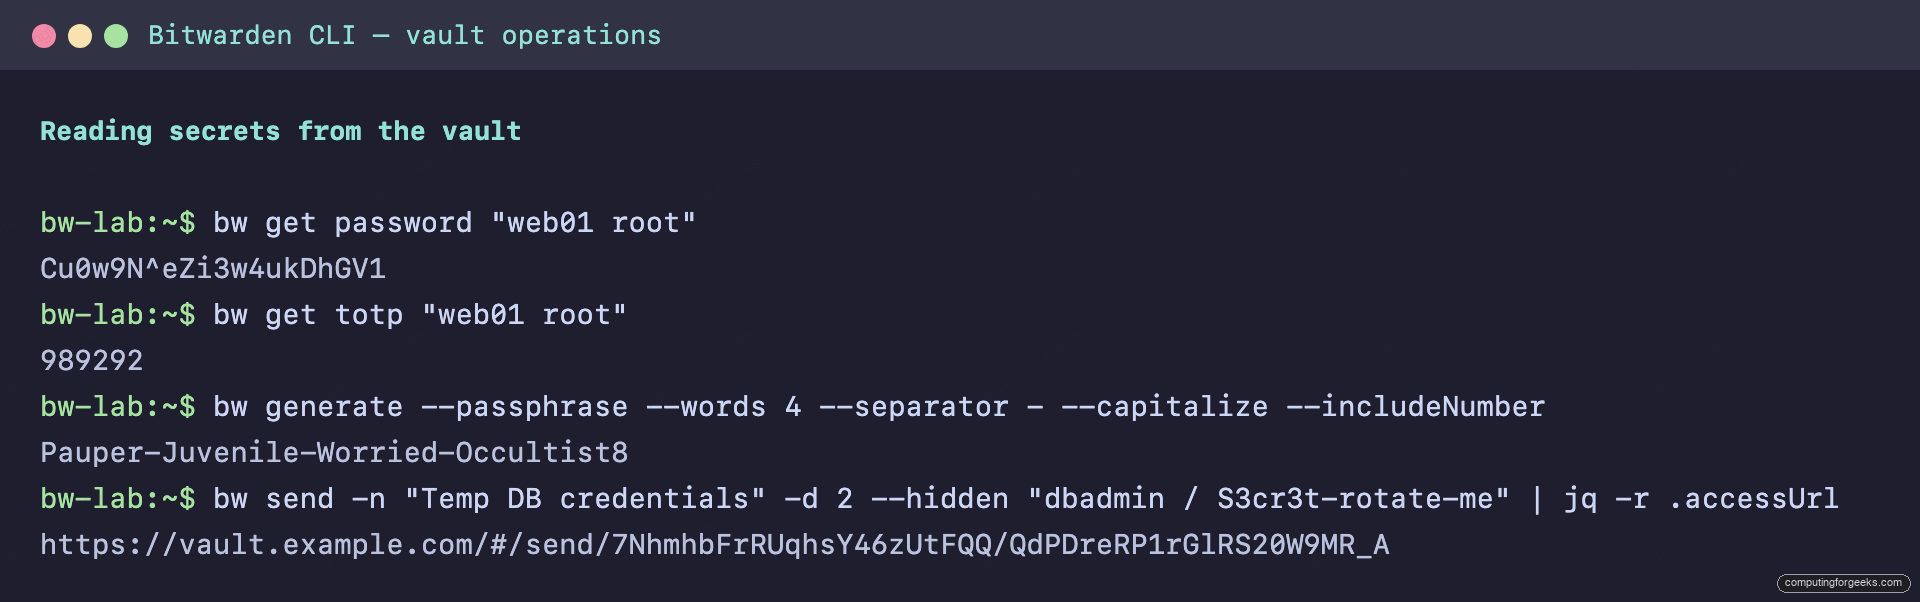
get accepts a name fragment, but it demands exactly one match. Two of our items contain “example.com” in their URIs, and the CLI refuses to guess:
More than one result was found. Try getting a specific object by `id` instead. The following objects were found:
42ddd407-e7dd-4e6d-a304-c2f658995d2a
105a656c-c1da-4c4f-8689-ab886836123a
In scripts, never rely on name matching. Resolve the ID once and reference it everywhere:
ITEM_ID=$(bw list items --search "web01 root" | jq -r '.[0].id')
bw get password "${ITEM_ID}"
Step 7: Create Folders and Items
Creation follows one pattern everywhere: fetch a JSON template, modify it, base64-encode it, submit it. The bw get template and bw encode commands exist purely for this pipeline. A folder is the simplest case:
bw get template folder | jq '.name="Servers"' | bw encode | bw create folderThe server responds with the created object, ID included:
{"name":"Servers","object":"folder","id":"44355598-1443-4762-95ec-7b6afd46fc95"}A login item works the same way, just with more fields. This one stores a root login with a URI, a TOTP seed, and a password generated inline so a human never sees or types it. Capture the folder ID first, then build the item:
FOLDER_ID=$(bw list folders | jq -r '.[] | select(.name=="Servers") | .id')

bw get template item | jq --arg pass "$(bw generate -ulns --length 20)" --arg fid "${FOLDER_ID}" \
  '.name="web01 root" | .login={"username":"root","password":$pass,"uris":[{"uri":"https://web01.example.com"}],"totp":"JBSWY3DPEHPK3PXP"} | .folderId=$fid' \
  | bw encode | bw create item
The response echoes the stored item, and it is the last time that password needs to exist outside the vault:
{"type":1,"name":"web01 root","favorite":false,"reprompt":0,"id":"105a656c-c1da-4c4f-8689-ab886836123a","collectionIds":[],"object":"item","folderId":"44355598-1443-4762-95ec-7b6afd46fc95","fields":[],"login":{"uris":[{"uri":"https://web01.example.com"}],"fido2Credentials":[],"username":"root","password":"Cu0w9N^eZi3w4ukDhGV1","totp":"JBSWY3DPEHPK3PXP","passwordRevisionDate":null},"passwordHistory":[],"creationDate":"2026-07-20T17:13:09.696Z","revisionDate":"2026-07-20T17:13:09.697Z","attachments":[]}Secure notes use .type=2 with a secureNote stanza instead of login. Everything the CLI writes shows up in the web vault instantly, which is also the quickest way to verify a scripted import did what you intended:
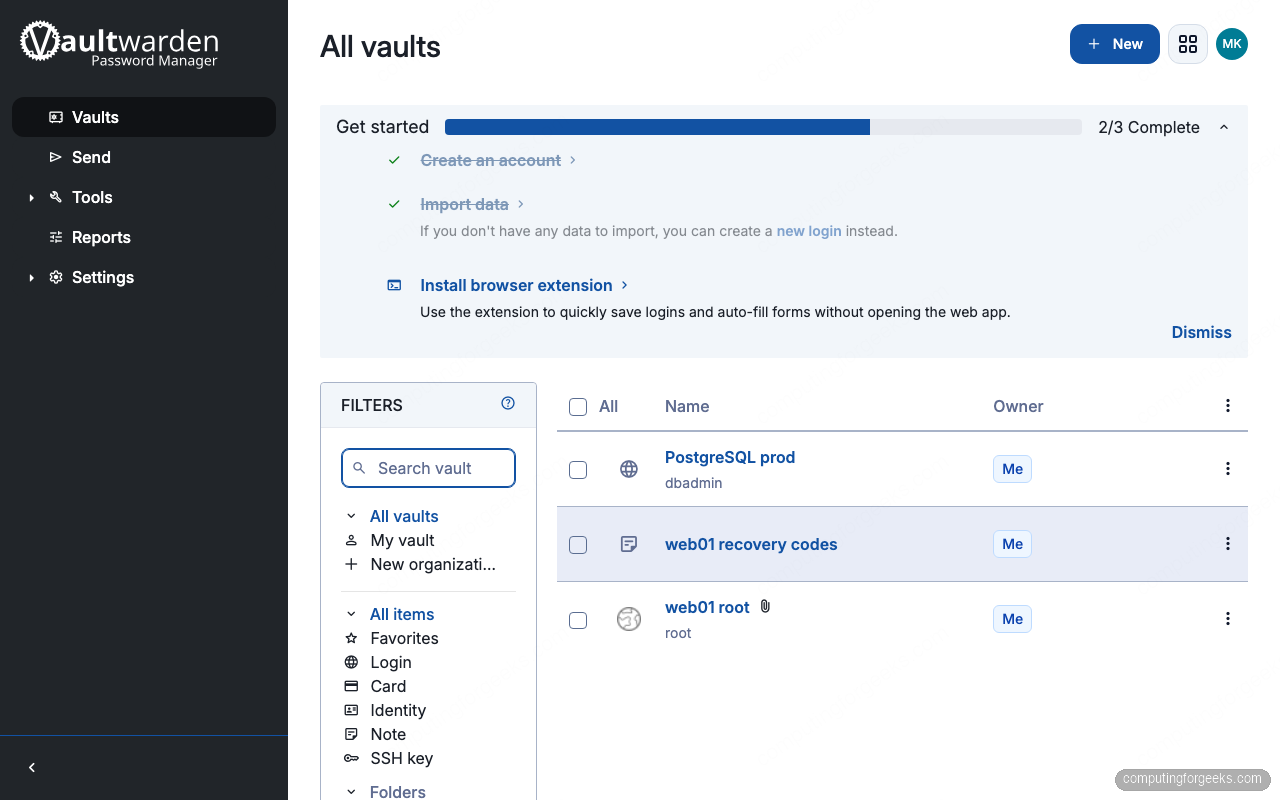
All three items in that screenshot, including the attachment paperclip on web01 root, came from the terminal.
Step 8: Edit Items Without Opening a Browser
Editing is a read-modify-write of the full item JSON. bw edit replaces the object, so pull the current state, patch one field with jq, and push it back. Rotating a password becomes a one-liner:
bw get item "${ITEM_ID}" | jq --arg p "$(bw generate -ulns --length 20)" '.login.password=$p' \
  | bw encode | bw edit item "${ITEM_ID}"
The response proves the rotation happened: the new password is live and the old one moved into passwordHistory:
"login":{"username":"root","password":"2KBiu#H3XLf2E3azb#t2","totp":"JBSWY3DPEHPK3PXP","passwordRevisionDate":"2026-07-20T17:14:11.127Z"},
"passwordHistory":[{"lastUsedDate":"2026-07-20T17:14:11.127Z","password":"Cu0w9N^eZi3w4ukDhGV1"}]
Step 9: Generate Passwords and Passphrases
bw generate deserves use even outside vault workflows. The default is 14 characters of mixed-case letters and numbers with no specials, which is weaker than it should be, so be explicit. Uppercase, lowercase, numbers, specials, 20 characters:
bw generate -ulns --length 20A fresh value every run:
sOIe^eGgHn4dx$gBDYh#For anything a human must type, passphrases beat character soup:
bw generate --passphrase --words 4 --separator "-" --capitalize --includeNumberWhich produces something memorable but still strong:
Pauper-Juvenile-Worried-Occultist8Step 10: Trash, Restore, and Permanent Delete
Deletes are soft by default. The item moves to the trash, where it survives for 30 days on Bitwarden servers (Vaultwarden keeps trash until the admin sets TRASH_AUTO_DELETE_DAYS):
bw delete item 80c29bf1-dca1-442b-9bd6-1c30a55c2419Confirm where it went, and bring it back if that delete was a mistake:
bw list items --trash | jq '.[] | {id, name}'
bw restore item 80c29bf1-dca1-442b-9bd6-1c30a55c2419
Adding --permanent to the delete skips the trash entirely. There is no restore from that, so treat it like rm on a production box.
Step 11: Attach Files to Vault Items
Key files, kubeconfigs, and recovery PDFs belong in the vault next to the credentials they pair with. Attachments hang off an existing item (file storage is a paid feature on the Bitwarden cloud; Vaultwarden includes it):
bw create attachment --file ./web01-backup.key --itemid "${ITEM_ID}"Pulling it back down on another machine is symmetric:
bw get attachment web01-backup.key --itemid "${ITEM_ID}" --output ./restored.keyThe CLI confirms the write with Saved /home/user/restored.key. This pattern pairs well with tools like chezmoi for dotfile management, which can template secrets straight out of a Bitwarden vault.
Step 12: Share Secrets with Bitwarden Send
Stop pasting credentials into Slack. Bitwarden Send creates an encrypted, self-destructing link, and the CLI builds one in a single command. This Send hides the text behind a reveal click and deletes itself after two days:
bw send -n "Temp DB credentials" -d 2 --hidden "dbadmin / S3cr3t-rotate-me"The JSON response contains the one thing you share, the accessUrl:
"accessUrl":"https://vault.example.com/#/send/7NhmhbFrRUqhsY46zUtFQQ/QdPDreRP1rGlRS20W9MR_A"The decryption key rides in the URL fragment after the last slash, which never reaches the server logs. Audit what is outstanding with bw send list, revoke early with bw send delete <id>, and add --password or --maxAccessCount 1 for anything genuinely sensitive. Text Sends are free everywhere; file Sends need a paid plan on the Bitwarden cloud.
Step 13: Export the Vault
An encrypted vault you cannot restore is still a single point of failure. Export supports csv, json, encrypted_json, and zip (the zip includes attachments). Plaintext JSON is for migrations, and it belongs on encrypted storage only, deleted right after use:
bw export --format json --output ./vault-backup.jsonFor a recurring backup job, use encrypted_json with its own passphrase, so the backup does not depend on your account encryption key and survives even an account reset:
bw export --format encrypted_json --password "Backup-Encryption-2026" --output ./vault-backup.enc.jsonOne version note from testing: older guides show the master password as a positional argument (bw export MyPassword --format json), and the CLI’s own help text still lists that form. The current release rejects it with error: too many arguments for 'export'. Run the flag-only form above; the CLI prompts for master password confirmation when it needs one.
bw import handles the return trip and understands formats from dozens of other password managers. Run bw import --formats for the full list.
Step 14: Run the Built-In REST API with bw serve
Shelling out to bw for every secret is slow, because each invocation spins up a Node.js runtime. For anything that reads secrets in a loop, bw serve starts a local REST API that holds the unlocked session in one process:
bw serve --port 8087Every CLI operation maps to an endpoint. Status, search, and TOTP look like this:
curl -s http://localhost:8087/status | jq '.data.template.status'
curl -s "http://localhost:8087/list/object/items?search=web01" | jq '.data.data[].name'
curl -s http://localhost:8087/object/totp/${ITEM_ID} | jq -r '.data.data'
The responses come back as JSON envelopes with a success flag:
"unlocked"
"web01 recovery codes"
"web01 root"
553216
You can even lock and unlock over HTTP with POST /lock and POST /unlock. Now the warning, and do not skip this: the API has no authentication. Any process that can reach the port can read every secret in the unlocked vault. Bind it to loopback (the default), never pass --hostname all, run it as a dedicated user, and treat a shared host as a hostile one. The only guard built in is that requests carrying a browser Origin header get rejected, which stops web pages from probing the port but does nothing against local processes. If you need secrets on another machine, run bw serve there, not across the network.
Step 15: Put It Together in a Script
Everything above condenses into a repeatable pattern for unattended jobs. API key for authentication, master password from a protected file for decryption, one session reused for all reads:
#!/usr/bin/env bash
set -euo pipefail

# BW_CLIENTID and BW_CLIENTSECRET come from the environment (CI secret store)
bw login --apikey --nointeraction

export BW_SESSION=$(bw unlock --passwordfile /root/.bw-master --raw)
bw sync --nointeraction

DB_PASS=$(bw get password "PostgreSQL prod")
pg_dump "postgresql://dbadmin:${DB_PASS}@db01.example.com:5432/app" > /backup/app.sql

bw lock
unset BW_SESSION DB_PASS
We ran this exact flow end to end in the lab: API key login, file-based unlock, sync, and a clean password read with nothing sensitive in history, argv, or the terminal. If one machine needs to run jobs against two accounts, point each at its own state directory with BITWARDENCLI_APPDATA_DIR, because the CLI stores one login per data directory.
Security Checklist Before You Automate with bw
Run down this list before the first cron job goes live. Each line maps to a failure mode we would rather you read about here than discover in an incident review:
- The master password never appears as a command argument. Interactive prompt,
--passwordenv, or--passwordfileonly. - Any password file is
chmod 600, owned by the job’s user, and lives outside every git repository. BW_CLIENTID,BW_CLIENTSECRET, andBW_PASSWORDlive in a CI secret store or systemd credentials, never in the unit file or pipeline YAML.- Scripts unlock once and reuse
BW_SESSION. A second unlock invalidates every session that came before it. - Every unattended script ends with
bw lockand unsets its secret variables; shared or untrusted machines getbw logoutinstead. bw servebinds to loopback only, and nothing else untrusted runs on that host.- Plaintext exports are temporary artifacts: created on encrypted storage, consumed, then shredded. Recurring backups use
encrypted_jsonwith a dedicated passphrase. - The API key gets rotated in the web vault the moment you suspect exposure, and your account has two-step login turned on regardless, ideally with hardware security keys.
With those in place, the Bitwarden CLI turns the vault from a browser convenience into the secrets backend for your whole shell environment, and every credential your automation touches has exactly one encrypted home. The official CLI documentation covers the remaining corners, including organization confirmation flows and SSO login.
![Install Kali Linux 2026.1 Step by Step [Full Guide]](https://computingforgeeks.com/wp-content/uploads/2026/03/install-kali-linux-20261-step-by-step-768x403.png "Install Kali Linux 2026.1 Step by Step [Full Guide] 7")